Vibration damping installation guide
Cut down unwanted resonance and road noise

This guide offers examples of vibration damping installations and suggested layouts. While the installation of your product will depend on the make and body style of your vehicle, as well as your installation location, this will give you an overall look at the many ways that vibration damping can be used to improve the performance of your mobile audio system.
[Shop for sound deadening materials]
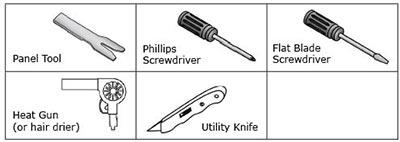
Tools needed
Deciding where to install
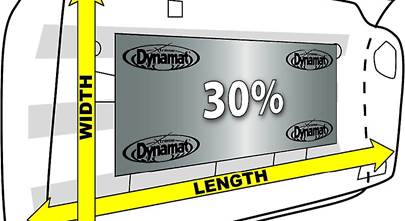
Vibration damping material is often sold in "kits," each intended for a specific installation location. You can also purchase it in bulk sheets for large, all-over applications.
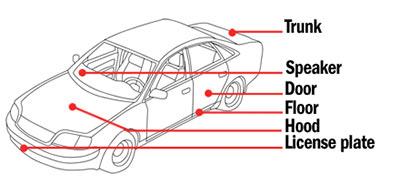
Vibration damping material can be installed just about anywhere in the car to solve specific problems.
The first step is to decide where you want to install your damping material. You'll want to think about your end goal (e.g. quieter overall ride, less vibration, tighter bass, etc), before you begin, and remember that your results will depend on your vehicle type and the specific problems you're having. Below are some of the most popular installation locations with a brief explanation of the benefits of each.
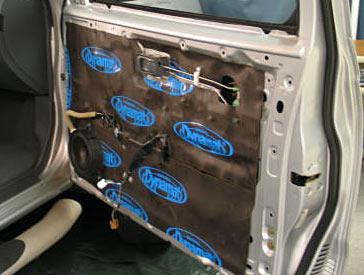
Line the doors to cut out road noise and isolate your door-mounted speakers.
Doors
An inexpensive "door kit" is often one of the best ways to improve your sound system's overall performance because it will provide enough coverage to drown out a lot of road noise while damping resonance around the speakers. And, since most car doors aren't very well insulated to begin with, the doors are a good first choice that will likely make a very noticeable difference.
Trunk
Rattle is a common problem with trunk-mounted subwoofer systems. Adding damping material to the floor and cover of the trunk compartment can make a huge difference. It doesn't take much material to dampen most vibrations, but as a general rule, the louder you like to crank it, the more you should install.
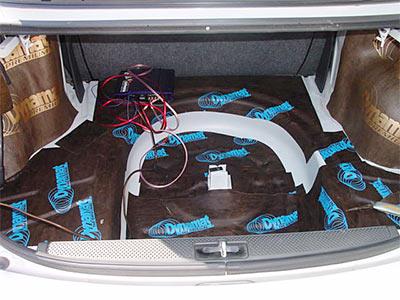
Crankin' subwoofer systems can create noise in the trunk compartment if not properly damped.
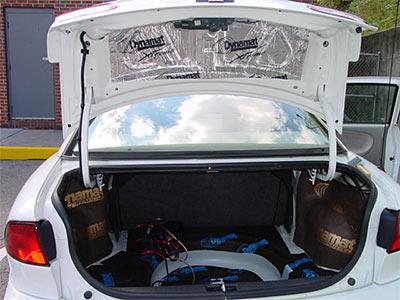
Even treating the trunk top helps.
Speakers
Instead of covering an entire area, you can also install vibration damping around your speakers to reduce resonance and isolate them from the rest of the vehicle. This is a good approach when you don't want to invest in a lot of material, but want to get the most bang for your buck.
Hood
A noisy engine can wreak havoc on your driving experience, especially when that noise starts to bleed back into the cabin and interfere with your sound system. Lining the inside of the hood with heat-resistant damping material will help keep that noise where it belongs.
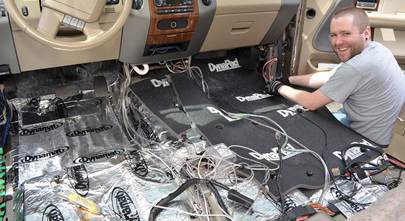
Floor
The space between your feet and the road is anything but quiet (with tire squeal, engine noise, wind, and more all competing for your attention), and an inadequately insulated floor panel will do very little to keep that excess sound out of your way. But by lining the floorboards with a dampener you'll not only cut down on the vibrations that these sounds create, but the material will act as a physical blockade that will insulate you from the road.
License plate
True, your license plate doesn't directly impact your sound quality, but if you like to listen to a lot of bass, a rattling plate is going to get old quickly. This simple installation will take care of it in less than ten minutes.
Fortunately, installing vibration damping material is fairly straightforward, no matter where you want to put it in your car. You'll find instructions for a door installation below, but the general principles apply to all of the locations mentioned on the preceding page.
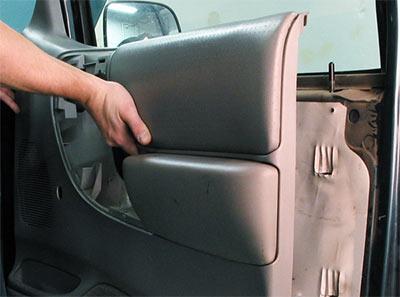
Using a panel tool, carefully pop the door panel off of its retaining clips and remove it from the metal exterior of the door.
Removing door panels
Set parking brake and disconnect the negative terminal from your battery to prevent an electrical short.
Using a panel tool, gently pop the retaining clips along the edge of the interior panel one at a time until the whole thing comes loose. Then, making sure there isn't anything else holding the panel in place, carefully lift it up out of the window track and out of the way.
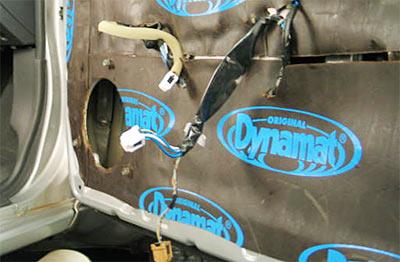
If you're working on a door, you should be able to see the clear plastic weather covering that's glued behind the interior panel at this point. A gentle tug will release it from the metal.
Next, wipe down the entire metal surface with denatured alcohol (or other degreasing agent) to make sure it is totally clean. (Denatured alcohol, available at most hardware stores, is a great choice for this sort of cleaning because it has a lower water content than standard rubbing alcohol and doesn't leave a greasy surface behind.)
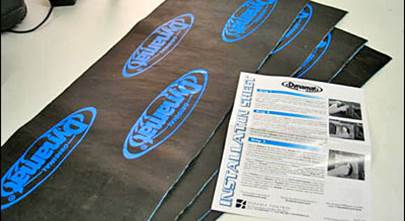
Preparing the materials
Using the plastic weather guard as a template, cut the material to size, leaving holes for hardware such as the door handle, window assembly, and speaker. If you have screws that needed to go through, hold the material up where you want to place it and press down to make indentations around the hardware locations. That way, you'll be able to go back and cut out the necessary holes before securing it to the door.
Once everything is in place, peel off the backing and stick the Dynamat to the vehicle, using a roller to ensure even adhesion. Go over it with a heat gun to mold the material for a custom fit.
Mounting the materials
Since most vibration damping materials come with a sticky glue backing, all you have to do is peel and stick. Warming it up with a heat gun or hair dryer during installation increases its flexibility and improves its adhesion to the mounting surface. Use a roller to ensure a good stick and to get the material into every crevice on the panel.
Once everything is in place, peel off the backing and stick the Dynamat to the vehicle, using a roller to ensure even adhesion. Go over it with a heat gun to mold the material for a custom fit.


Comments (0)