How to build a subwoofer box
This DIY project can be a real money-saver

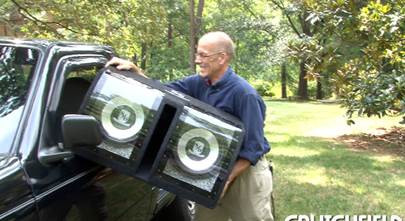
Building your own subwoofer box is a great way to get the look and fit you want, without spending a fortune. All you need is a few basic tools, hardware, and materials.
In this article:
- We'll explain how to design your subwoofer box on paper. Getting the math right is crucial for getting the proper volume.
- Next, we'll walk through a build, step by step, and share a few tips along the way.
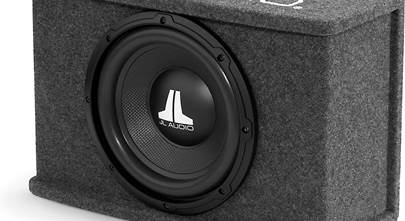
Building a box is a lot of fun and will save you some cash, but DIY jobs aren't for everyone. If you get through this article and decide that box building might not be for you, then check out our selection of high-quality, premade subwoofer boxes.
Cost for materials
We spent right around $50, though your costs will vary depending on what you already have in the garage.
Time spent
Building our subwoofer box took about three hours. Your project could take more time or less, depending on the complexity of your box's shape, and the tools you have at your disposal. We had a roomy workbench and well-equipped shop.
What you'll need
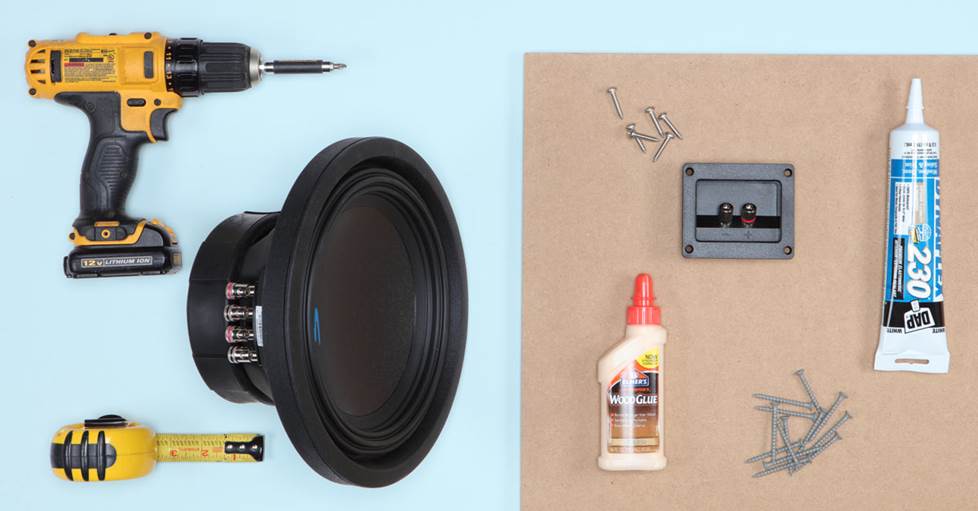
- Jigsaw
- Table saw or circular saw
- Electric drill with bits for pre-drilling screw holes and driving screws
- 3/4" MDF (medium density fiberboard)
- 2" drywall screws
- Panhead sheet metal screws (1/2" and 1")
- Carpenter's glue
- Silicon caulk
- Non-hardening rope caulk
- Speaker terminal cup — see our full selection of box building supplies
Choosing your subwoofer
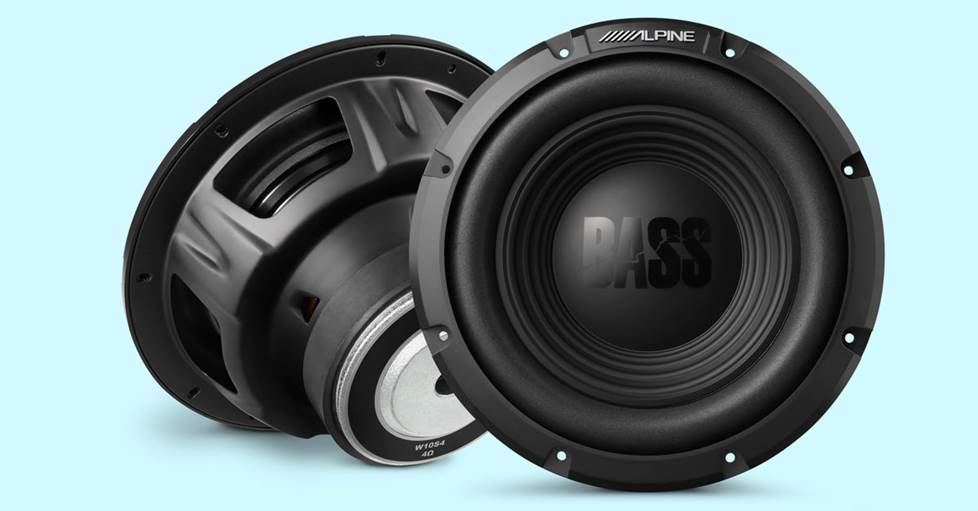
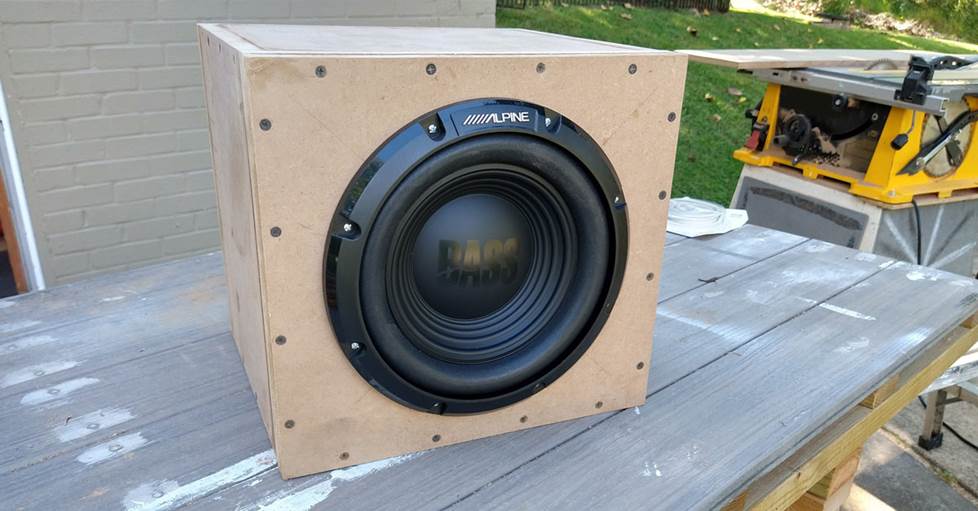
When choosing a subwoofer, carefully note the manufacturer's recommended enclosure size, especially if you have limited space in your vehicle. The box volume tells you how big your enclosure needs to be for maximum performance from the sub. The box shown in this article was intended for the trunk of my Nissan sedan, so I wanted to make sure it wouldn't take up too much space. With that requirement in mind, I chose a 10" Alpine sub. The manufacturer recommends a box volume of 0.65 to 1.0 cubic feet, so it'll be fine in a small box.
Planning your subwoofer box design
You can follow these steps to determine the correct dimensions for your subwoofer box design:
Determine the minimum depth of your box. Measure the depth of your subwoofer and add 2 inches. This measurement is the minimum depth of your box (in this article, the depth refers to the front-to-back dimension of the box, with the woofer being mounted to the front).
Determine the minimum height and width of your box. Measure the frame diameter of your woofer, or check the mounting template that may be included with the owner's manual, to determine the minimum height and width for the front of your box. If you plan to mount a grille, be sure to allow for any additional space that may be needed to accommodate it.
Determine the available space in your vehicle. Measure the height, width, and depth of the vehicle space that you are willing to devote to your subwoofer. If the box must be wedge-shaped to fit, you will need to know the depth at the box's top and bottom.
Sketch out your box. Now's the time to sketch your box on paper using the dimensions you've gathered. The box shown in this article is rectangular, but you may find that a wedge-shaped box fits better in your car or truck. Your sketch may look like one of these:
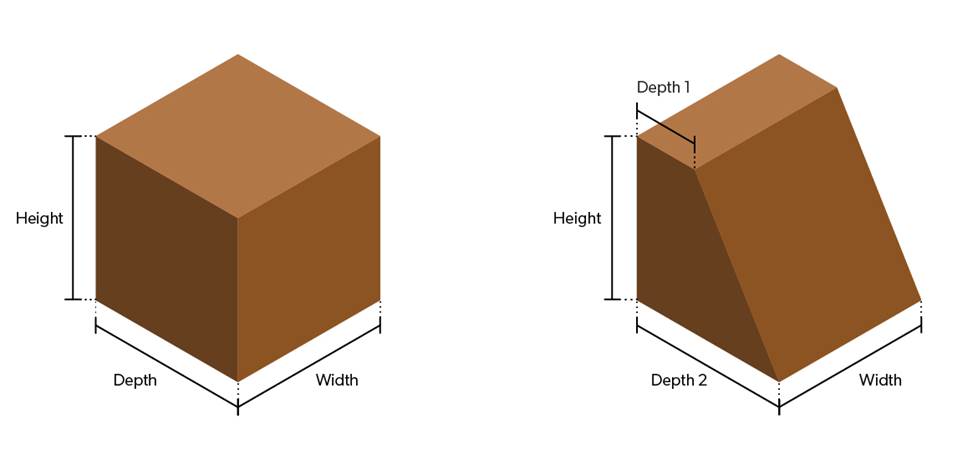
For our examples, let's use the following external dimensions:
| Rectangular box | Wedge box |
|---|---|
| Height: 13" | Height: 14" |
| Width: 14" | Width: 18" |
| Depth: 12" | Depth 1: 5" |
| Depth 2: 8" |
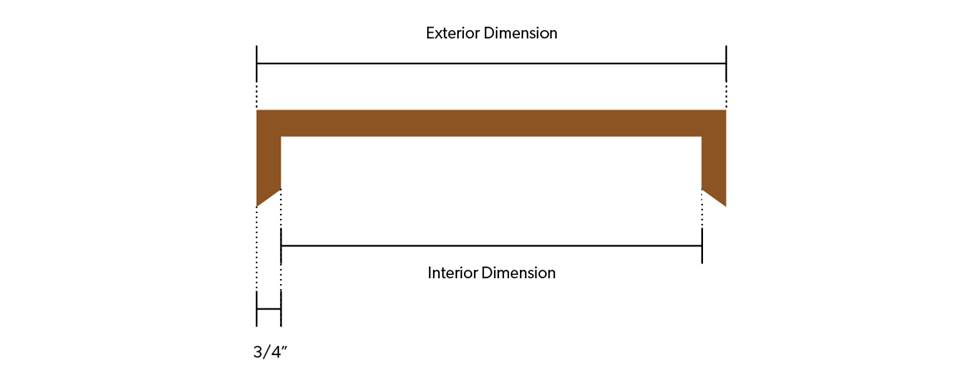
Determine the internal dimensions and volume of your box. The above steps identified the external dimensions of the box. To determine the internal volume, just subtract the thickness of the wood to be used for construction. If you're using 3/4" MDF (recommended!), then you'll subtract 2 x 3/4", or 1-1/2", from each dimension.
The internal dimensions for our examples:
| Rectangular box | Wedge box |
|---|---|
| Height: 11.5" | Height: 12.5" |
| Width: 12.5" | Width: 16.5" |
| Depth: 10.5" | Depth 1: 3.5" |
| Depth 2: 6.5" |
Calculate the internal box volume in cubic inches. Based on the internal dimensions, you can calculate the internal volume of the enclosure using the following formula: Height x Width x Depth = Cubic Volume
Let's plug in some numbers:
Rectangular box:
11.5" x 12.5" x 10.5" = 1,509.375 cubic inches
Wedge box: Since the wedge box has two depth dimensions, we need to find the average depth before we can determine the volume. To find the average depth, add the two depth measurements together, then divide by two. Remember that Depth 1 = 3.5 and Depth 2 = 6.5.
3.5" + 6.5" = 10"
10" / 2 = 5"
So, the average depth of the wedge-shaped box is 5". Plug that dimension into the formula:
12.5" x 16.5" x 5" = 1,031.25 cubic inches
Convert cubic inches to cubic feet. Since most manufacturers will provide the recommended box volume in cubic feet, you'll need to convert the internal volume from cubic inches into cubic feet. This is done by dividing the cubic inches by 1,728.
Rectangular box: 1,509.375 / 1728 = 0.873 cubic feet
Wedge box: 1,031.25 / 1728 = 0.597 cubic feet
Adjust your box's volume to match the sub's specifications. Now, compare the volume of the box you've sketched to the manufacturer's recommendation. If it's too large or too small, you can make small adjustments to one dimension until your box's internal volume matches the manufacturer's recommendation as closely as possible. Often, manufacturers will recommend a range of enclosure volumes. You can get good results with a box that's anywhere inside the recommended range.
Determine the final exterior box dimensions. Once you've identified the correct internal dimensions, it's time to add back that 1-1/2" we subtracted in step 5, to derive the new external dimensions. Double check to make sure that these dimensions will fit properly in your car, and you're ready to move on to construction.
Step-by-step instructions for building the subwoofer box
Step 1 – Cutting the boards
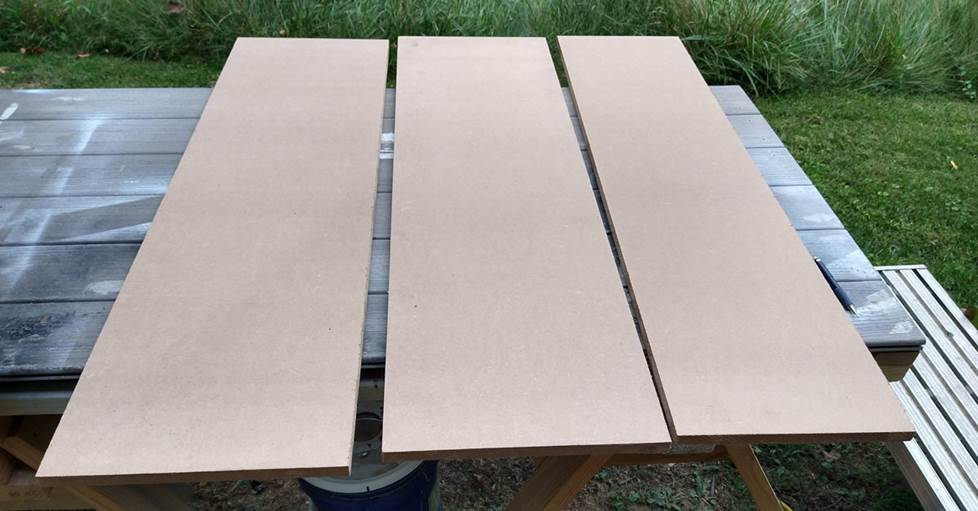
We started by measuring and cutting the main pieces of MDF for the front, sides, back and top of the box, using a table saw.
Don't have a table saw? Don't worry. If you purchase your MDF at any large home improvement store, they should be able to cut it for you for a small fee. (Shout out to Cameron at my local Lowe's. He turned the 6'x8' sheet of MDF into planks that would fit into my car.)
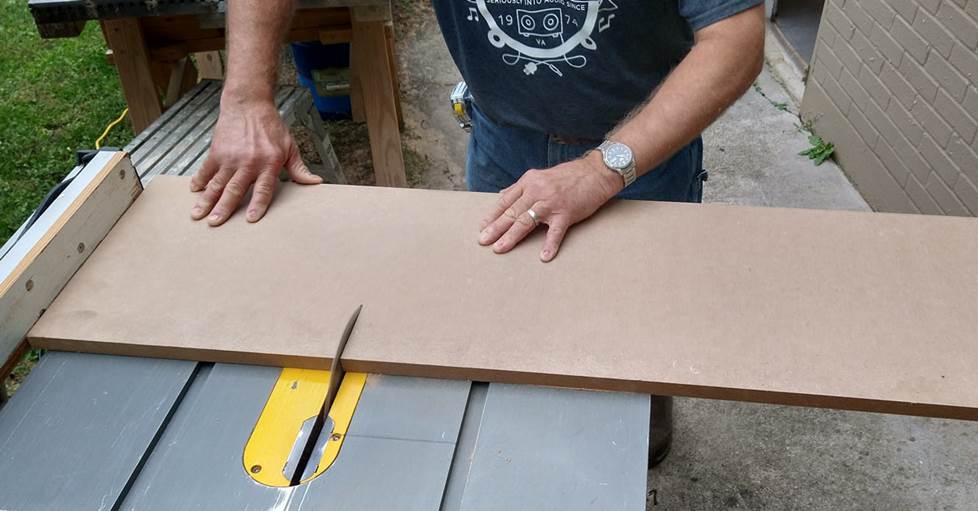
You could also use a circular saw, just be careful to keep your cuts square (smooth, flat cuts help to ensure that the box seals well).
We cut seven pieces total – top and bottom, two sides, the back, and two identical pieces for the front (since it was to be a double thickness). Once this is done, the rest of the process is like assembling a model kit or prefab furniture.
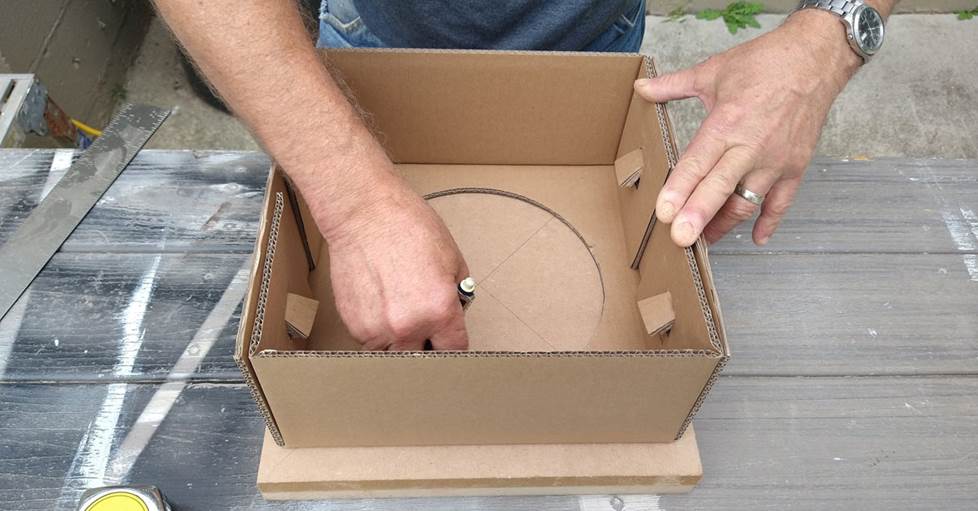
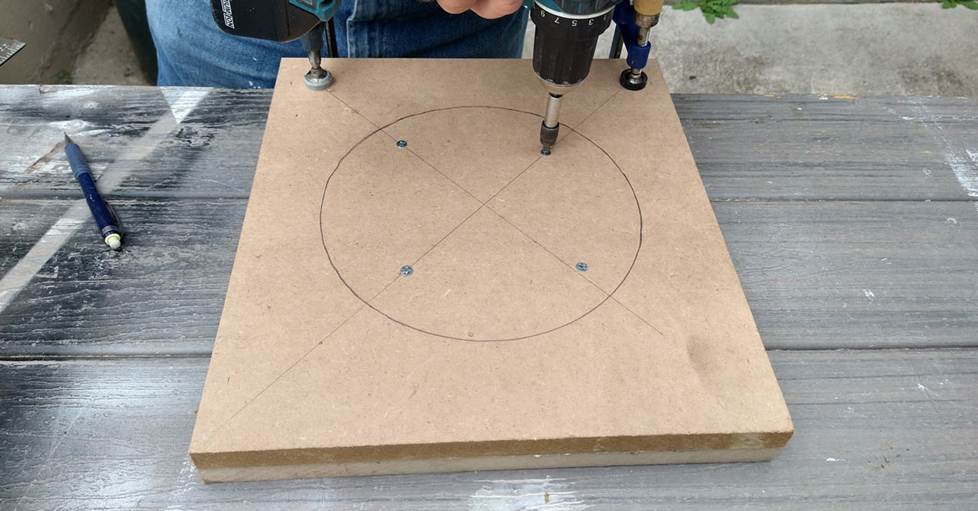
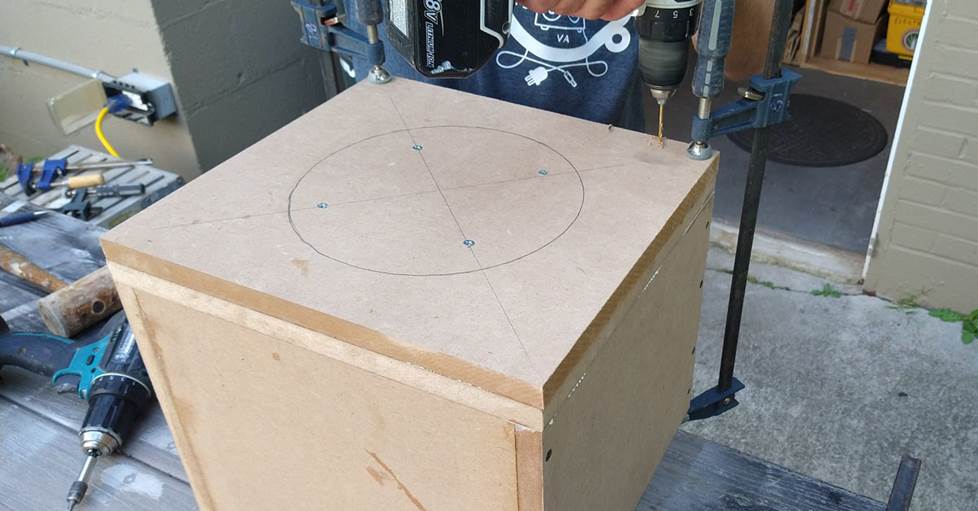
Step 2 – Draw the circle
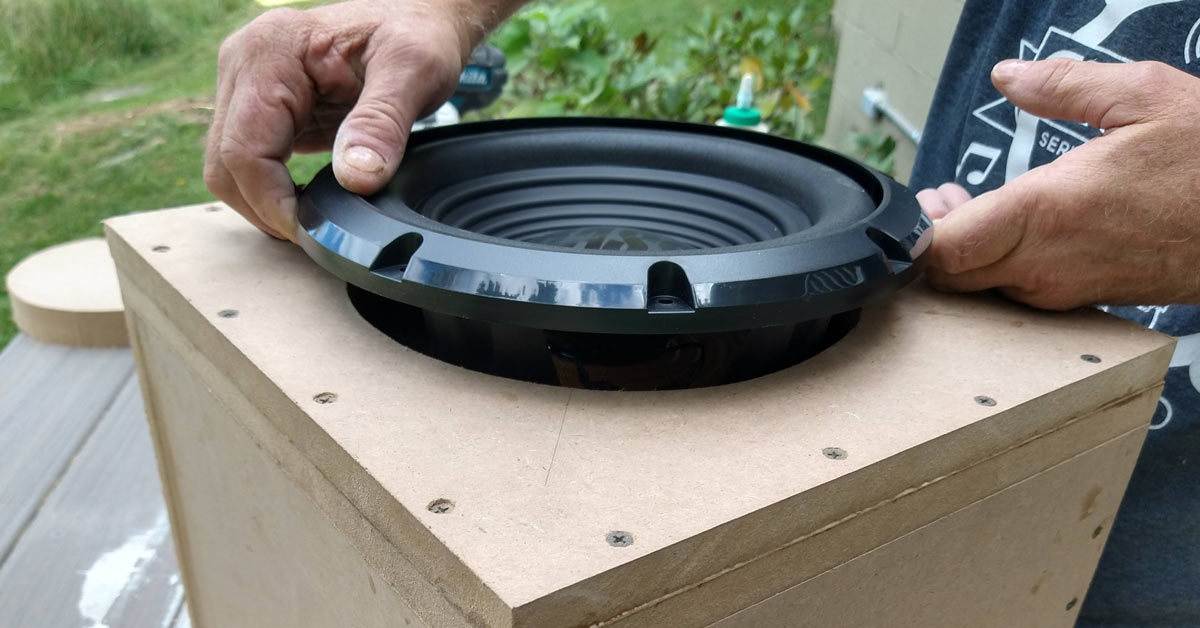
After the pieces are cut to size, use a compass, or the template that may be included in your subwoofer's packaging, to mark the woofer cutout on one of the identical front pieces. We used the cardboard packing insert as our template.
Step 3 – Prepping the front panels
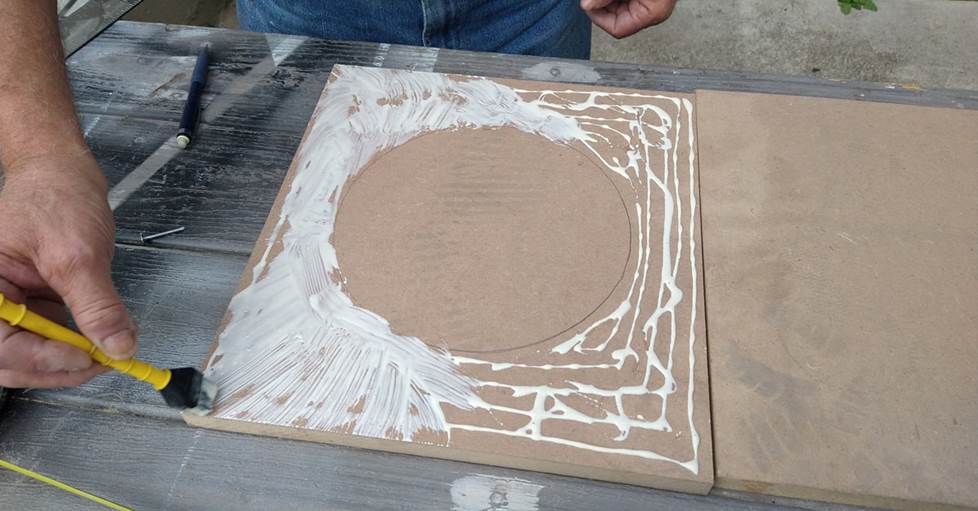
If you choose to use a double-thickness of MDF for the front panel (this method is recommended — it provides an extremely strong, non-resonant mounting surface for the sub), fasten the two identical front pieces together using plenty of carpenter's glue and several sheet metal screws. Also, the double thickness will serve to strengthen the box as a whole.
If you don't use a double thickness of MDF for the mounting surface, you should definitely plan to use bracing elsewhere in the box for added strength. In fact, it's never a bad idea to use bracing no matter what, especially if your box is larger than a cubic foot. The box will be subjected to extreme internal pressure, so the stronger it is, the better.
The easiest way to add bracing is with 2"x2" strips of lumber. Glue and screw these along at least two of your box's internal seams before attaching the top and bottom.
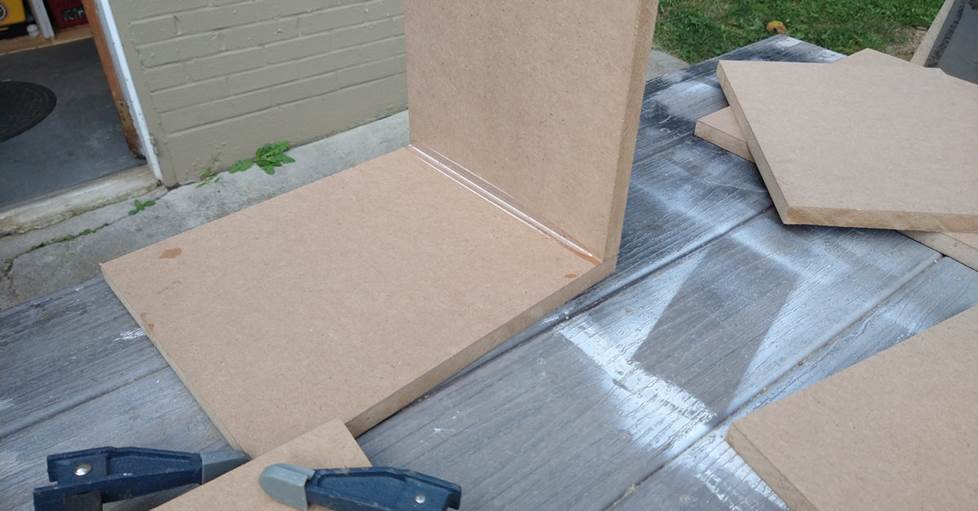
Step 4 – Assemble the box
While the front panels were clamped and the glue was drying, we assembled the rest of the box.
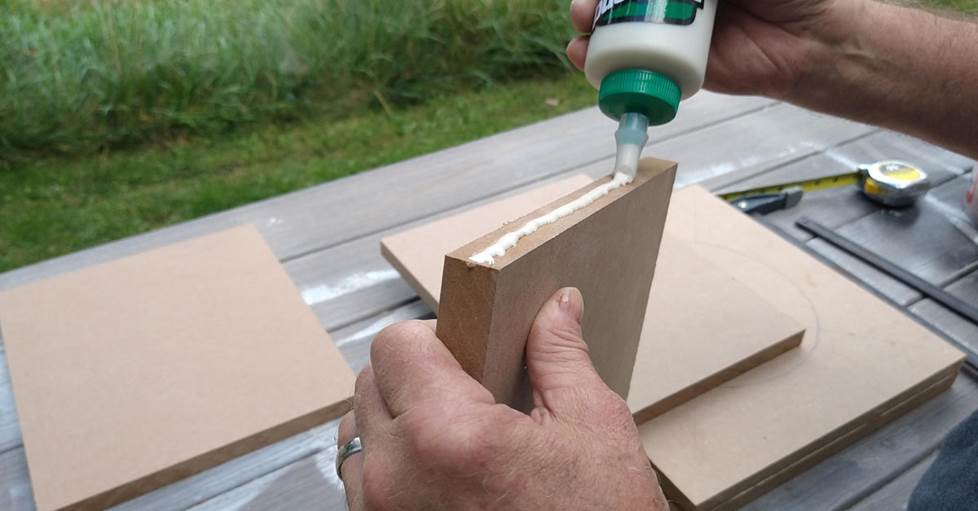
We drew a bead of glue on the panel edge and pressed it against the attaching panel. We used wood clamps to hold the panels together until we got screws in place. The glue, not the screws, is what will ultimately seal the box, so don't be afraid to pour it on.
MDF can be prone to splitting, so we pre-drilled the screw holes, then inserted the screws. It's times like this that it really pays to have both a drill and a bit driver!
We fastened the pieces together using 2" drywall screws. Some of the glue will squeeze out during this step — you can wipe it off the outside of the box using a wet rag, but it's OK to leave it on the inside edges (it'll actually help with the seal).
Step 5 – Attaching the final sides
When assembling the box, you might find that it’s a little out of square. This is where wood clamps can really help to pull things into shape. When you screw on the last two sides (front and back, in our case), it should pull things back into alignment.
Note: the largest sides of the box should overlap each of the smaller sides to provide the greatest strength.
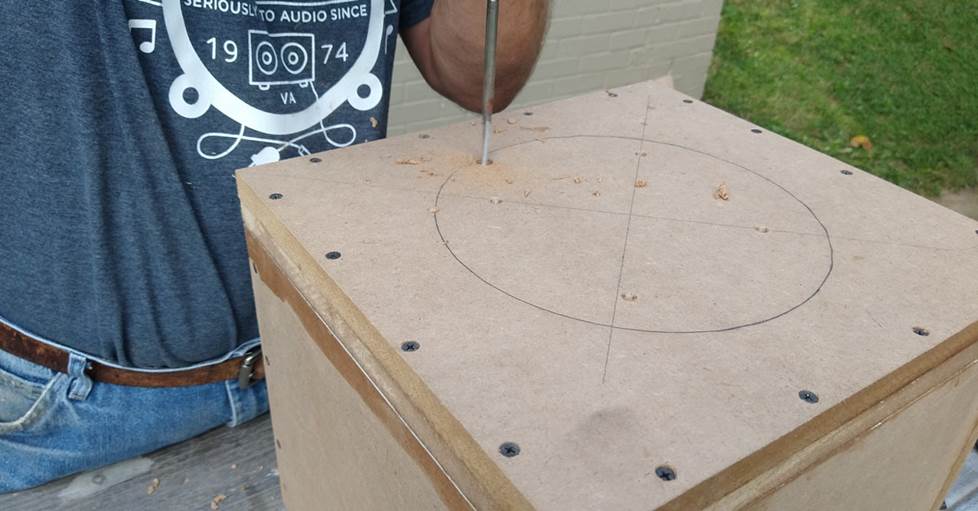
Step 6 – Cutting the opening for the woofer
Using our drill and a large bit, we made a hole near the inside edge of the circle we had traced, large enough for our jigsaw blade to fit in.
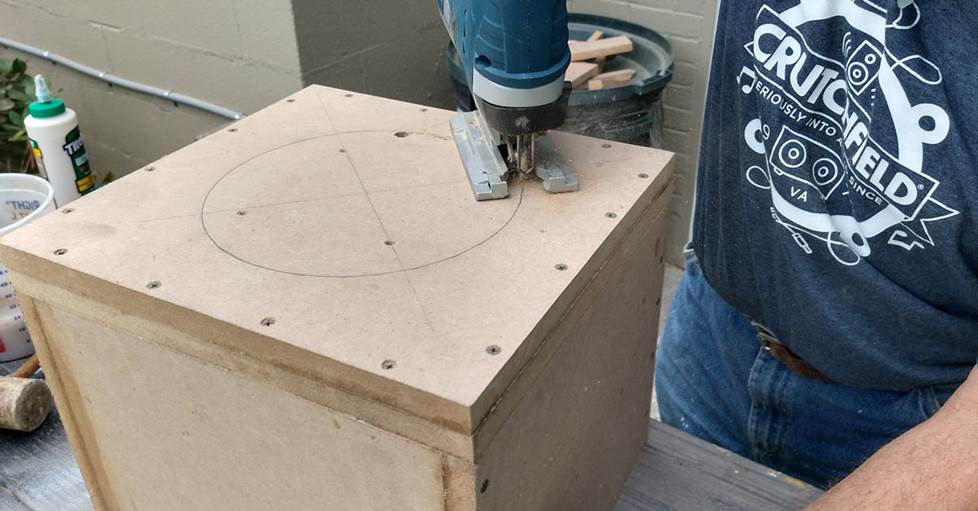
We cut out the circle with a jigsaw, gave it a quick hit with sandpaper, and the woofer opening was complete.
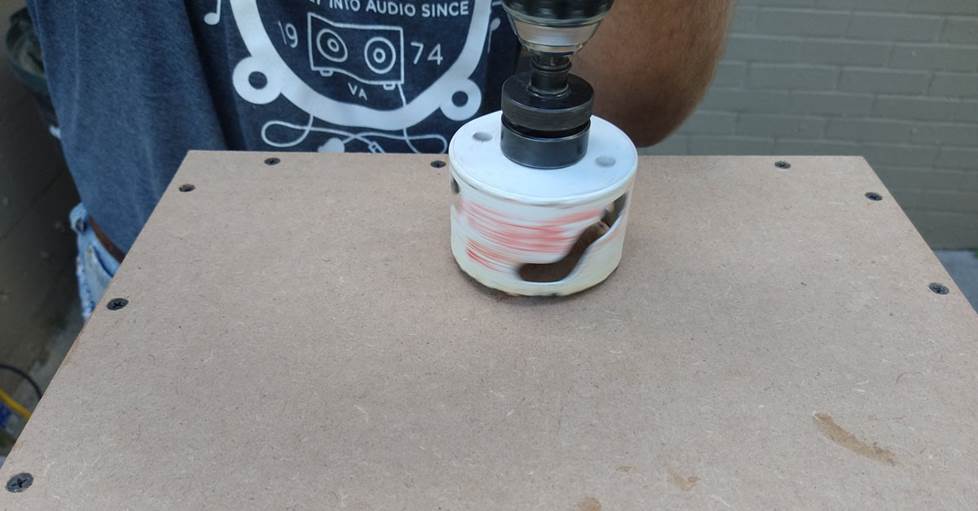
Step 7 – Adding the terminal cup
Flipping the box over, we used a 3" hole saw to create the opening for the terminal cup. If you don’t have such a large hole saw or if you have a square terminal cup, you can use the drilling/jigsawing procedure we used on the front of the box.

After smoothing the opening with rough sandpaper, we ran a bead of silicon caulk around the edge of the terminal cup and screwed it into place using 1/2" sheet metal screws.

After you've glued-and-screwed all the panels and cut the holes, you're just about done.
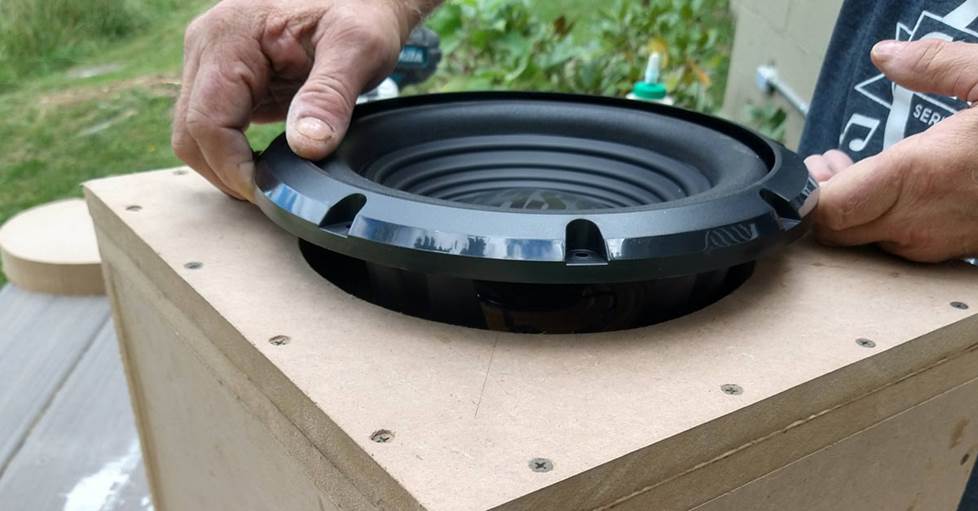
Step 8 – Test fitting the woofer
The next step is to drop the subwoofer in and make sure it fits. If the sub is a tight fit, use coarse sandpaper or a rasp to adjust the opening.
This would be a good time to mark the locations of the screwholes with a pencil so you can pre-drill the holes after you remove the woofer. We happened to do it at the end of the process.
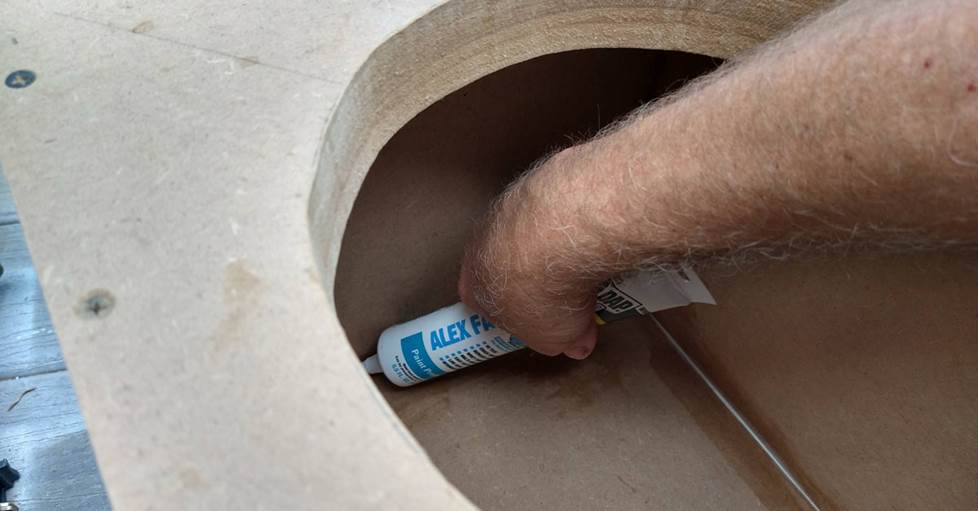
Step 9 – Seal the interior
To make double sure that everything was sealed and airtight, we waited for the glue to dry and ran a bead of silicon caulk over all of the box's internal seals. We used a hand-held tube of caulk, since it would be tough to get a caulk gun down inside the box at this point.
Let the caulk cure for 12-24 hours before putting the subwoofer back in. Some silicon caulk releases acetic acid fumes while curing, which have the potential to destroy subwoofer surrounds.
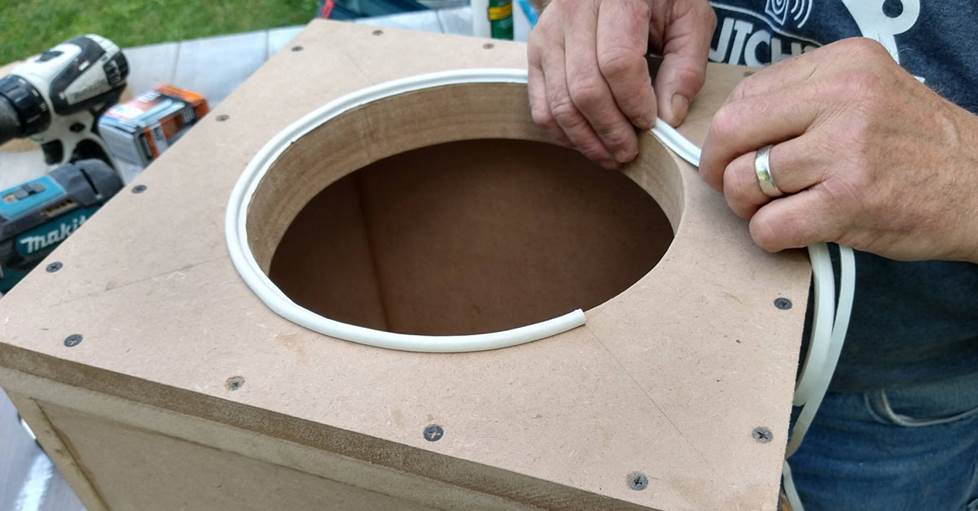
Step 10 – Installing the subwoofer
After the caulk had cured, we added some non-hardening rope caulk (found in the weatherstrip section of the hardware store) to act as a seal beneath the woofer frame.
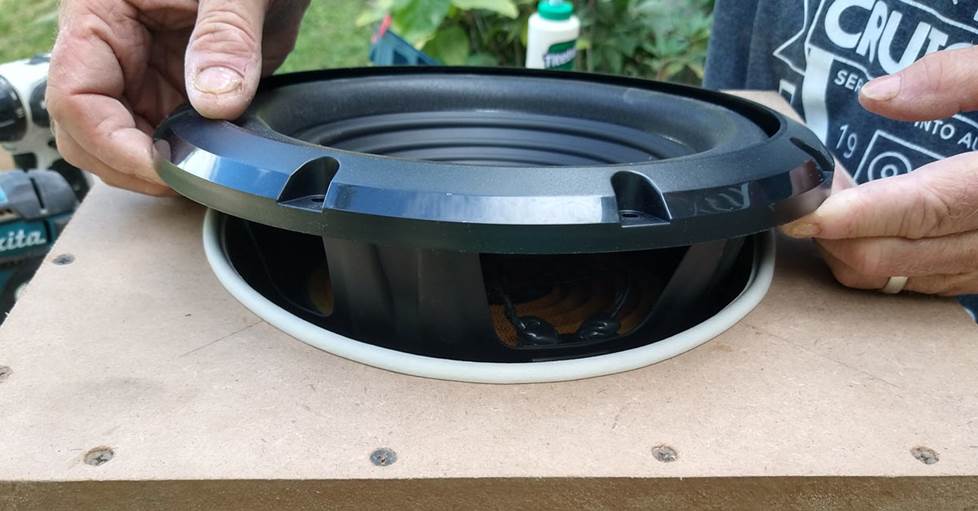
Next, we dropped the woofer back into the hole and used a pencil to mark the screw hole locations, then removed the subwoofer and pre-drilled holes for the mounting screws.
Finally, we connected a length of speaker wire from the terminal cup to the subwoofer, placed the subwoofer back in the box, and screwed it down. We were very careful to not let the drill slip off of the screws and ruin my shiny new sub.
Finishing and customizing the subwoofer box
The box is finished, the woofer is installed. Now it’s time to take it out to the car and try it out.
But you’re not done. Naked MDF has a cool, rugged look, but it’s also prone to chipping. And you probably have a more sophisticated sense of décor than "woodshop chic." Prefab boxes are covered in rugged carpet. You can use that (we happen to carry box carpeting amongst our box-building supplies), vinyl, or any other material you want. This is where you really get to make the box your own.
Check out our article about customizing a subwoofer box for some ideas.
And big thanks go to my buddy Cris at Clever Home Improvements in Staunton, VA for use of his skills and shop.
Now, it's your turn
Following the directions in this article, you should be able to build your own subwoofer box. Be sure to check out our selection of subwoofer installation accessories — we carry a variety of speaker terminals, port tubes, carpet, and other accessories you need to build your box. And if you need help, contact our advisors. They'll answer questions and make sure you get everything you need.


Micah
Posted on 4/30/2025
What about using a port? Do some subs not need a port? How do you know if a port is needed?
Mouaz
Posted on 11/29/2024
Hello everyone, would you please share some enclosure dimensions for this sub SWR-1042D
Edidiong Inyang from Nigeria
Posted on 12/28/2023
This was very helpful. Keep up the good work... Thank you
pal
Posted on 11/20/2023
building any kind of enclosure without using thiele small parameters are just plane amateur stupid...
Mostrillete from Evansville
Posted on 10/21/2023
Demasiado específico y detallado este poste parece muy bueno y fácil para realizar .
Leobardo from Cuautitlan Izcalli
Posted on 11/2/2022
Muy buena información GRACIAS...??
paul from hixson
Posted on 7/8/2022
thoughts on using plywood such as BC sheathing or birch plywood?
Chris from Southgate mi
Posted on 9/29/2021
Can I get the specs for a single 4 O duo voice call 9500 Box
Jake from Coventry
Posted on 1/31/2021
Should I insulate the inside of this box at all or leave it as is when completed?
Alexander H. from Crutchfield
on 2/3/2021
Cason from Bear
Posted on 11/6/2020
Does the equation to find the volume of the box change since you doubled thickness for the front?