In-wall and ceiling speaker placement and installation
For home theater or music

Planning a new in-wall or in-ceiling speaker system for your home? A do-it-yourself install can be a rewarding experience that also saves you money. This guide will help you get started.
We’ll give you some tips on where to place your speakers. Then we’ll explore a typical installation.
If you're still shopping for your gear, check out our in-ceiling and in-wall speaker buying guide.

A pair of well-placed speakers fills small rooms with pleasing background music.
Speaker placement
It’s important to have a clear plan before you begin your install. Good speakers placed in their ideal locations may sound better than excellent speakers in the wrong spots.
In-ceiling placement for background music
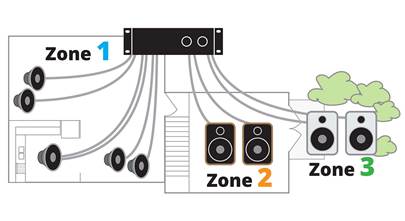
Planning a system that's mainly for background music? Aim for balanced sound throughout your space. It’s better to have too many speakers than too few. If the speakers are too far apart, you'll have music playing too loudly in some parts of the room and too quietly in other spots.
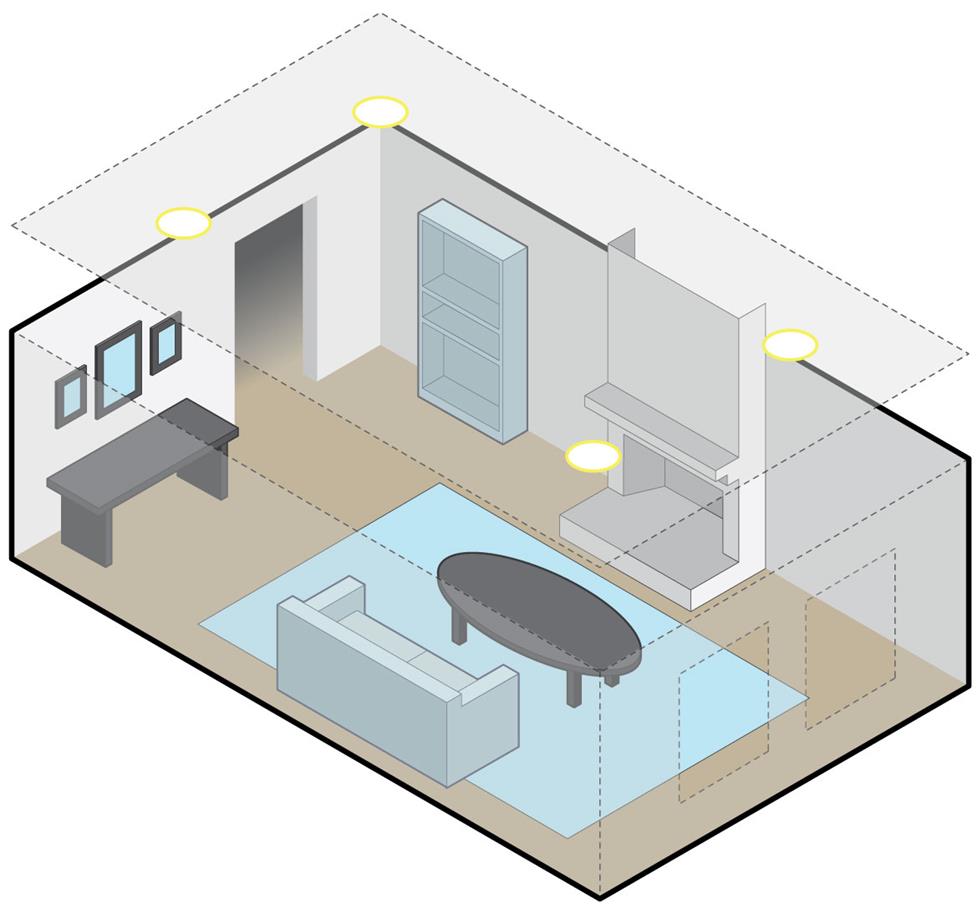
Use two pairs of speakers for balanced sound in larger rooms. We recommend installing in-wall and ceiling speakers at least 18-24 inches away from an adjacent wall or ceiling.
Stereo-input speaker placement
Sometimes you want music overhead but have room for just one speaker. The solution? A stereo-input speaker, which plays both the left and right channels of your music.
A stereo-input speaker is a great way to add background music to a small space. Or you may want several stereo-input speakers in a hallway or an odd-shaped room that's not well suited for stereo pairs.
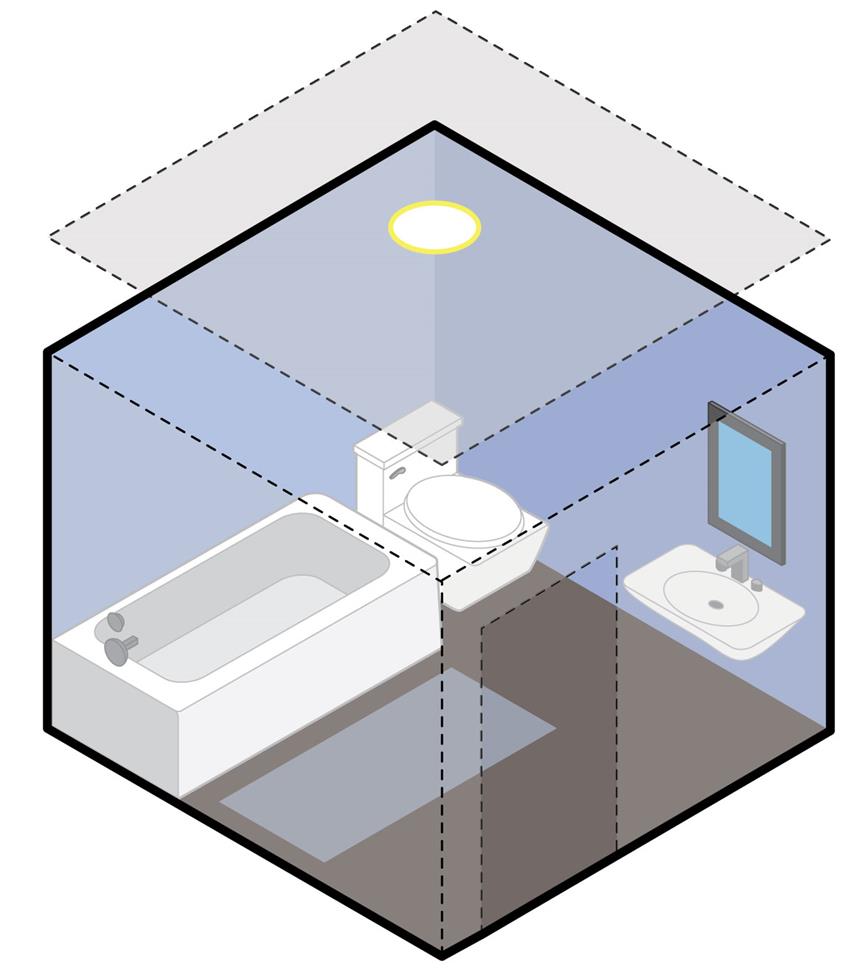
A centrally located stereo-input speaker is a great fit for the bathroom. It produces both channels of your stereo music source from a single location.
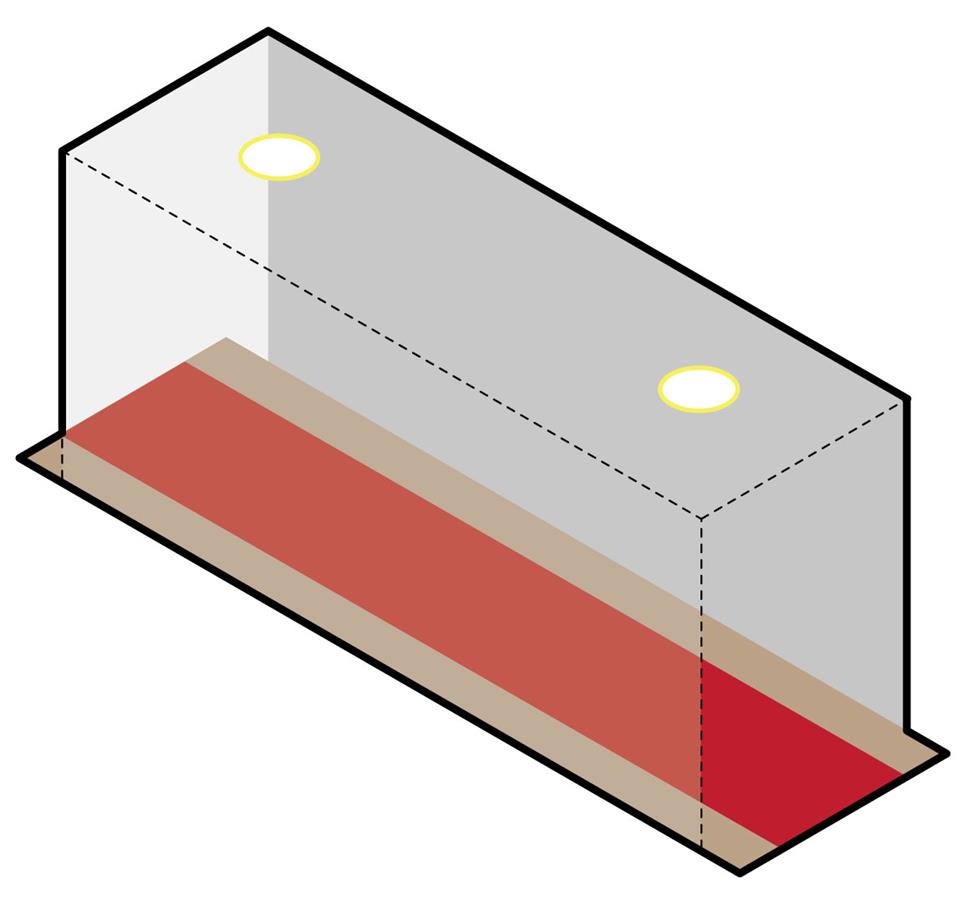
Want background music in a long, narrow hallway? Install a stereo-input speaker at each end for balanced sound throughout the space.
In-wall placement for dedicated music listening
Creating a space where sitting and listening to music is the main focus? In-wall speakers positioned at ear level recreate the live sound experience.
Try to place your left and right speakers the same distance from each other as they are from your prime listening seat. This gives you balanced, focused sound.
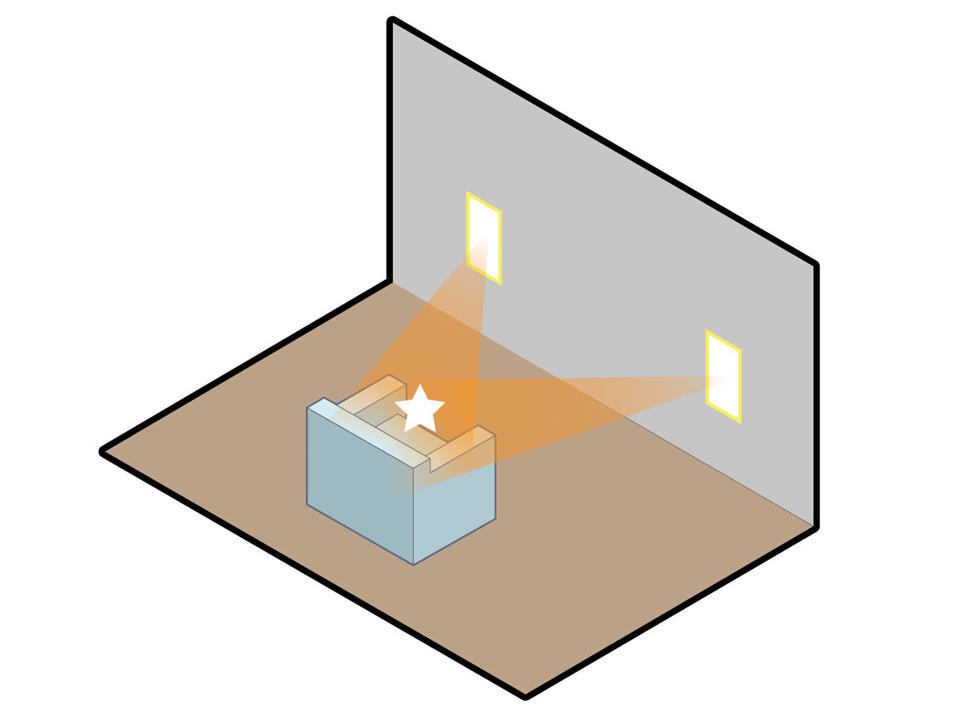
Setting up a music listening room? Space your ear-level speakers the same distance from each other as they are from you for the best sound.
Speaker placement for home theater
Is your home theater going to be in your living room or family room? Or will it be in a media room that’s used only for watching movies or sporting events?
The ideal in-wall speaker placement in both rooms is about the same. The height of the left- and right-channel speakers may vary, depending on what activities take place in your room.
Speaker placement in a mixed-use room
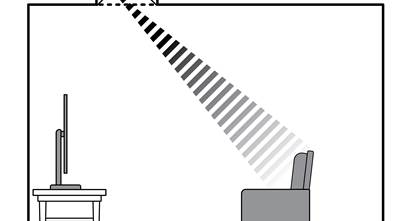
Say you’re entertaining in your living room, and want to play music for your guests. You want your front and rear in-wall speakers at about ear level when standing. This elevated placement gives you great music performance as people are moving around. It also gives you immersive sound effects when you watch a movie.
It's tempting to install the in-wall speakers right beside the TV for aesthetic reasons. But your system will sound better if the front speakers are spread out. If you can, place your front left and right speakers the same distance apart from each other as they are from your prime viewing seat. This gives you a wide front soundstage that simulates a theater.
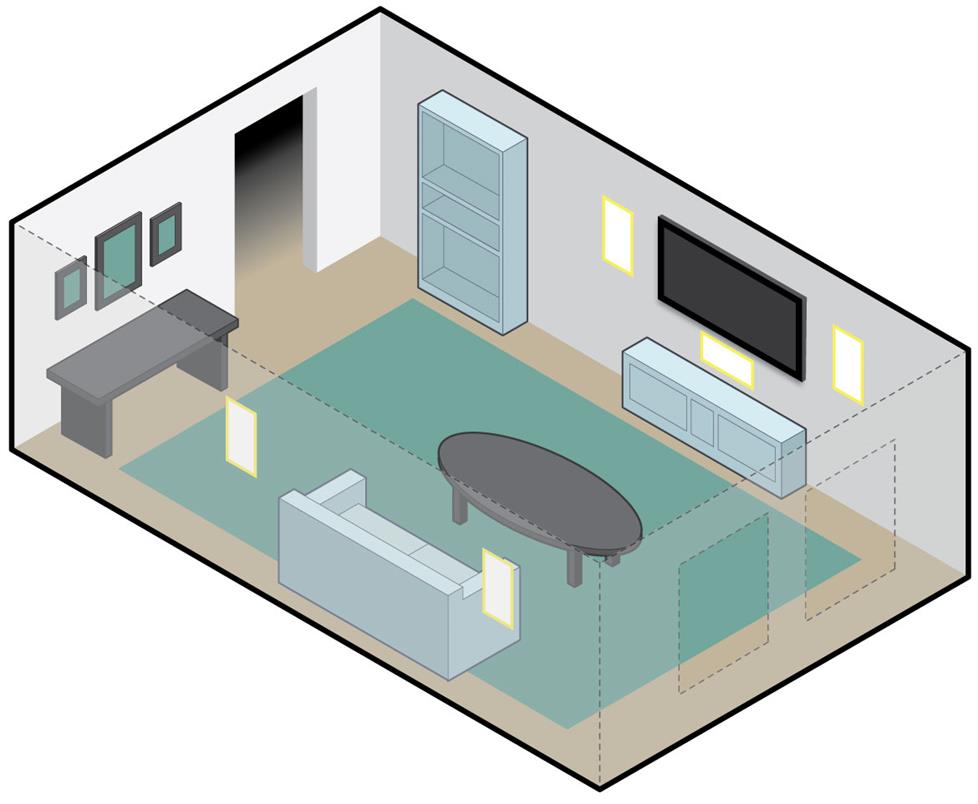
In a mixed-usage room you want your front and rear in-wall speakers at about ear level when standing.
Placement in a dedicated theater room
Speaker placement in a dedicated theater room follows the same guidelines as above, except for the speaker height. Since you're not using the room for anything else, you want each speaker at ear level (or slightly higher) when seated. This gives you the best surround sound experience.
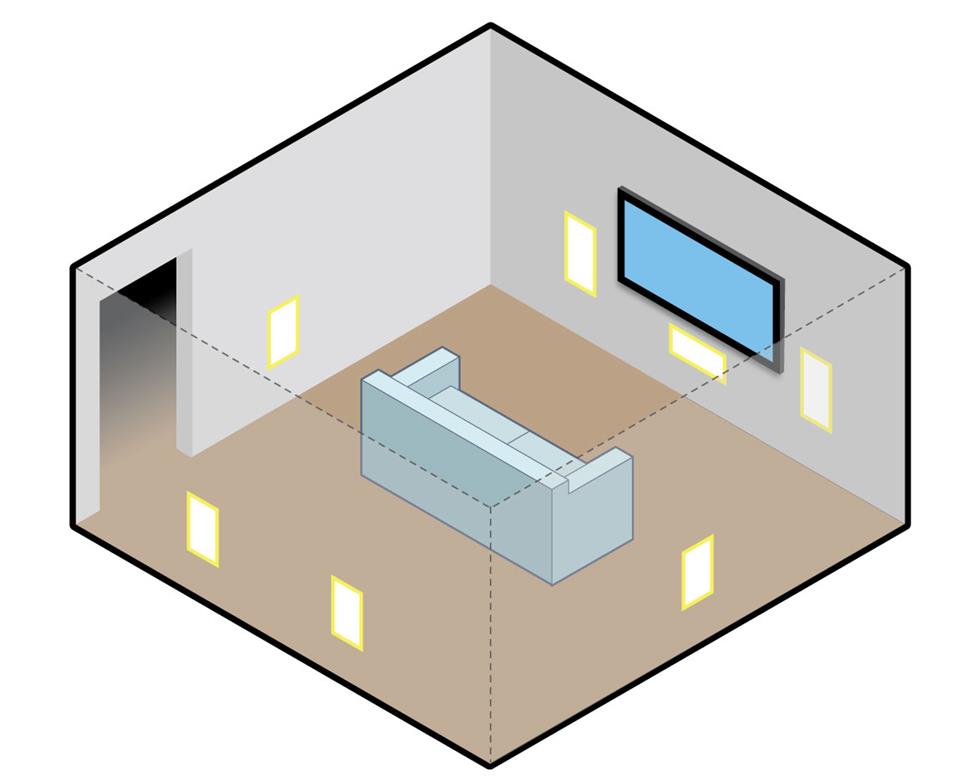
Building a dedicated home theater room? Install your in-wall speakers at about ear level when seated for the best sound.
Center channel speaker placement
Dialogue is clearer and easier to understand when your center channel is at ear level when you’re seated. But, your TV looks best when its middle line is at eye level.
Choosing the center channel and TV mounting locations calls for a balance between the two factors. Decide the height for both before installing either one. You might find taping up cardboard cutouts of each helpful for determining the best spots.
In most installs, the center channel goes under the TV. Try to leave at least a few inches of space between the top of the center channel and the bottom of your TV. This prevents the TV from blocking some of the center channel's sound .
Surround speakers placement
If you’re using rear surround speakers, face them toward the front of the room, as illustrated above. If you’re using side surrounds, aim them toward each other. If your speakers' tweeters can swivel, aim them toward your seating position.
Your surround speakers should be spaced about the same distance apart as the front left and right speakers. We recommend installing in-wall and ceiling speakers at least 18-24 inches away from an adjacent wall or ceiling.
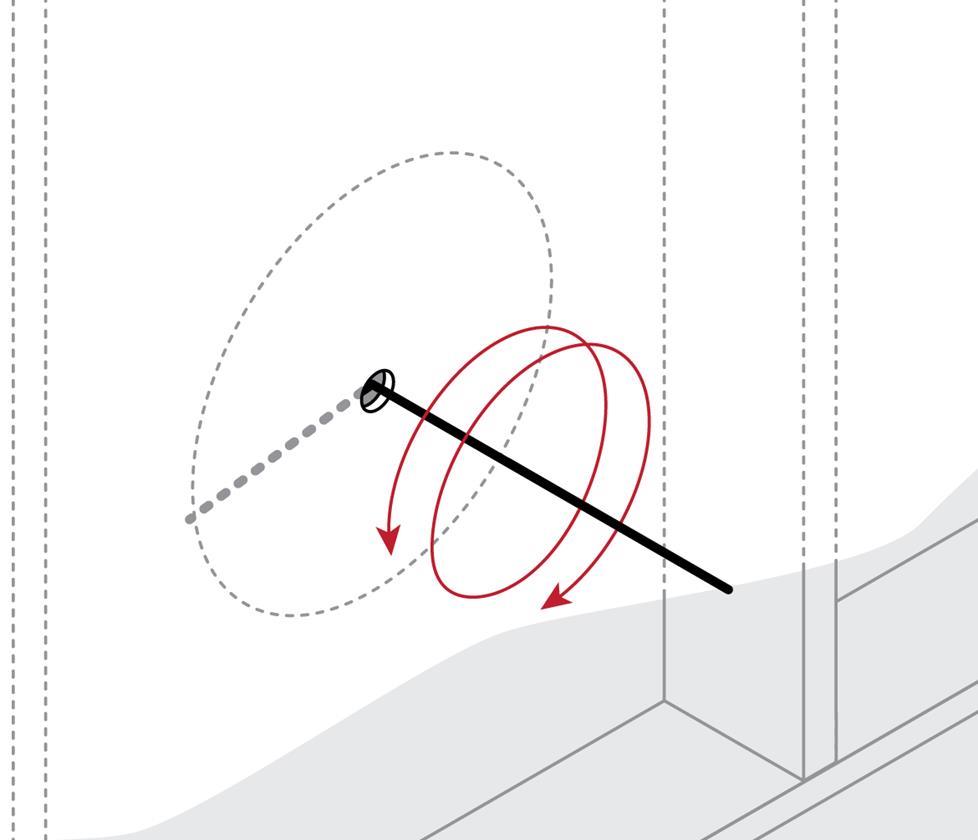
Placement for Dolby Atmos® and DTS:X™ overhead speakers
Planning to use overhead speakers for special effects? For Atmos systems, Dolby recommends using four in-ceiling speakers. One pair located in front of your listening position, and a second pair behind it. If your system can only accommodate one pair of speakers, mount them slightly in front of where you’ll be listening.
Don’t worry if your speaker placement isn’t perfect. Your Atmos-enabled receiver’s auto calibration system will help dial in the sound. Check out Dolby's speaker setup guide for a deep dive into Atmos speaker placement.
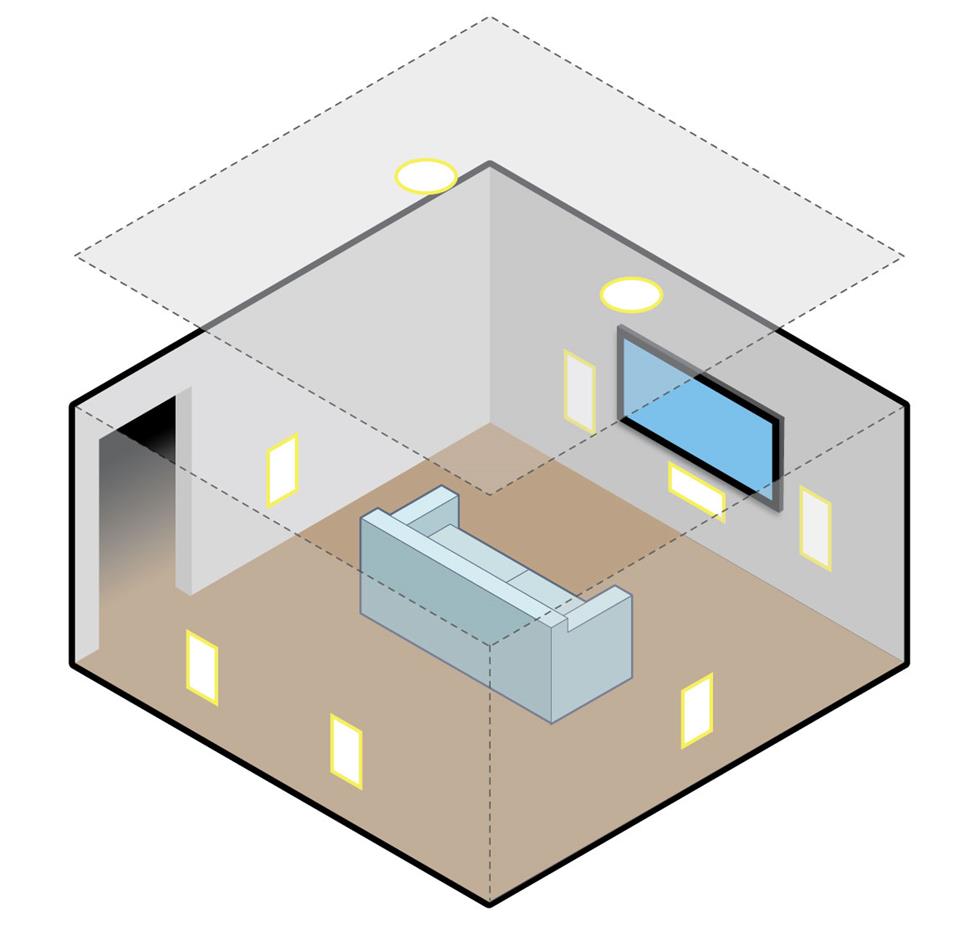
Adding a pair of overhead speaker channels to your system? Place them slightly in front of your seats for immersive sound effects.
Preparing for the installation
Making sure you have the right tools on hand helps ensure a smooth installation. Below is a list of the tools used in a typical install. Check the owner's manuals of your speakers to see if anything else is required.
- drywall saw
- utility knife
- wire stripper
- level
- stud finder
- screwdriver
- masking tape
- pencil
- measuring tape
- drill and bits
- Shop Vac®
Use UL-rated wire for your in-wall or in-ceiling speakers
It's important that you use speaker wire that's approved for in-wall runs. You want UL-rated wire that's labeled CL2 or CL3. Check out our in-wall wiring guide for more info.
Confirm your speaker locations with a stud finder
After you map out your speaker locations, make sure there’s enough space in the wall or ceiling to accommodate them.
Identify any potential hazards behind the wall or ceiling. Use a high-quality stud finder that can detect metal pipes, AC wires, and other obstacles hidden behind your walls.
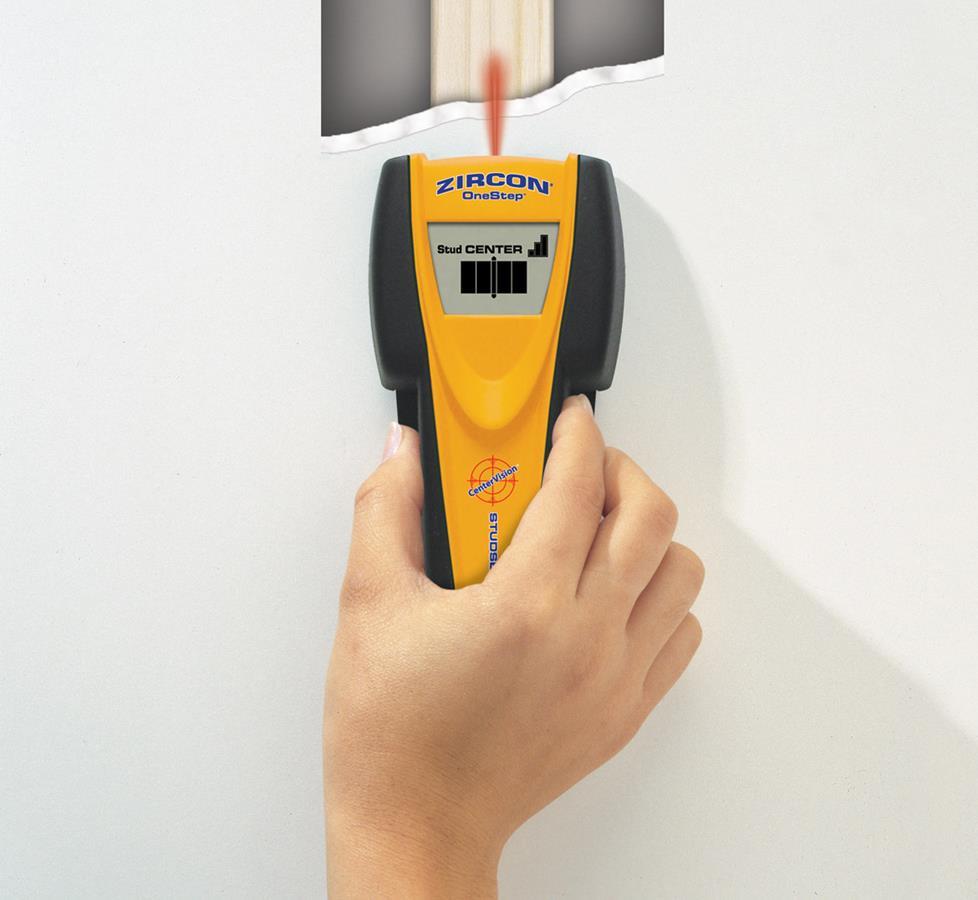
Self-installing? It's worth investing in a high-quality stud finder that can detect obstacles hidden behind your walls. (Photo courtesy of Zircon.)
Do a thorough check behind the walls
Try to inspect as much as possible without making a hole. See if you can detect which way joists run and where empty wall space between studs might be.
You’re looking for wall locations that are empty of pipes and electrical wires. You may not know what's behind the wall with absolute certainty, so you might have to cut and patch exploratory holes.
Start with a pilot hole
In an existing room, you'll want to drill a pilot hole to determine if each of your speaker locations will work. This lets you explore the space behind the wall or ceiling to make sure there isn’t anything there.
Before you begin, turn off the power in areas you'll be working to avoid electric shock. Then drill a small hole in the middle of where you want to place your speaker. Use caution when drilling so you don't plunge your bit into a pipe or electrical conduit.
A pilot hole lets you explore the space behind the wall to make sure there isn’t anything surprising there.
Explore the area
Insert a sturdy wire (like a bent coat hanger) into the pilot hole. If there might be power lines behind the wall near your pilot hole, wrap the exploratory wire with electrical tape.
Explore the surrounding area. Make sure there's enough room for the speaker, and that there’s nothing in the way. Check your speaker’s mounting dimensions to make sure there's enough space to accommodate it.
Confirm your speaker locations before you cut
Don't cut any drywall until you've drilled pilot holes and checked all of your desired speaker locations. If one of your locations doesn't work out, you might want to move one or more of them.
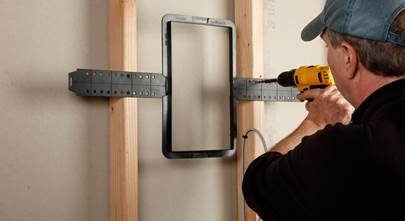
Use rough-in brackets to map out your speaker locations
Rough-in brackets are very helpful if you’re working with new construction. They're also useful if you're renovating an existing room where the old drywall has been removed.
These brackets mount between two studs or joists. Your drywall hanger will cut the speaker holes for you.
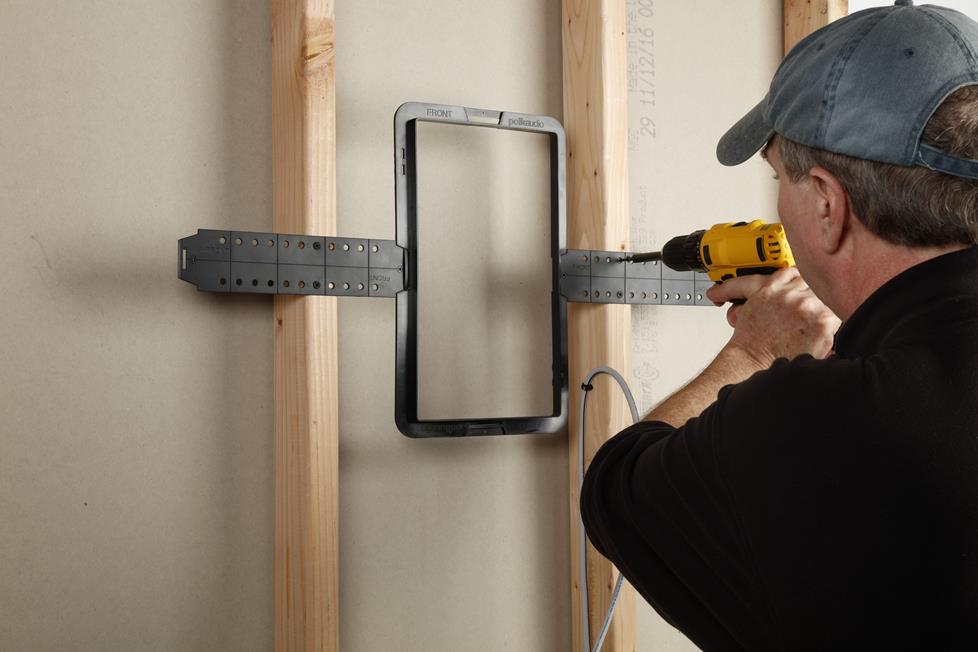
Rough-in brackets let you easily mark where each speaker will go before the wall goes up. They also give your speaker a sturdy bracing between two studs.
Keep the sound where you want it
Your speakers may have another room located adjacent to them. Consider in-wall or in-ceiling speakers that have a back-box to limit the sound that leaks through. Back-boxes improve bass response by providing a sealed enclosure around the speaker. They also keep dust and dirt out as well.
Installing your new speakers
Cutting drywall and mounting the speakers
In this video, Crutchfield A/V expert Norm gives step-by-step instructions. We encourage a thorough viewing since he goes into detail about the entire installation process. After you check it out, scroll down for some additional tips.
Beware of the dust
Cutting into drywall and plaster creates a fair amount of dust. Cover any furniture near your installation before you begin your work. It’s helpful to have someone hold the vacuum hose under the drywall saw as you cut. This eliminates a lot of the dust clouds that are generated during installation.
Plaster and lath walls
If your house has plaster-and-lath walls or ceilings, installing your speakers will be more complicated. Plaster tends to crack and crumble easily, so you should be prepared to do some touch-up work.
Running in-wall wire could be particularly challenging. It may be worth running out-of-wall wire, and using carpets, cabinetry, and other spaces to hide it. See our article on home A/V cable management for more ideas.
Drop ceiling installation
Installing speakers in a drop ceiling is different than a normal drywall installation. Drop ceiling panels often aren’t strong enough to support the weight of in-ceiling speakers.
Reinforce where the speaker is mounted with a large piece of plywood above the foam panel. Mount it to the cross braces, and then cut the speaker opening into both the plywood and the drop ceiling.
For high-quality pressboard drop ceilings, you'll be able to cut directly into the sturdy ceiling panels.
Fine tuning your speakers
Once your speakers are installed, you're ready to make any final adjustments. If you have aimable tweeters, direct them toward your seats before installing the speaker grilles.
Check for tone controls on the speaker. If the speaker is within a foot of a corner, set the bass controls to the "minus" or "cut" position. If the room doesn’t have a lot of upholstered furniture to absorb sound, set the treble control to the minus/cut position.
Learn more about room acoustics and treatments here.
Personalized advice from our team of experts
Have questions about planning your new system? Our expert Advisors know the gear inside and out. Contact us today.
Free lifetime tech support is included with your Crutchfield purchase.


David from Highland
Posted on 3/2/2025
Hello Crutchfield, I'm building a new Home theater and would like to install Martin Logan Motion XT CI XTW6-LCR behind an acoustic transparent scrren. Do these Martin Logans require extra depth in the wall? should I build this wall with 2x6" studs to account for the extra depth required?
Frank
Posted on 10/30/2023
Good instructive article. Thank you, Frank
Leandro from São Paulo-Brasil
Posted on 8/1/2023
Good afternoon, I would like to know the correct position of the rear speakers, taking into account that my sofa is against the back wall. Can I recess the speakers into the wall or should I install them on the ceiling?
Scott Graff from Hoover
Posted on 3/18/2023
I would cut your plywood to the size of the tile minus a quarter inch on 2 adjacent sides . Use your template and cut both holes and clean the mating surfaces . Use a whole tube or more of a rubbery silicone and spread all over the tile and sandwich the two pieces together . Install the tile back into the ceiling grid and install the speaker. The speaker will clamp the plywood and tile together. Let dry and wire the speaker up. Enjoy the improved bass response !
GEOFF A from PACE
Posted on 7/18/2022
The example layouts are nice, but one of the most important is missing! How do you layout a theater system for a viewing area in an open layout floorplan? Where there is no directly adjacent or behind?
Shannon Sirles from Emerald Isle, NC
Posted on 4/9/2022
I have a house on the NC Coast. We are three houses from the ocean. We had some Pyle Speakers on our 3rd floor covered deck ceiling. It's the second pair in 5 years. They are connected to our SONOS system. The hole that's already there is circular and is 9 3/4" OD. Will these speakers work for that hole size and will there hold up better in the coastal climate? Or do you have another recommendation. I don't want to break the bank as the conditions are pretty harsh and I don't think any speaker will last too long out there. Unless you feel otherwise?
Jim Peterson from Oak Park
Posted on 2/24/2022
Is there a video that addresses how to do the wiring? I'm actually replacing 2 existing in-ceiling speakers with new Polk MC60s. I think the Polks are the same size as my existing speakers. When I started to take the existing speakers out of the ceiling, I expected speaker wire but it look like something else, so hoping you have a video or details/pictures of how the wiring is usually done.
Kramer Crane from Crutchfield
on 2/25/2022
Jim Stannard from Irvine
Posted on 11/4/2021
Hi there, I'd like to do a 9.1 or 11.1 in-wall/ceiling atmos setup using Definitive sub/speakers & sub-amp and a Denon receiver. I'm looking at the UIW RLS II's for front R/L and the IW Sub Reference with subamp 600. My problem is that there are no walls on the left and right sides of the home theater area, the left side is the kitchen and the right is the dining room and no physical separation. I do not want to use floor-standing surround speakers if I can help it, because of wires and aesthetics. Can I do ceiling speakers that act as sides? Any thoughts on the best way to do this? -Thanks!
Kramer Crane from Crutchfield
on 11/8/2021
In your shoes I'd go with a pair of the Definitive Technology UIW RCS II for your side surround channels. They are voice-matched to the UIW RLS II, and can direct their sound down toward your seats thanks to an angled-driver design. I think they'd be a wonderful addition to your stealthy Def Tech home theater system!
Robert A from Loomis
Posted on 10/27/2021
Hello. Great post. I'm in a bit of a quandary the only place I have for rear surrounds is on a small wall that runs between the raised ceiling in the living room to the normal height ceiling in the kitchen (open concept home). So a couple questions: 1. Is having the rear surrounds mounted so much higher than the seated position going to make it pointless to even add them? 2. I believe the area behind the wall they would be mounted in is the attic. Which is great for access but wondering if that much open space would require an enclosure for the rear of the speakers. Appreciate any guidance or suggested speakers if you think it worthwhile. Ideally I'd go with a DefTec as my fronts are DefTec towers with the atmos modules installed. Thank you!
Kramer Crane from Crutchfield
on 11/2/2021
Yes, I think adding rear surrounds to your system is absolutely worthwhile. If they'll be mounted above six feet then I recommend installing the speakers upside down to bring the tweeters closer to ear level. That'll sound way better than not having anything at all back there.
I recommend giving one of our Advisors a shout to find the right speakers for your space. Thanks again for reaching out, and happy listening!
Ashley Karen Roy from Austin
Posted on 10/20/2021
This is one of the most helpful things I've ever read in the internet. Thank you!
Kramer Crane from Crutchfield
on 10/21/2021