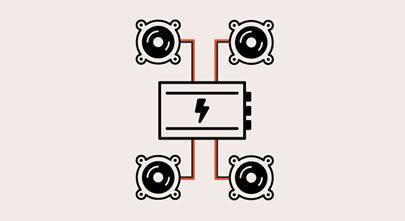
Car amplifier installation guide
Step-by-step instructions for wiring an amp

Q: How do I install an amplifier?
A: Read this article! We cover all of the basics of where to mount and how to wire the amplifier. And we'll walk you step-by-step through the installation process. We'll also share a few expert tips and tricks along the way.
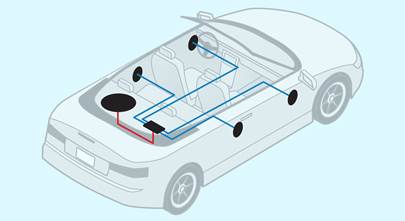
This installation guide offers examples of amplifier installation and layout. Installation specifics will depend on the make and body style of your vehicle and the equipment you purchased.
Before going through this more-detailed guide, you might want to watch our amplifier installation video to get an overview of what's involved:
Preliminary considerations
Before we get into the installation, let's talk about some of the details:
- What installation accessories do you need?
- Where should you put the amp?
- How and what do you dissassemble in order to run wires?
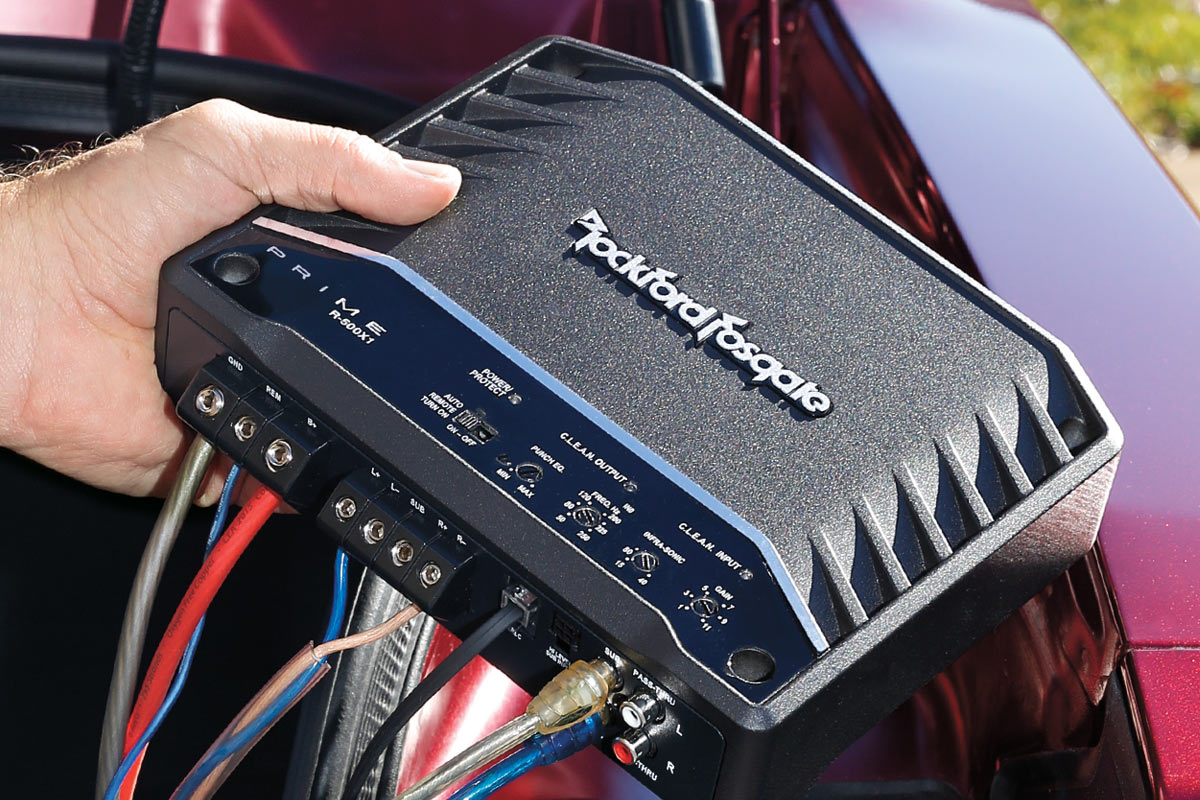
What wiring and accessories do I need?
Car amplifiers don't come with any wiring included. You must supply the amp's power and ground wiring, an inline fuse, a remote turn-on wire, RCA cables, and speaker wires.

Power and ground wires
The power and ground wires need to be thick enough to accommodate the amp's demand for electrical current or the amp won't operate properly or put out its rated power.
Your amp's instructions will include a recommendation on what size wire to use. Or, you can check out How to determine the best size wire for help doing it yourself. Don't forget to measure all distances first, so you'll know what lengths of wire to get.
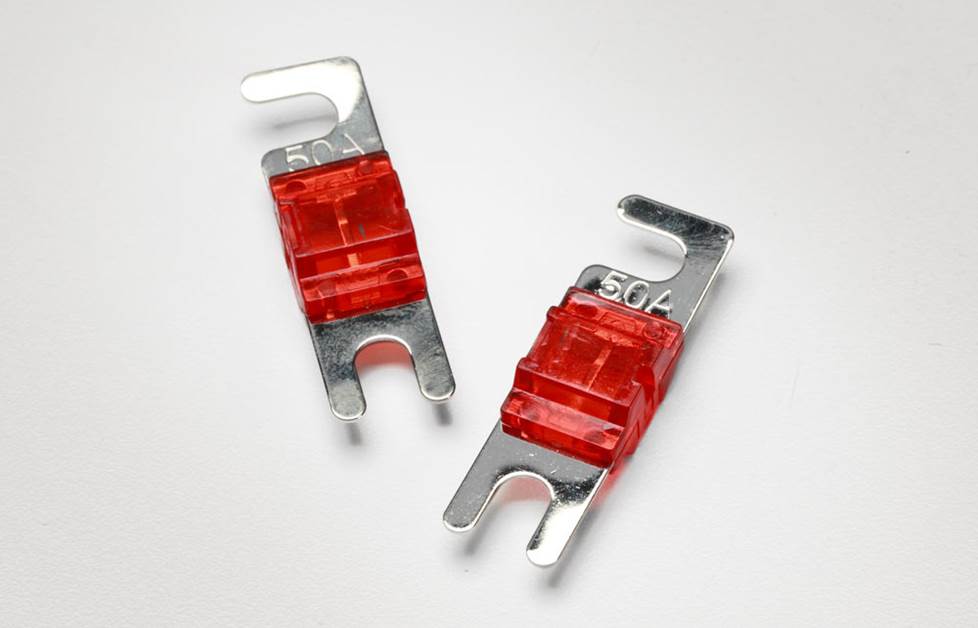
The fuse that will protect your system
The in-line fuse on the main power cable, mounted within six inches or so of the battery connection, is essential for protecting the wire, your car, and you from a catastrophic fire in the event of a short circuit. Each wire manufacturer rates their wire's current capacity differently, but as a general rule, for a typical 16- to 20-foot run, you'll be safe using a:
- 25-amp fuse with 10-gauge wiring
- 60-amp fuse with 8-gauge wiring
- 100-amp fuse with 4-gauge wiring
- 250-amp fuse with 1/0-gauge wiring
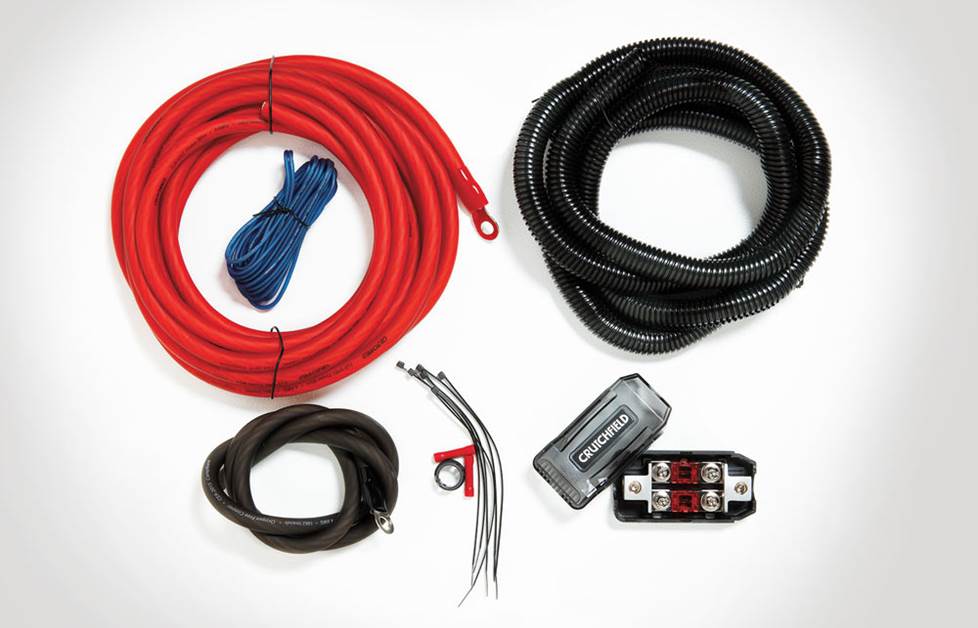
An amplifier wiring kit
The easiest way to get these items is with an amplifier wiring kit, which will include matching power, ground, turn-on wires, and fuse.
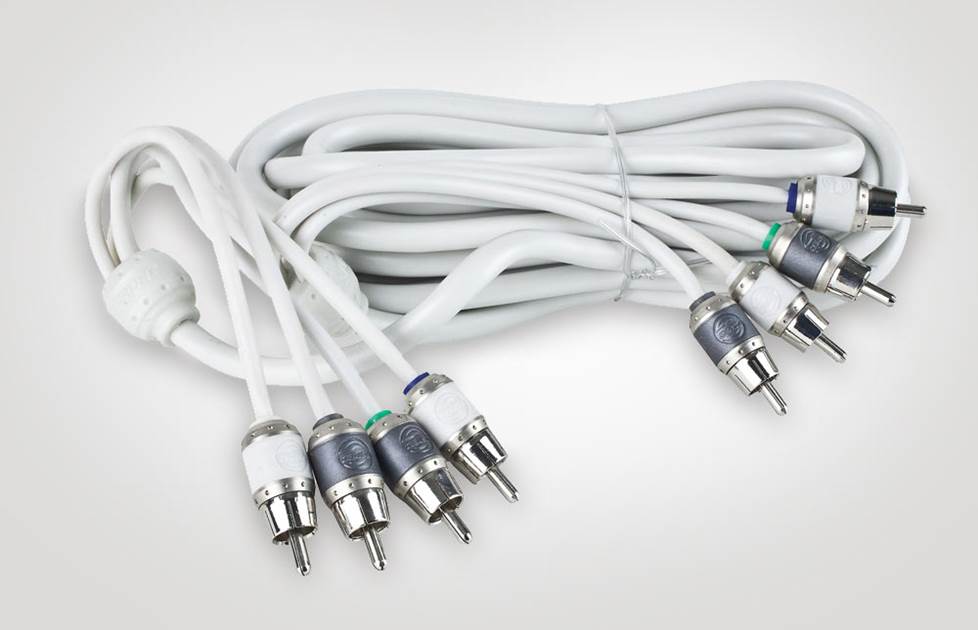
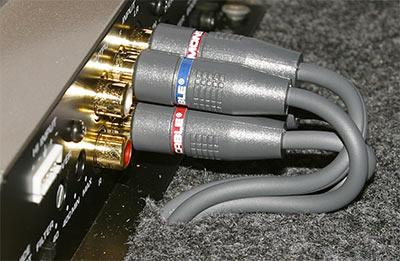
RCA cables and speaker wire
Amp wiring kits often don't include signal wiring. Your amplifier gets its input signals from the receiver's output typically via RCA cables. RCA cables come in stereo pairs, in various lengths.
When running new speaker wires from your amplifier's output to the speakers, any size wire from 18- to 14-gauge will work fine. (The lower the gauge number, the thicker the wire.) For subwoofers, use 16- to 12-gauge wires.
Where should I mount my amp?
Use these guidelines to choose a location for mounting your amplifier. A smart mounting location will help your installation go smoothly:
- Follow the manufacturer's recommendations for mounting the amplifier and make sure it's secure. An amp that isn't secure could break loose in an accident and injure someone as it flies through the vehicle.
- The amp should be at least three feet from the stereo to avoid noise radiated from the vehicle's electrical system. The amp can also interfere with the stereo's AM/FM reception.
- Do not bolt your amplifier directly to your car's metal chassis — that's inviting noise problems, like ground loops which hum or buzz. You could use rubber grommets around the mounting screws to isolate the case. Or you could mount the amp onto a wooden board or plastic panel and attach that to the car body.
- An amp produces damaging heat during operation, which its heatsink absorbs and radiates away from the circuitry. The amp needs a few inches of air space around it to stay as cool as possible. Never mount an amp upside down, as dissipated heat will radiate back into the amp.
- Make sure there's enough room for you to connect the wiring and adjust the controls (gain, crossover, bass boost, etc.).
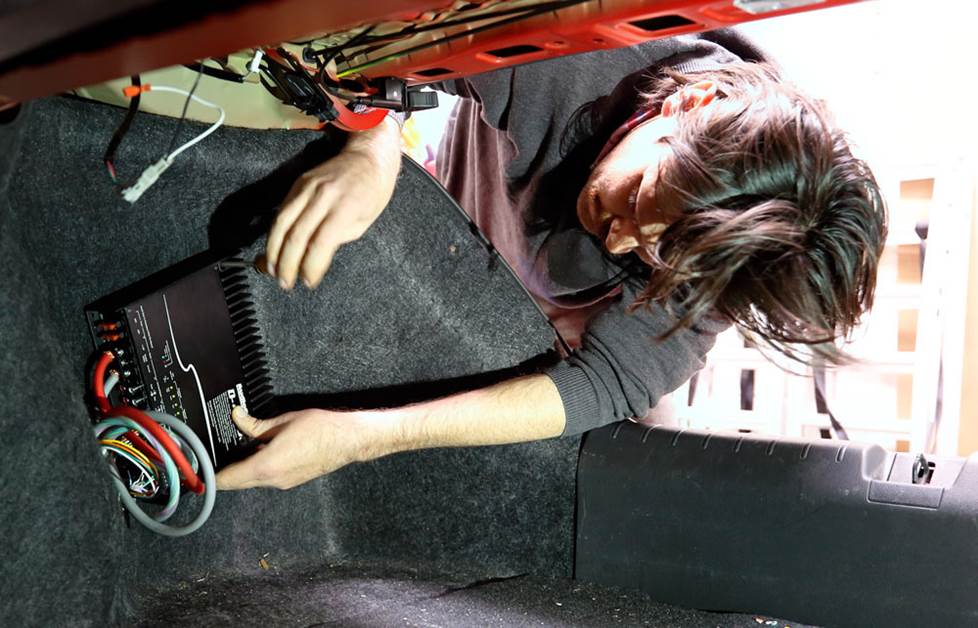
A compact subwoofer amplifier mounted in an out-of-the-way nook in a trunk with plenty of air space for cooling
Good locations to install an amplifier include:
- On the firewall (passenger side)
Pros: You can use short wires and patch cords. You won't have to remove a seat or climb into the trunk.
Cons: Only very small amps fit here. This puts your amp close to some common noise sources. - In the trunk or hatch area
Pros: Plenty of room for large amps. Near the rear speakers. Easy access to the amp controls.
Cons: You sacrifice some cargo space. Longer wires and patch cords are required. - Under a seat
Pros: Closer to the receiver, so you can use shorter patch cables and signal cables, which are less prone to noise and signal degradation. Closer to the front speakers, so running wire to them will be easier. No cargo space sacrificed.
Cons: You may have to remove the seat to do the installation. Warning: removing your seat could deactivate your vehicle's SRS (airbag) system. Only small amps will fit. The amp will need to be protected against water from rain or snow brought in on shoes.

Where do I run the wires for my amp?
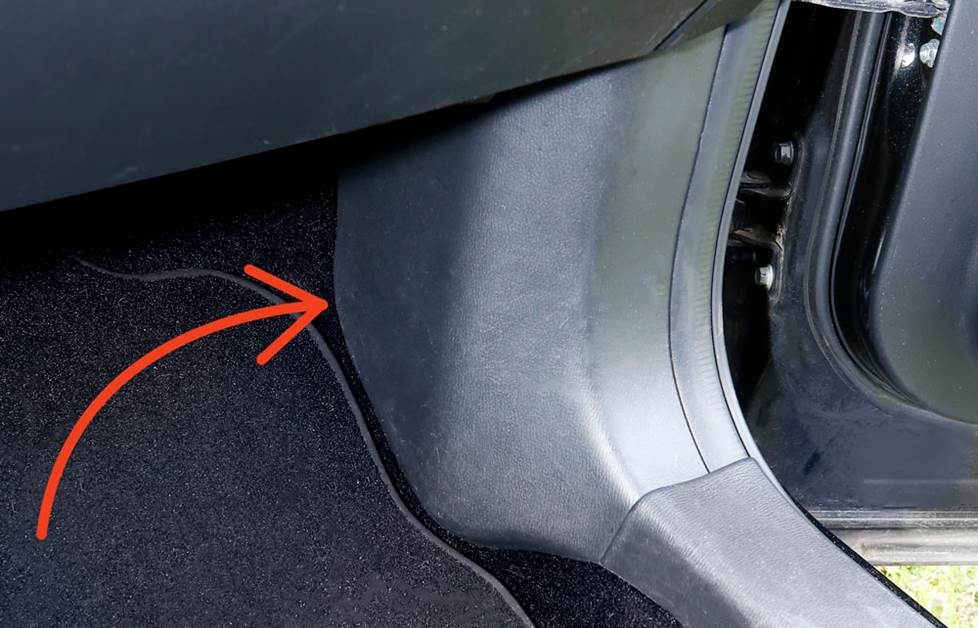
All system wiring should be concealed for safety, and to give your installation a nice, finished look. Wires should be secured so that they do not interfere with safe vehicle operation. Depending on the location you choose for your amplifier, the wiring may need to be run under the dash, door scuff plate, pillar trimpanel, or kickpanel.

Bojo trim panel tools
The instructions below address, in general, which panels may need to be removed and how they typically come off. Often, panels can be pried up at the edges. You'll probably also need to remove some screws and retaining clips. To prevent damage, always use care when removing panels — a panel tool is helpful.
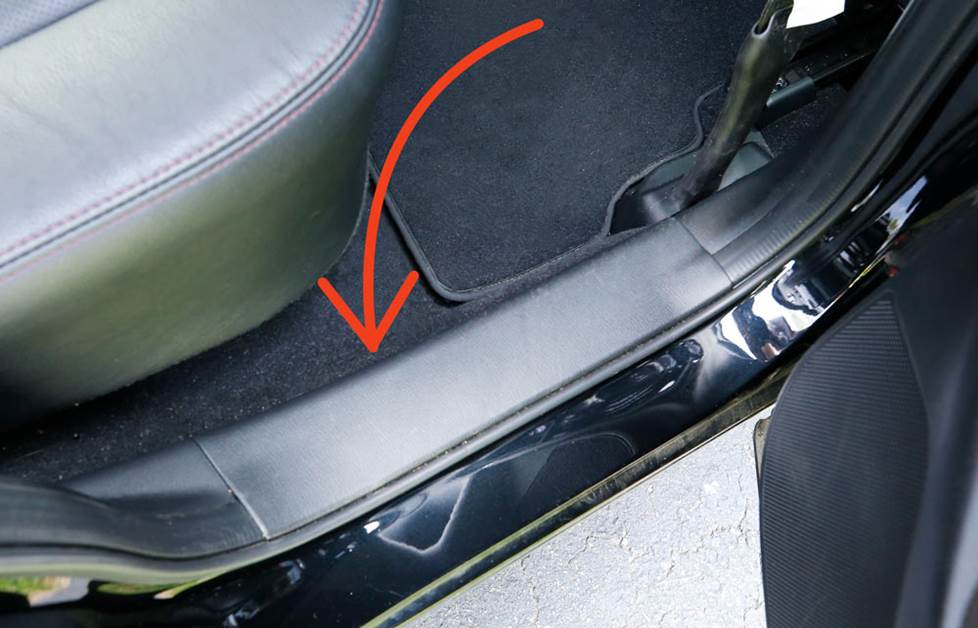
Removing the door scuff plate
The plates are usually removed by prying up the edges to release clips. Some vehicles will have screws present which will need to be removed.
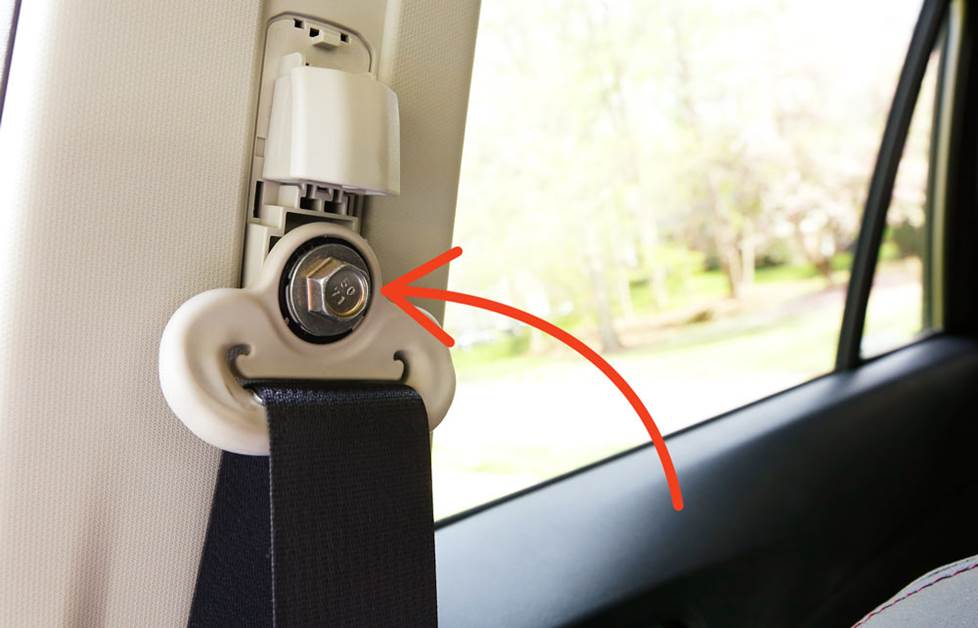
Removing the seat belt
A seat belt may be located on a panel that needs to be removed. Most seat belt anchor covers pry off. The seat belt anchor is secured with a large nut or bolt.
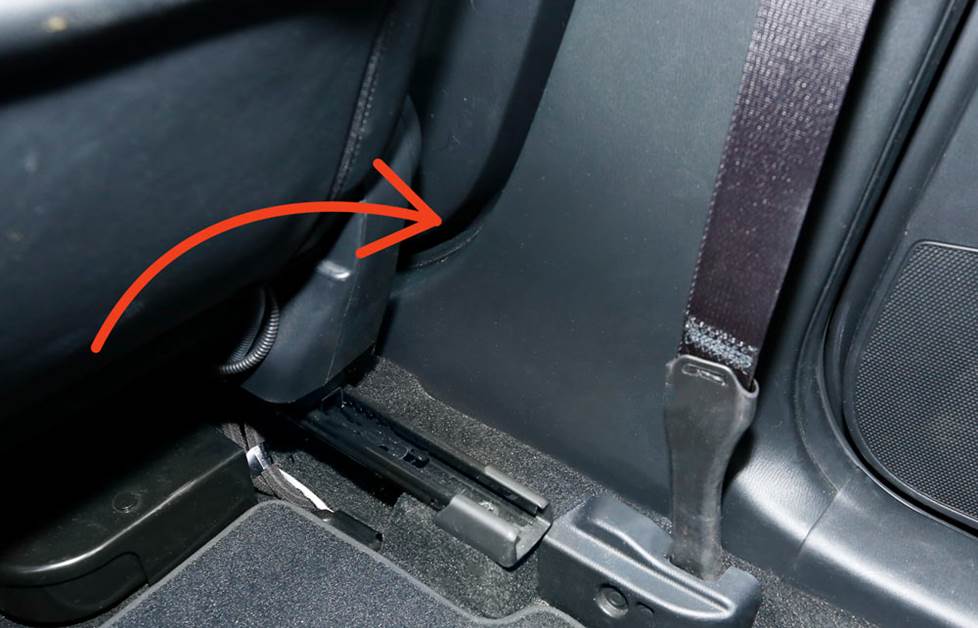
Removing the pillar trimpanel
Remove the seat belt if present. Remove screw covers, screws, and plastic retaining clips if present. Pry up the edges of the panel to remove it.
Removing the kickpanel
Look for screws and pry-out retaining clips to remove. Pry out the edges of the panel to release and remove it.
Routing wire behind the dash
When routing wire behind or under the dash, always secure it with plastic wire ties. Be sure that the wire doesn't interfere with any moving parts to ensure safe operation of the vehicle.
How to install the amplifier
With that background stuff covered, it's time to get to work. Gather up your gear and tools, maybe a friend and a soda, and give yourself plenty of time.
Step 1 — Disconnect the battery
Set the parking brake and disconnect the negative terminal from your battery to prevent any electrical shorts or shocks.
Step 2 — Mount the amplifier
Mount your amplifier in the location you've chosen.
Step 3 — Install the power wire
The power wire from your amp wiring kit (usually 16-20 feet in length) needs to run from the battery, through your car's firewall, through the car's body to the amp. Find an unused grommet in the firewall or one that already has wires or cables passing through it and that has enough room for the power wire to fit through too.
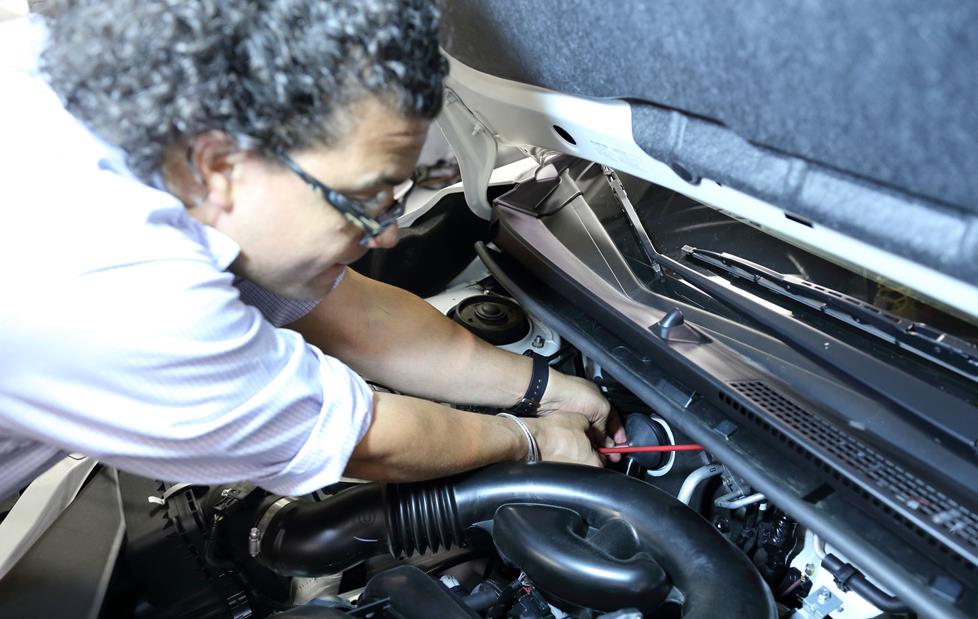
Route the power wire from your amp wiring kit through a hole in your vehicle's firewall, using a grommet or bushing to prevent the insulation from scraping against metal.
If you can't find an existing grommet, you'll have to drill a hole through the firewall. Make sure you don't drill into any electrical or gas lines — check both sides of the firewall. Use a grommet to protect your wire from fraying and shorting as it passes through the hole.
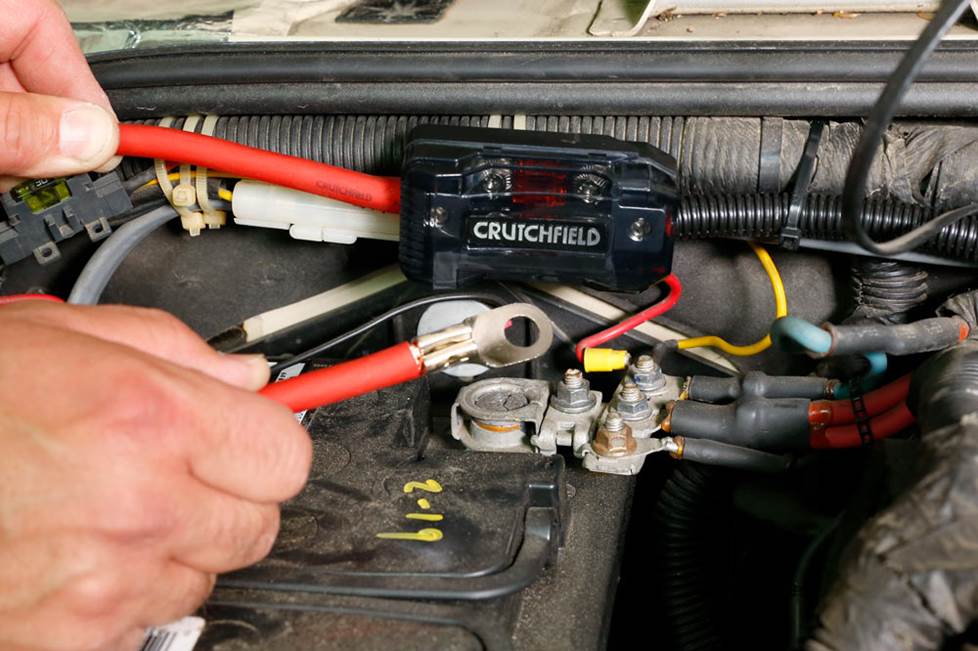
Fuse installed on power wire, and secured in engine compartment near the battery.
Step 4 — Install the fuse holder
The power wire from your amp wiring kit may have a fuse holder installed. If so, go to Step 5. If not, find a good spot close to your battery to place your fuse-holder (included in the kit) — less than 6" from the battery is best. Be aware: even after a fuse blows, the short stretch of cable between the battery and the fuse holder will still be live and a potential fire hazard in the event of an accident. Anchor the fuse holder to a suitable spot with a screw or cable tie, so it won't hang loose or bounce around.
Cut a short piece off the end of the power wire (to cover the distance from the battery to the fuse holder location), and strip the insulation off both ends with a wire stripper. Crimp the terminal ring (included in the kit) onto one end of the short piece of wire, and attach the fuse holder onto the other end. Strip the insulation off the end of the power wire that leads into the passenger compartment, and connect it to the other end of the fuse holder.
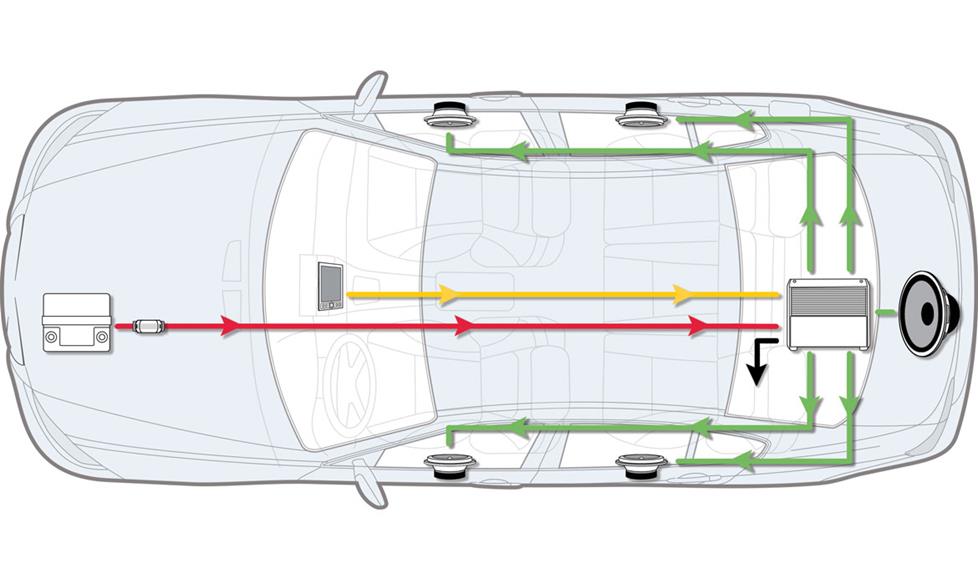
Multi-amp installations
When powering multiple amplifiers, you run a single heavy-gauge power cable from your battery to a distribution block, and then connect a lighter-gauge cable from the block to each amplifier. This arrangement minimizes potential noise problems and keeps your installation looking neat. Make sure the main power cable is thick enough that it can handle the total current draw of all the amplifiers.
Check out our amplifier wiring diagram to see how the wiring gets connected in a typical 2-amp system.
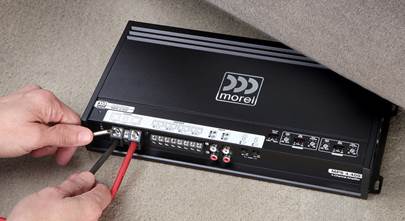
Step 5 — Connect the power wire
Attach the power cable to the positive battery terminal (not directly to the battery post itself). For top-mounted battery posts, the most common way to do this is to crimp a ring terminal onto the end of the power cable (many cables in wiring kits come with it already attached). Remove the battery terminal's nut, slip the power cable's ring over the bolt that secures the battery terminal to the battery post, and replace the nut. For GM vehicles with a side-mount post, we offer terminal adapters that work nicely.
A wire loom provides added protection for your wire against the high heat inside the engine compartment. If your kit includes a wire loom, thread it over the power cable until it reaches the firewall and cut to fit. Thread another piece over the short power wire running from the fuse holder to the battery.
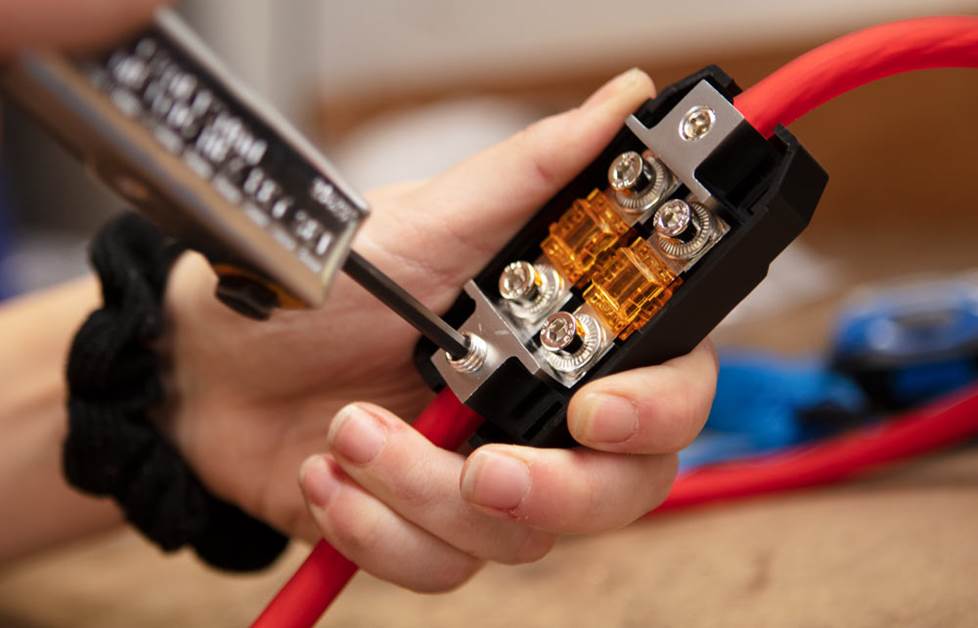
Step 6 — Ground wire: the most important connection of all
As near to the amplifier's location as possible, find a bolt to your vehicle's metal frame to use for ground. If you can't find a convenient ground screw or bolt, drill a hole for one — be careful not to drill into any wiring, the gas tank, or a gas or brake line. Crimp a ring terminal (usually included with the amp kit) to the short piece of ground cable (also in the kit).
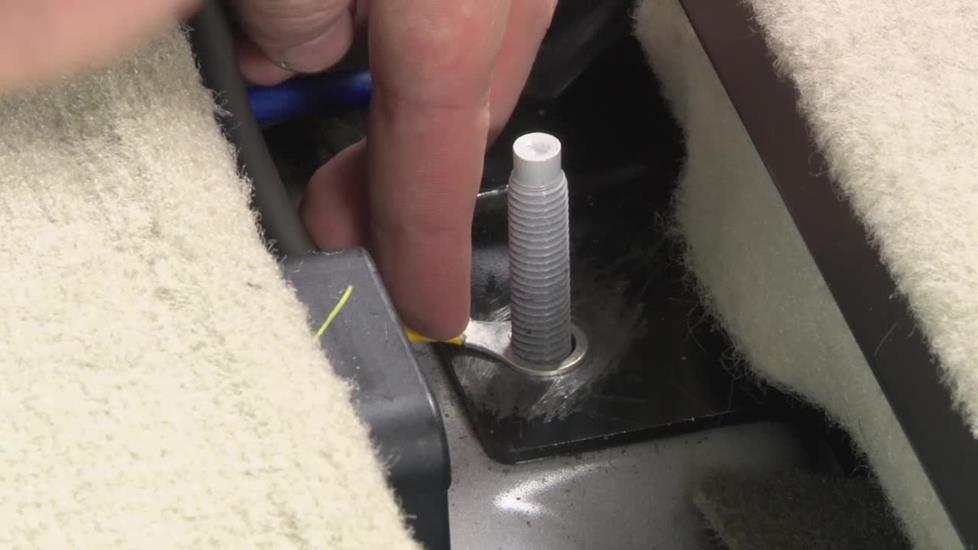 Scrape away any paint and clean the bolt location thoroughly, and then bolt the terminal tightly to the vehicle's metal chassis so the ground connection will be bare metal to bare metal. Use a lock washer, a star washer, extra screws, and any other technique or device that'll keep this connection tight, clean, and electrically conducting. Many people even coat the final connection with silicone caulk to prevent corrosion.
Improper or loose grounding is the #1 cause of amplifier problems.
Step 7 — Connect the remote turn-on wire
The turn-on wire (also called the remote wire) is located behind the stereo. On aftermarket stereos, it's usually a blue and white wire. The remote wire will "tell" your amplifier to turn on whenever the stereo is powered up (usually, whenever the vehicle is turned on). You'll have to remove the stereo to get to this wire. For step-by-step instructions on removing your vehicle's radio, see your vehicle-specific Crutchfield MasterSheet™, or read our Car stereo installation guide.
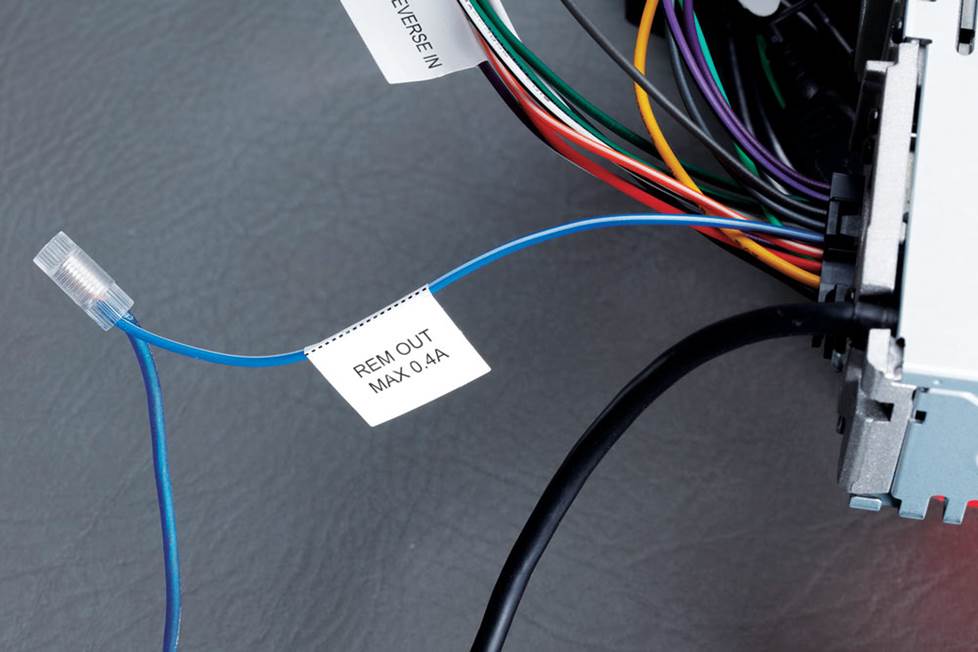
Locate the remote turn-on lead behind your radio (usually a blue and white wire), and connect the turn-on lead from your amplifier wiring kit to it.
Strip the insulation off a small section of this wire coming from the radio and the turn-on lead that came with your wiring kit and connect them together via solder, a crimp connector, or a Posi-Connector.
The turn-on signal is +12 volts DC. If, like a factory radio, your radio doesn't have a remote turn-on output, then you can get the turn-on signal from your vehicle's fuse box. Because of its low current demand, you can connect your turn-on lead to almost any fused output terminal, like the one for the radio itself for instance, as long as it only powers up when the vehicle's on. Using an Add A Fuse connector plus a 2A to 10A fuse will make this connection easier.
You'll need to route the turn-on lead to your amplifier through the car's body — it's often easiest to route the turn-on wire with the RCA cables (next step) but you can also route it with the power wire after it passes through the firewall. The power and RCA cables should run on opposite sides of the vehicle, to reduce noise — but it won't matter for the turn-on lead's low current.
Step 8 — Making the signal connections
If your in-dash receiver has preamp (RCA) outputs, connect your RCA patch cables to them. Route the patch cables to the opposite side of the vehicle from the power cable. It's important to separate the patch cables from the power wires as much as possible to avoid potential noise problems. Now you can partially re-install the radio in the dash. Avoid completely re-installing it if you can, in case you need to fix a problem later.
If you're using a factory radio with no RCA outputs, you can get your amplifier's input signals from the factory speaker wiring. The speakers will be getting their signal from the new amplifier — which leaves the radio's outputs available to use for the amp's inputs. There are two ways to do this: get a line output converter (LOC) that'll adjust the speaker-level signal for your amp's input, or get an amplifier with speaker-level inputs. You cut the factory speaker wires behind the radio, and connect the wires coming from the radio to your LOC or amp's inputs.
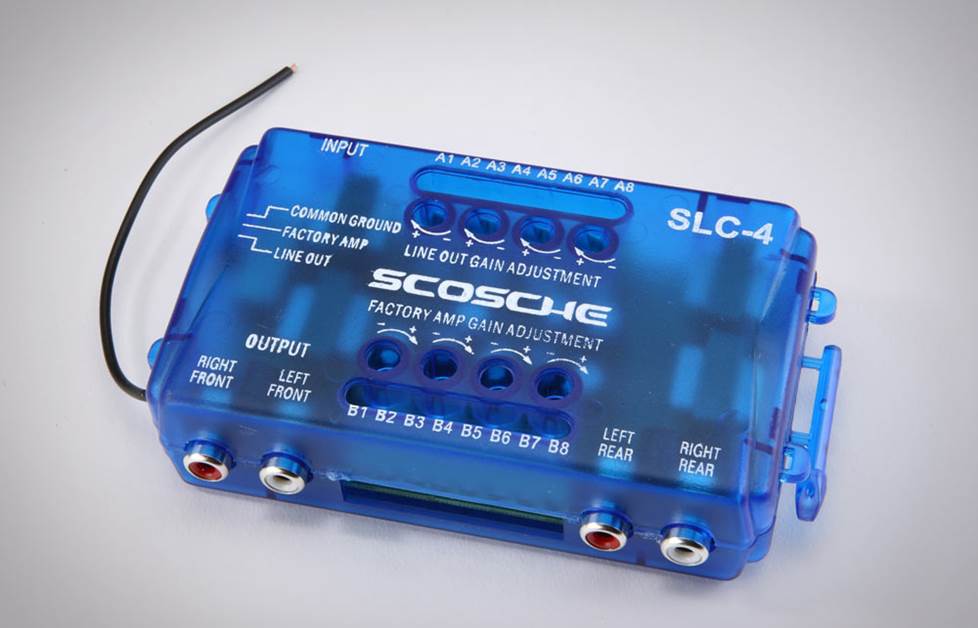
Scosche SLC4 Line Output Converter
Learn more about line output converters.
Step 9 — Speaker wiring
Now you have to provide a way for the music to get from your new amp to the speakers. The best way to do that is to run a new speaker wire from each amplifier output to each speaker. Use 14- or 16-gauge wire for speakers, 12- or 14-gauge for subwoofers. Speaker-level signals are not very prone to picking up interference, so it's okay to run your speaker wires near power cables.
Running wires is all about finding the best path. Here, we're running a bundle of speaker wires across the backseat to the amp in the trunk.
You'll have to run each wire for your door speakers through the rubber gasket or boot around the hinge, to protect the wires from the weather or from getting pinched in the door. There may be a Molex plug or a similar obstruction blocking the way, but you can usually find a place to drill a hole through it big enough to fit your wire through. Disconnect or cut the factory speaker wires and connect the new wires directly to each speaker terminal.
It is important that you keep the polarity of your speaker wiring straight. This means that each positive terminal of the amp connects to a positive terminal of a speaker — and the same goes for the negative terminals. This ensures that your speakers will operate in mechanical phase — all the speaker cones moving the same direction with the same kind of signal — and will sound balanced when playing together. The positive and negative terminals of each speaker should be labeled, but if not, the positive terminal will usually be wider than the negative terminal.
Use your factory speaker wiring
Another and much more convenient way to send the powered signal from the amp to your speakers is to run the speaker wires to the harness that’s behind your receiver, where all your car’s speaker connections are accessible in one place. You cut each speaker wire from the receiver's harness and reconnect it to a speaker wire coming from the amp. Then, the signal can flow from the amp to the speakers by way of the vehicle's original factory wiring. This technique will work fine in systems with up to 75 watts RMS of power per channel — but for more powerful systems it would be better to run new speaker wire directly from the amp to each speaker.
Check out How to connect an amplifier to a factory stereo to see how this can be done.
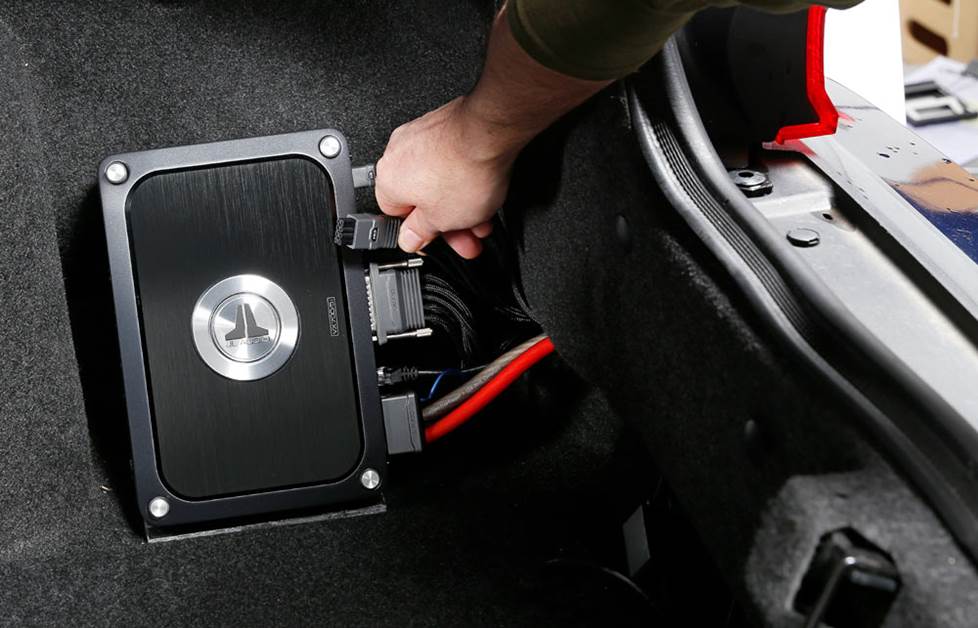
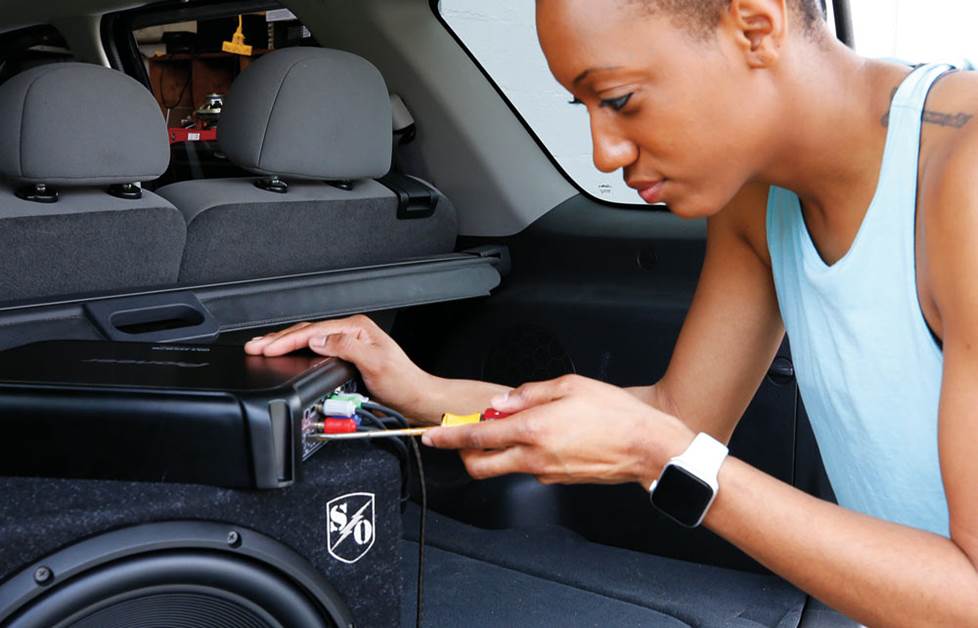
Step 10 — Connect all the wires
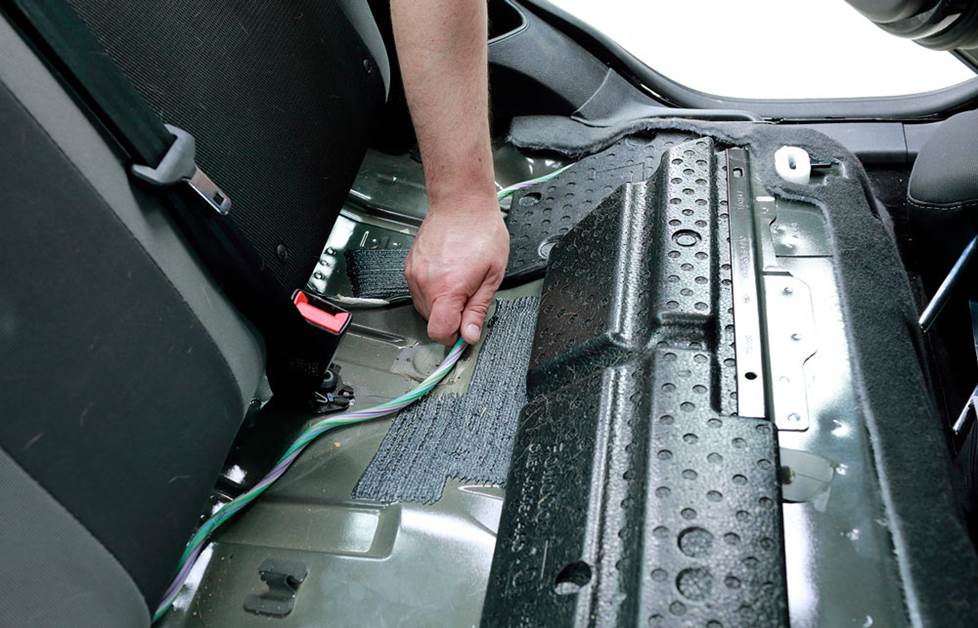
Neatly drape or trim each wire and connect it to the amp. Make gentle curves with the wires, not sharp bends that could pinch. Many people cut small slits in their vehicle's carpeting and run their wires underneath, for stealthy installations that look factory-neat. A wiring snake comes in handy for this. Tape your wires to the snake, fish it under and through to where you want your wires to go, and pull them on through.
RCA cables routed through slits in the vehicle's carpet, and connected to the amplifier's signal inputs
Step 11 — Turning it on
Check all of your wiring, from the battery and receiver to the amp and speakers, making sure every connection is tight and secure with no stray wire strands laying out that could cause a short circuit. Especially, check that the ground connection is tight and secure. Set all the amplifier's gains to minimum, and turn off all the filters and any bass boost or EQ it may have. See that the main fuse is properly installed in its holder. Then, reconnect your car's negative battery cable.
Turn on your car, then turn on the radio. Verify that the amplifier powered up (there'll probably be an indicator light on it somewhere). Play some music and turn the volume up just loud enough to hear. Now verify that sound is coming from each speaker and/or subwoofer in your system. If everything sounds right, you can finish re-installing the stereo and all your vehicle's paneling, and then move ahead to step 12.
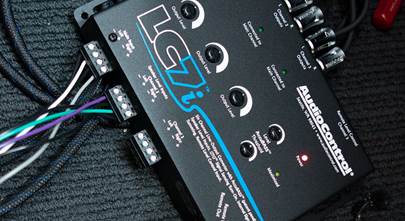
Step 12 — Setting the amp's gain
Setting your amplifier's gain, or input sensitivity, matches the amp's input level with the receiver's output level, resulting in maximum distortion-free music and minimum background noise.
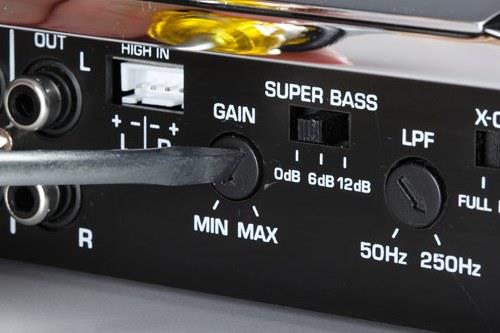
Setting the amp's gain
For a detailed explanation of how to do this, read our article about setting the gains on a 4-channel amplifier. If you’re installing an amp for a subwoofer, read How to tune your subs. The approach is the same, we’ve just tailored the explanation to each situation.
Enjoy your new system.
When things go wrong
Usually, once you've installed your amp, you can turn on the stereo and immediately enjoy all the extra power and detail in your music. But sometimes things just don't work like we expect them to right from the start. If this happens to you, don't get stressed out too much. Read our article about troubleshooting your amp installation for help with finding and solving the most common problems.
Give us a call — we'll help you outfit your system
Your best first step is to call Crutchfield and talk to an Advisor about what your amplifier will need. They'll make sure you get all the necessary hardware and accessories for a successful and satisfying installation. And remember, anything you buy from Crutchfield comes with free lifetime tech support. Just click on "Contact Us" at the top of this page for the toll-free number and other methods of contacting us.


_mobile.jpg)


Steve from Worc
Posted on 5/23/2026
Hi , What if your vehicle does not have a ignition key accessory on switch setting? How can the amp be triggered to come on please?
Raymond Porras from Greeley, Colorado
Posted on 8/11/2025
I own a 2021 Silverado 1500 RST . What all do I need to install an amp and 12" sub box ?
Buck Pomerantz from Crutchfield
on 8/12/2025
Kaung from Myanmar
Posted on 8/8/2025
How to connect 3500watt 2ohms 4 channel to 10 inch 1500watt woofer?
Buck Pomerantz from Crutchfield
on 8/11/2025
Doug from Viper
Posted on 6/20/2025
Trying to find out were the amp is on a 2014 high country Silverado
Buck Pomerantz from Crutchfield
on 6/23/2025
Anthony from Tuscumbia
Posted on 3/6/2025
Hello my amp comes on when I start my car, then it cuts off. What have I done wrong??? Plzs help!
Buck Pomerantz from Crutchfield
on 3/7/2025
Leonard Gomillion
Posted on 7/13/2024
Thank You.
David from Cádiz, Spain
Posted on 7/31/2023
Hello Buck, I just wanted to thank you for your work and these masterpieces of articles you write, literally dissolved my insecurities and resolved my questions. Altough I don't even have the opportunity to hire a Crutchfield professional to install the audio system for me, I think that most of the job, which comes from experience and knowledge, are from you and your YouTube channel.
Mike
Posted on 6/2/2023
I have 1 Amp already under my passenger seat and I want to add a second amp to power a subwoofer in the trunk. Where will be the best place to mount/wire up distribution block.
SALVATORE
Posted on 3/5/2023
Can a small powered sub (specifically the jbl basspro nano) be wired directly to an auxiliary fuse in the fuse box, or does it need to go right to the battery?
Buck Pomerantz from Crutchfield
on 3/6/2023
Adam
Posted on 3/5/2023
When running power cable, speaker wire/RCA'S and remote wire to a built in amplifier for 10" woofer which wires have to run on separate sides of the vehicle from one another so don't get any buzzing or feedback in general? Thanks for any help.
Buck Pomerantz from Crutchfield
on 3/6/2023