Full-range speakers installation guide

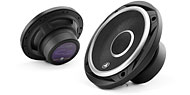
This installation guide offers examples of the basic tools and techniques you'll need to replace your car's factory speakers with aftermarket full-range car speakers. The installation of your speakers will depend upon the make and body style of your vehicle, as well as the equipment purchased.
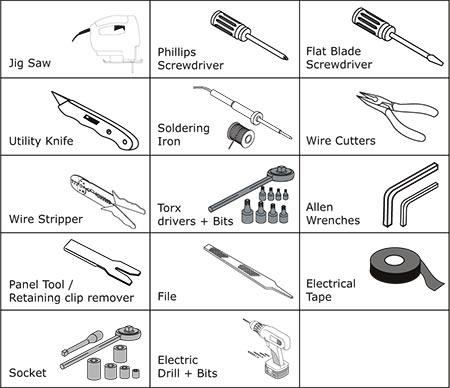
The tools you'll need
You'll need some basic tools to install your new speakers and connect them to your system. You probably won't need all of these tools for your installation, but it's good to have them handy before you start any car audio installation.
You can also download a pdf of the Full-Range Speakers Installation Guide. Note: To view this file, you will need the Adobe Acrobat PDF reader (free download).
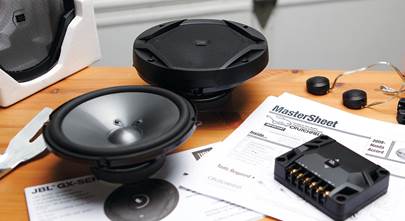
For more detailed instructions on how to install new speakers in your car, there's the Crutchfield MasterSheet™, available for a vast array of cars and trucks and included free with your car stereo or speaker order. This detailed, step-by-step guide will walk you through the specific procedures for your vehicle.
Installing Speakers: Easy and Effective
Installing new speakers is the single most cost-effective improvement you can make to your vehicle's audio/video system. Not only are aftermarket speakers relatively inexpensive, they are usually not difficult to install, thanks to the free brackets, wiring harnesses, and detailed instructions Crutchfield will send you when you buy your speakers from us (available for most vehicles). Of course, each car is different, but let's take a look at some of the more common speaker mounting locations, and what you might expect when installing speakers there.
There are two types of speaker installations:
- Easy Fit
Easy Fit speakers fit your factory speaker openings and use factory speaker grilles and brackets.
An Easy Fit speaker will fit directly into the existing factory speaker opening.
Occasionally, you will need to use a special set of brackets or adapters to install Easy Fit speakers in your vehicle, or you may need to drill new mounting holes. Crutchfield provides these brackets and adapters free with your speaker purchase.
Easy Fit speakers will sometimes need a bracket to fit properly into the existing factory opening. - Modify Fit
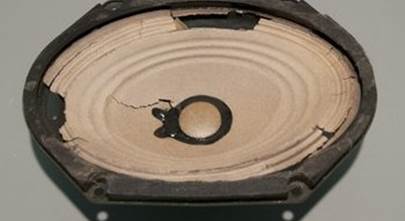
Speakers labelled as Modify Fit require modifications such as drilling new screw holes, or cutting or filing metal, plastic, or pressboard. These installations are more complicated and require more tools and time.
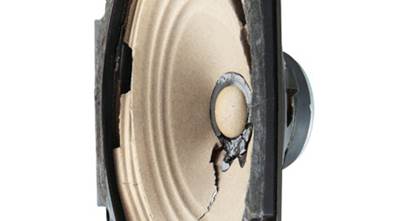
Modify Fit speakers may require minor additional steps such as filing a plastic speaker basket to allow for a larger magnet structure (left). In rare cases, a modify fit speaker may require you to cut a new speaker opening (right).
Replacing Dash Speakers
Although they can occasionally be tough to reach, most dash speakers are small and relatively easy to replace. In some vehicles, all you need to do is remove the grilles, which are usually held down by screws or friction fittings. If your grilles use friction fittings (you'll know because there won't be any screws evident), carefully pry them up from the edges. To avoid marring or cracking the surrounding area, put a broad, flat item, like a panel tool or putty knife, underneath whatever you're using to pry up the grille.
Other vehicles, however, require that you remove the entire dashboard panel to access the connections. Fortunately, most dash panels are held in place by just a few screws. Once you've removed them, it's just a matter of carefully pulling off the panel, making sure you don't catch any wires or ducts in the process. You'll find an offset screwdriver or stubby Philips screwdriver useful for getting to the screws near the windshield.
 Most dash speakers are small and relatively easy to replace. |
Remove the old speakers and make sure to note the polarity of each terminal. The speaker's positive terminal is the larger of the two, and is usually marked with a "+" or a colored dot. If your speakers came with a Crutchfield wiring harness, use it to connect to your factory wiring. If not, you'll want to solder the connections from your new speakers to the wiring in the vehicle, or use crimp connectors. Don't secure the wires with electrical tape, because the temperature extremes in a car will cause it to deteriorate. It's also a good idea to test the speakers before you put the dash back in place.
Replacing Door Speakers
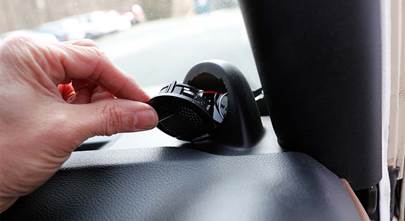
Doors are the most common location for car speakers and, in many cars, the speakers found there are fairly easy to replace. Most newer cars have a notch at the bottom of the speaker grille. Simply insert a screwdriver into this slot, pop out the grille, and unmount the factory speaker. In some cars, you may only need to remove a few screws to get the grille out of the way.
 Removing a speaker grille from the door. |
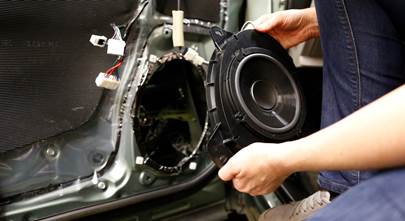
 Once you have removed the grille, most factory door speakers can be removed with a Phillips screwdriver. |
In still others, though, you'll have to remove the entire door panel to get the factory speaker out. Your Crutchfield MasterSheet™ will walk you through the specific procedure for your vehicle, but it's generally a pretty straightforward process.
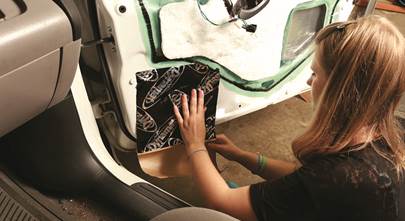
With some cars, you'll need to start by removing the window crank handles. The handles might be secured with a screw at the pivot point — usually hidden by a piece of snap-on trim — while others are held in place with a spring clip around the base. Crutchfield carries an inexpensive tool to help remove this clip, but it can be done with a small flat-blade screwdriver (use a shop rag to prevent scratching the crank). Just depress the surrounding door panel, look behind the window crank, and rotate the handle until you can see the ends of the spring clip. Then, just gently push it off with the screwdriver or tool. The clip will pop off, so keep a close eye on it. After removing the crank, take off the armrest (usually held on by a few screws), and the trim that fits around the handle. The only thing holding the door at this point should be the friction fittings around the edge of the panel and a few more screws.
With the screws removed, start at a bottom corner and pull the panel corner straight out. Use a panel tool around the fittings to pry out the panel. Try not to pull too hard, because you don't want to break the friction clips. Once a corner is loose, work across the bottom and up both sides. The panel should now be hanging by the trim that hangs off of the window well. Lift straight up and it should come free.
Rear deck speakers
Installing rear deck speakers presents many of the same challenges as door speakers. In many cases, the grilles on the rear deck can be easily pried up or removed by unscrewing them. Other times, they can be removed from underneath, via the trunk.
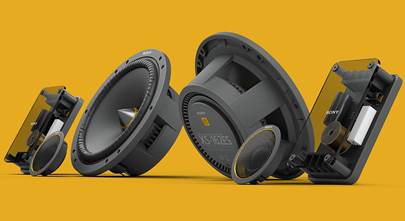
 |
 A look at a typical rear deck speaker installation. |
In some cars, however, the entire rear deck panel must be removed to access the speakers. Often, this means removing the rear seat to access the deck panel. Some seats are bolted in place, while others pop in and out. Either way, this is usually not a difficult process, but it can be time-consuming. With the seat out, you should be able to pry up the rear deck and work with the speaker openings in the same fashion as door or dash mounting locations.


Devon Whitmire from Travelers Rest
Posted on 2/8/2020
What role exactly do rear center speakers play in a car?
Alexander H. from Crutchfield
on 2/10/2020
Alexander Hrabe from Crutchfield
Posted on 8/11/2017
Barry, you'll find this info in our vehicle-specific instructions free with your speaker purchase. You can also purchase them separately for just $10. If you bought speakers from us but didn't receive your MasterSheet, be sure to give us a call.
barry from vic har.
Posted on 8/10/2017
how do you remove the dash speakers in a 1988 corvette
Alexander Hrabe from Crutchfield
Posted on 7/3/2017
Daniel, your best bet will be to try out both orientations before you finish your installation and test out what sound (if there's a difference) suits you best.
Daniel Vigneau from Wilmington
Posted on 7/2/2017
When installing full range speakers in the rear deck, does orientation matter? When right side up, the mid range and tweeter are in the same location on both speakers but I almost feel like they should be opposite each other. So I feel like I should turn one around and install it "upside down". Thoughts?
Alexander Hrabe from Crutchfield
Posted on 4/27/2017
Tom, I've passed your question along to our advisors for the best answer. Someone will contact you soon to help you make the best choice for your needs.
Tom WELBOURNE from Trussville
Posted on 4/25/2017
I have a 1986 GMC pickup that I bought brand new. I am in the finishing stage of restoration and building a console for the sound system I will be installing. I have been looking at the GPS receivers that you guys have and I think I will be ordering either the blaupunkt Phil. 845 or the San Antonio 640 or the boss bv960nv. It would be very helpful if you guys would give the dimensions of those units for it would help me in design of the console. I will be ordering the unit on the first on the month, for I am on a fixed income. And tell me which one you guys would pick. Thank y"all.
Alexander Hrabe from Crutchfield
Posted on 1/6/2016
Austin, I spoke with our Tech Department, and according to the installation information we have, you should be able to remove either speaker (woofer or tweeter) and still have the other play.
Austin Roy from Ponchatoula
Posted on 1/5/2016
This is great, however, in my 2006 nissan titan with no upgraded factory system has dash tweeters that are connected to the front door speakers. As soon as I remove it the signal to the woofer is instantly cut off. How do I remove these tweeters and use just the woofer by the door (I just need all the signals to go through that wire).
Alexander Hrabe from Crutchfield
Posted on 12/24/2015
Bryce, replacing the rear deck speakers in your Malibu is doable but it involves quite a lot of steps. If you purchase your speakers from Crutchfield, we'll include our vehicle-specific instructions free with the order. You can also purchase them separately for just $10.