


2010-2013 Ford Transit Connect
How to upgrade the stereo system in your Transit Connect


In brief: This Crutchfield Research Garage article gives you an overview of your Transit Connect's stock stereo system and your aftermarket upgrade options. We'll tell you all about:
- The factory stereo system
- Removing the factory radio
- Removing the factory speakers
- Adding more bass
- Other options for your Transit Connect
Then, use our vehicle selector to find the gear that will fit your van.
Overview of the Ford Transit Connect
The Ford Transit Connect is a handy van to have if you need to have a van. Smaller and nimbler than traditional vans, yet taller and arguably cooler than minivans, the Transit Connect made its U.S. debut in 2010 and was an immediate hit.
Gas was insanely expensive back then, but people always need to haul things, so a van that actually achieved decent fuel mileage was exactly right for the times. The fact that the Transit Connect was a well-sorted, thoroughly decent vehicle was kind of a bonus. As a result, the first-gen TC is still a popular choice for everyone from sub-contractors to motocross riders to the mobility-challenged.
Whether you use your Transit Connect for work, play, or everyday; better sound can make a pleasant drive even better. The standard stereos are adequate, at best, and with as much room as the Transit Connect has inside, there's plenty of room for audio upgrades.
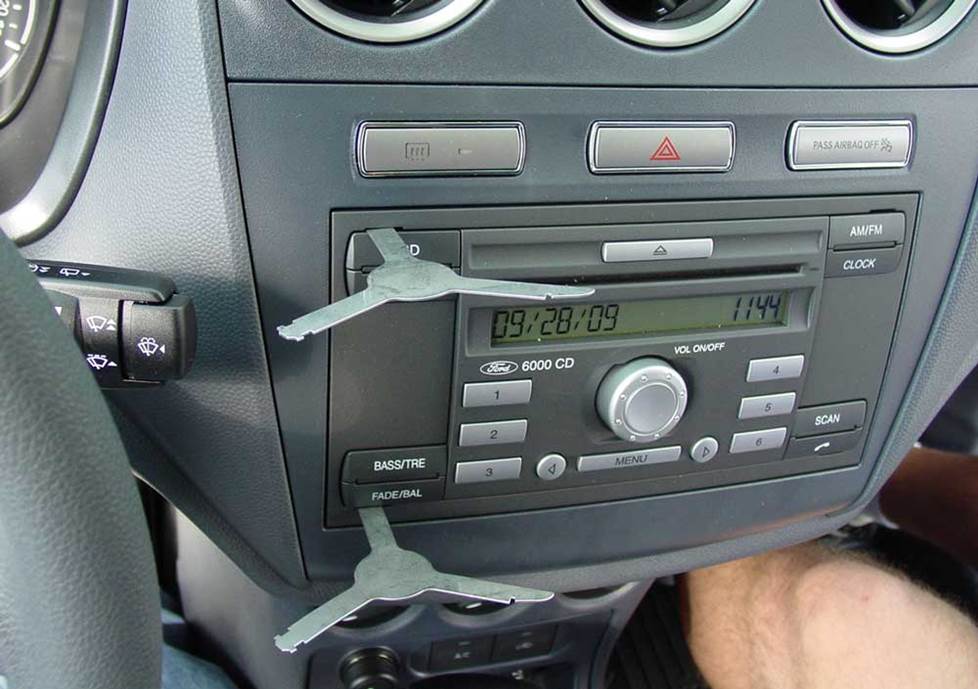
You'll need four of these DIN tools to remove the 2010-11 factory radio (Crutchfield Research Photo)
The factory stereo system
The Transit Connect was designed as a work truck first and foremost, so the factory radios were pretty basic. The 2010-11 models came with a standard AM/FM/CD receiver with two speakers, while the 2012-13 models offered an AM/FM/CD/MP3 receiver with your choice of two or four speakers. They're okay, but that's about all.
In any case, you'll lose the factory AUX input when you replace the radio, but you'll have no trouble finding an aftermarket stereo that has one. A wide variety of single-DIN (2" tall) or double-DIN (4" tall) stereos will fit, so you have plenty of options. You'll need a dash kit to install a new receiver in your Transit Connect, and it's available at a deep discount along with your Crutchfield purchase.
Ford also offered an optional in-dash computer in this Transit Connect, but we haven't seen one yet, so we can’t tell you much about what it does or how to replace it. If you have one, and especially if you've replaced one, please share your experiences in the Comments section below.
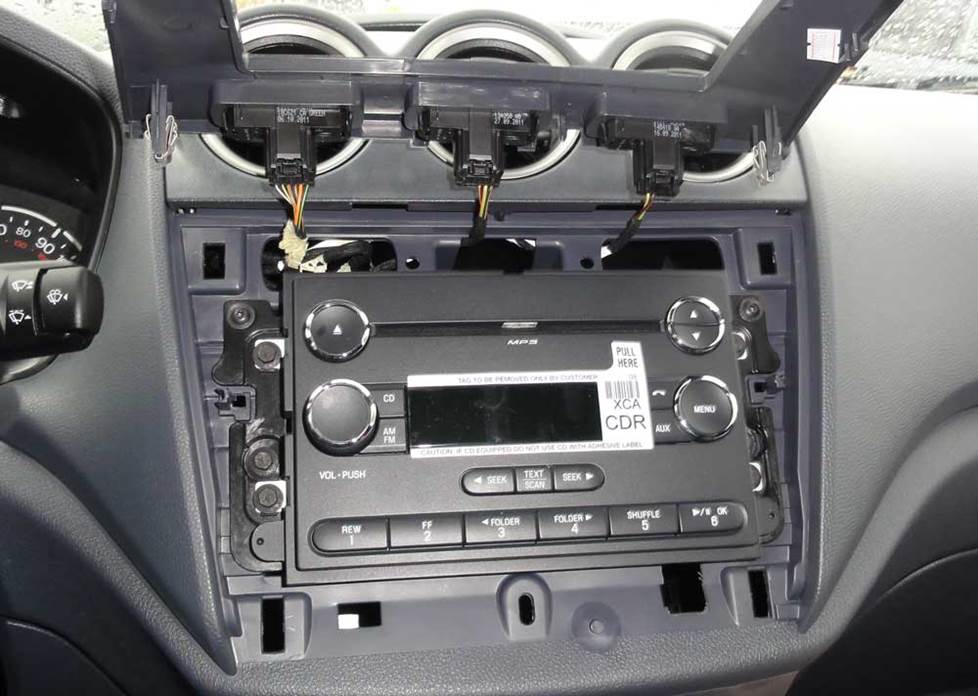
The 2012-13 model is a different deal, but it's still pretty easy to work with (Crutchfield Research Photo)
Removing the factory radio
The Transit Connect's stock radios vary a bit, but we can tell you how to remove either of them. Illustrated, step-by-step disassembly instructions can be found in the Crutchfield MasterSheet included with your order.
2010-11: The original radio was about as basic as you could find back then, but it did the job. Technology has moved on quite a bit, though, so it's time to add something new to your Transit Connect. Thankfully, the task is pretty easy.
To remove the old radio, take two pairs of DIN tools (included with your purchase), insert them into the holes on either side of the receiver until you hear a "click." Then, use the tools to loosen the radio and pull it out of the cavity.
You'll need a wiring harness adapter to connect your new stereo to the Transit Connect's factory wiring, and it's available at a nice discount with your Crutchfield purchase. 2011's wiring harness does not have a power antenna connection, so you'll need to connect the new stereo's power antenna wire directly to your vehicle's power antenna connection.
Tools needed: DIN tools (4)
Detailed stereo and speaker removal instructions

2012-13: Removing this radio is a little more involved, but not much. You'll start by using a panel tool to pry out the trim panel and release four retaining clips. Be careful when you're doing this, because you don't want to break the clips. They'll come out just fine, but patience is a virtue.
Next, disconnect the defroster and hazard switch harnesses, then place the trim panel on the top of the dash. You'll want to use a shop cloth or an old t-shirt to protect the dash from scratches.
With that out of the way, remove the four 7mm screws securing the receiver to the dash, disconnect the harnesses, and remove the receiver.
Note: When you're doing the job, remember that the airbag harness is located in this neighborhood. DO NOT disconnect the airbag harness.
Tools needed: Panel tool, 7mm socket, ratchet, and extension
Read our Car Stereo Buying Guide for shopping tips and advice.
Shop for car stereos that fit your Ford Transit Connect
Removing the factory speakers
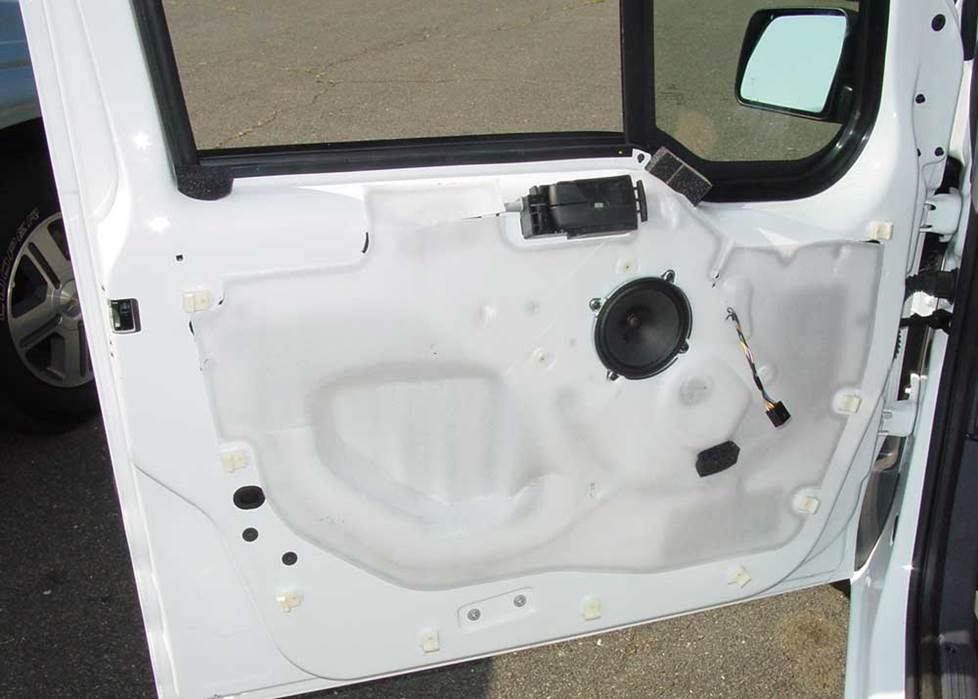
The front doors house 5-1/4" factory speakers (Crutchfield Research Photo)
Front door speakers
The Transit Connect's front doors changed a bit from 2010-2013, but 5-1/4" speakers remained a constant.
You'll start by using a pry tool to pry out the screw cover behind the door release handle. A hook tool will be really useful here. Remove the exposed Torx T-20 screw, then pull out the release handle trim. Next, pry off the door pull handle cover and remove two exposed Torx T-20 screws.
Now it's time to deal with the door panels. Remove three Phillips screws (or Torx T-20 screws) apiece from the panel, then lift up the top edge of the panel. Next you'll need to pry out one clip in the center of the panel (and the power mirror switch, if equipped) before disconnecting the harnesses and carefully removing the panel.
With the speakers exposed, all you need to do is remove the four Phillips screws securing the speaker to the door, disconnect the harness, and remove the old speaker. Your new 5-1/4" speaker will fit under the factory speaker grilles.
Tools needed: right-angle Phillips screwdriver, Torx T-20 driver, small flat blade screwdriver

The optional rear speakers have an awful lot of space to fill, so choose quality aftermarket models (Crutchfield Research Photo)
Rear roof speakers
The rear roof speakers, available on the 2012-13 models, are pretty easy to remove and replace.
To start, use a hook too to carefully pry off the speaker grille, then grab your Torx T-20 driver and remove the screws securing the grille to the factory bracket. Remove the grille ring, then remove four more Torx screws that secure the speaker to the grille.
Disconnect the harness, remove the old speaker, and get ready to install something that can do a much better job of filling the space with sound. A variety of 5-1/4" speakers will fit into the stock cavity, so you have plenty of options.
Read our Car Speakers Buying Guide for more information.
Shop for speakers that fit your Ford Transit Connect
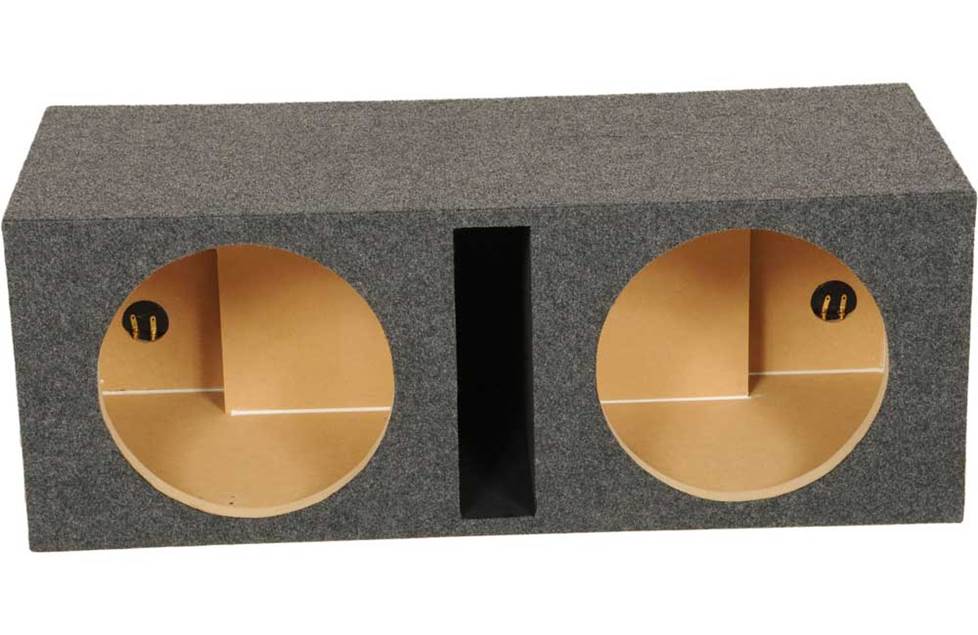
There's plenty of room for a subwoofer box like this SPL Boxes SB212SV
Bass in your Transit Connect
If you want to add a subwoofer (or two or four) to your Transit Connect cargo van, you have acres of space to work with. Okay, maybe not acres, but you get the idea. We haven't had an opportunity to crawl around a passenger van and measure things, but we imagine that there's still plenty of room for a sub enclosure behind that extra row of seats.
Learn more about building a bass system in our Car Subwoofer Buying Guide.
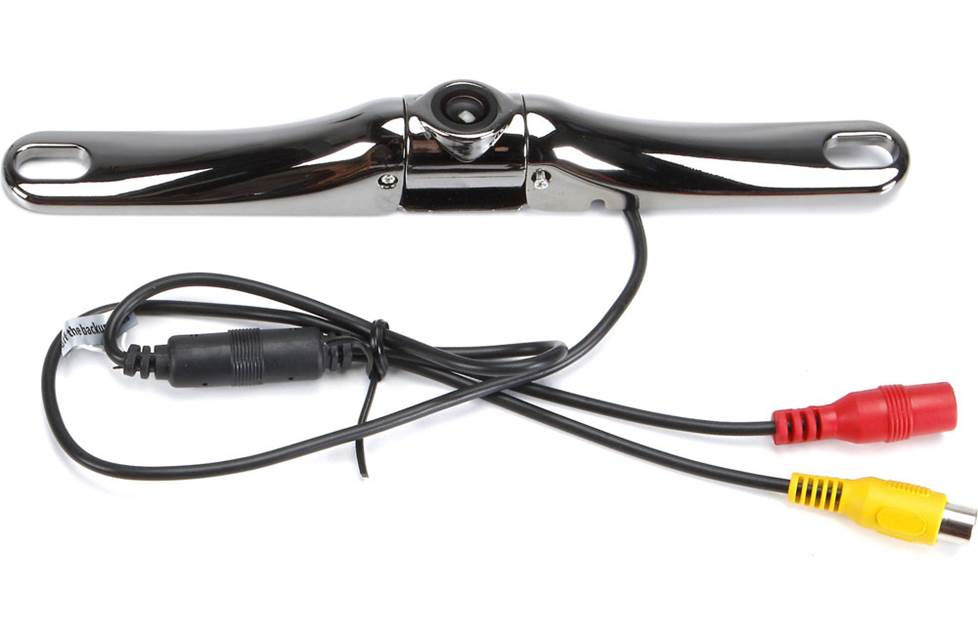
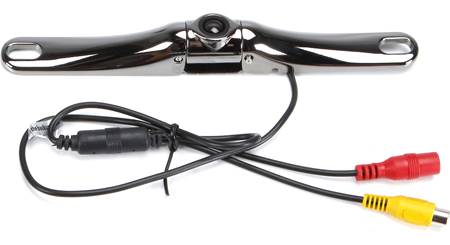
The Accele RVCLPMBS rear view camera is a great choice for your van
Other upgrade options for your Transit Connect
A discussion of "other options" for a van can get pretty broad in a hurry. Depending on what you're starting with and what you're trying to do, we could be talking about, well, almost anything. We'll stick to things you can actually buy at Crutchfield.
Add an amplifier for better sound
To further improve the sound quality, consider installing a 4-channel amplifier for your speakers. That will give you the best sound from your music and really fill up the van's cabin. You can power all four speakers or power the doors with two channels and use the other two to power your subwoofer. That's a great way to get the power you need without buying multiple amps. Learn more about adding amps to your system in our Car Amplifier Buying Guide.
Rear-view cameras
Visibility in the Transit Connect is better than you'd find in more traditional vans, but maneuvering in a crowded parking lot can still be challenging, especially with a cargo van. We offer rear-view cameras from Kenwood, Alpine, Sony, Pioneer, and more. Some are designed to work with same-brand DVD/nav receivers only, but others come with a composite video connector and will work with almost any video receiver. Rear-view cams can also work with a dash monitor or rear-view mirror monitor.
Noise damping
The Transit Connect is a smaller hauler, but it's still a van, and there are some acoustic challenges to deal with. Installing Dynamat in the doors when you're replacing the speakers can really reduce annoying road and wind noise. If you're all about sound, you might want to line the floors, as well.
You can also install a set of foam speaker baffles behind your new speakers. In addition to helping with performance, they'll also provide extra protection against moisture and dust.
Security
Installing a security system in your Transit Connect isn't easy (security systems rarely are), but it's less complicated than it could be. Our Crutchfield Advisors can help figure out what you need to get the job done, but we usually recommend taking your car and new gear to a professional installer when it comes to security systems.
Let's get started!
Ready to shop? Use our vehicle selector to find the gear that will fit your car or truck. If you have questions, give us a shout via phone, chat, or email
Comments (6)
Please share your thoughts below.


Patrick from DFW
Posted on 7/22/2023
Larry Roman, I know you expected a reply 6 years ago... I ran into the same issue. I bought a leased van that was a former parts delivery van, same as yours. I had to pop off the lower right then force the upper right off. I used a plastic pry tool and an excessive, uncomfortable amount of force. The bezel did not break surprisingly and the pry tool was smashing against the head unit.
Guy Anthony De Marco from Urbana
Posted on 8/14/2018
A correction of a minor error: There is a row of three T20 screws on the bottom edge of the door panel. It should say remove three screws from the left edge, right edge, and bottom of the panel. Then you can continue as directed to pull the door panel free from the clips and slide it up out of the window channel. Be careful, since there is thin plastic and a rubber glue run around the edges of the door moisture sealer and it is easy to either tear or pull the rubber glue away from the metal door.
Jon Paulette from Crutchfield
on 8/15/2018
Jon Paulette from Crutchfield
Posted on 1/25/2018
Aaron, When you enter your vehicle's info into our Outfit My Car tool, you'll see which speakers fit your van -- in terms of both depth and diameter. In terms of the amp situation, there are some possible solutions worth discussing, so give us a call or chat. Our advisors can help you find something that'll work.
Aaron from San Jose
Posted on 1/24/2018
I have the 2 speaker 2012 model.b How thick of a 5.25 speaker can I fit in there without it blocking the window. Mounting depth? Also is a work van, have little to no room for an external amp. With only 2 speakers, are there bridgeable head units to give the pair more juice? Can I do it with stock?
Jon Paulette from Crutchfield
Posted on 10/25/2017
Larry, Use a panel tool to pry out the trim panel and release four retaining clips. Be careful when you're doing this, because you don't want to break the clips. Complete instructions can be found in the Crutchfield MastertSheet.
Larry Roman from Valley City Oh
Posted on 10/24/2017
My 2012 Transit Connect does not have the 4 slots on the corners to insert the keys or other tool. This is a factory am/fm with no CD player. How do I go about prying the trim away?