2008-2014 Dodge Challenger
How to upgrade the stereo system in your Challenger


In brief: This Crutchfield Research Garage article gives you an overview of your Challenger's stock stereo system and your aftermarket upgrade options. We'll tell you all about:
- The factory stereo system
- Removing the factory radio
- Removing the factory speakers
- Adding more bass
- Other options for your Challenger
Then, use our vehicle selector to find the gear that will fit your car.
Overview of the Dodge Challenger
Everything comes back in style eventually, including old-school muscle. When Ford's retro-themed 2005 Mustang got off to a brilliantly successful start, Chrysler quickly got to work on its own retro rocket. The new Challenger emerged in 2008, and with original Challengers and 'Cudas going for big money at collector auctions, the enthusiastic reception from the Mopar muscle car community was no surprise.
Though the original cars will always be legendary, the new Challenger is bigger and better in almost every measurable way. It can travel quickly in a straight line, of course, but this one also turns and stops – two things that the old cars really didn't do well. Today's Dodge Challenger is a muscle car for grown-ups.
Sure, this powerful coupe is fun between stoplights, but it's also a comfortable long-distance cruiser with surprising amounts of room for people, stuff, and yes, great new stereo equipment.
Detailed stereo and speaker removal instructions

The factory stereo system
The Challenger has played host to several different stereo systems over the years. The base package was a 4-speaker system (later, six) with a single-disc AM/FM/Sirius/CD/MP3 receiver. The next step up was a 6-speaker (later, seven) Boston Acoustics package with an AM/FM/Sirius/CD/MP3 player and an amp mounted under the driver's dash. Optional packages added things like navigation systems, Bluetooth® connectivity, Sirius satellite radio, iPod® and USB connectivity, and digital music storage.
The Challenger's original premium package was a 13-speaker Kicker audio system with 6-CD changer and a subwoofer. Later on, an18-speaker Harman Kardon sound system replaced the Kicker gear at the top of the line. We haven't had a chance to research the Kicker or Harman Kardon systems yet, so the instructions below deal with the base and Boston Acoustics systems.
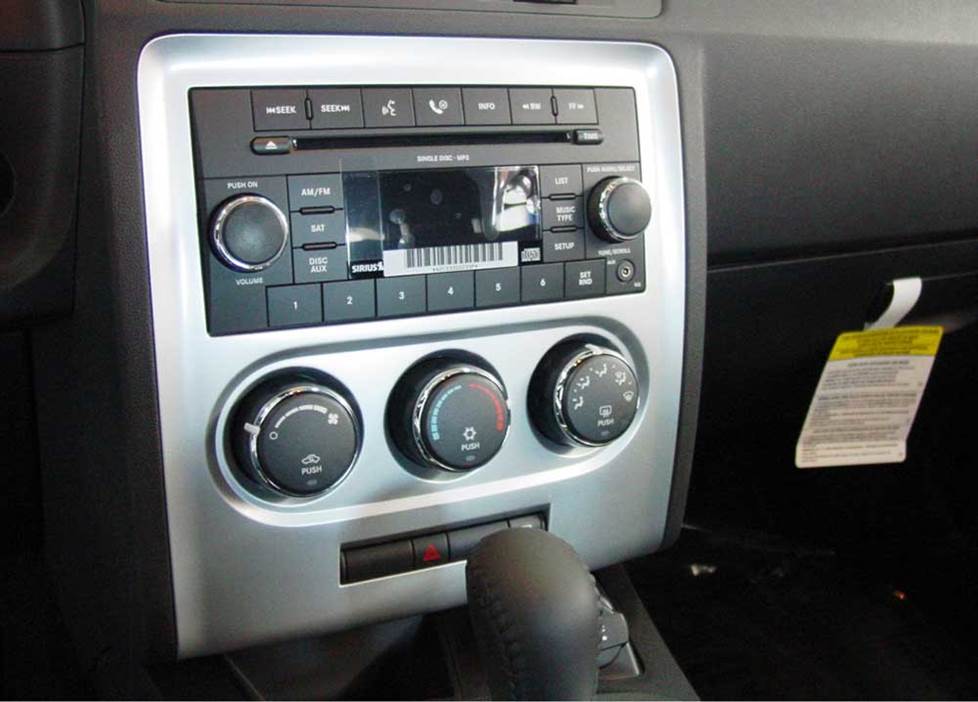
The Challenger's factory receiver (Crutchfield Research Photo)
If you have experience with those premium systems, we'd like to hear from you – and we imagine other Challenger owners would, too. When you have a moment, please share your installation tips and tricks in the Comments section below.
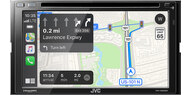
Before you start your project, note that if your 2008-2013 Challenger is equipped with factory-installed navigation, Sirius satellite radio capability, and/or hands-free cell phone interface, you'll lose those functions when you replace the factory radio. You can get them all back with the right aftermarket receiver, though.
The factory sound system also requires a special adapter for your new stereo system. Both the PAC C2R-CHY4 or RP4-CH11 will enable the new stereo to work with the Challenger's electronics. These adapters are pricey, but when you purchase your new stereo from Crutchfield, you'll save a healthy amount of money on the integration adapter. We recommend the RP4-CH11, because it has a built-in factory steering wheel audio control adapter.
Removing the factory radio
Removing the Challenger's stock receiver is reasonably easy. Replacing it can be a bit, er, challenging (sorry....), depending on the aftermarket receiver you choose.
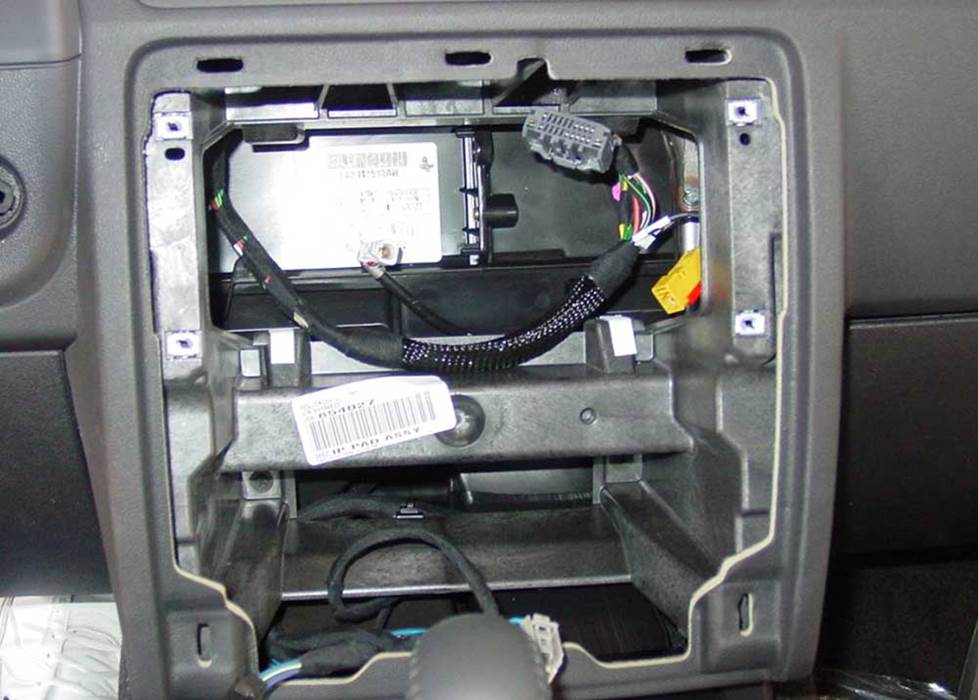
The Challenger's radio cavity (Crutchfield Research Photo)
To get the old one out, use a panel tool to pry the receiver trim panel out to release eight retaining clips, then disconnect the wiring harnesses and remove the trim panel. Next, remove four Phillips screws that secure the receiver to the dash, disconnect the harnesses and remove the receiver.
A single-DIN receiver will fit right in with the help of a mounting bracket that's included (at a deep discount) with your stereo purchase. Many shallow-mount double-DIN receivers will also fit with a mounting kit.
You'll need to do a bit of work before you can install a standard-depth double-DIN receiver, though. Due to the depth of the receiver cavity, you'll need to cut the brace in the sub-dash in order to create space for one of those receivers. This isn't difficult for an experienced installer, but for a beginner, it could be a bit much. If you're not 100% comfortable cutting into your car's dash assembly, it's best to leave this job to a car audio professional.
Tools needed: Panel tool, Phillips screwdriver
Read our Car Stereo Buying Guide for shopping tips and advice.
Shop for car stereos that fit your Dodge Challenger
Steering wheel audio controls
In most cases, it's reasonably easy to retain your car's steering wheel audio controls when you install a new stereo. When you enter your vehicle information, our database will choose the adapter you need to make your factory steering wheel controls work with a compatible aftermarket receiver.
Removing the factory speakers
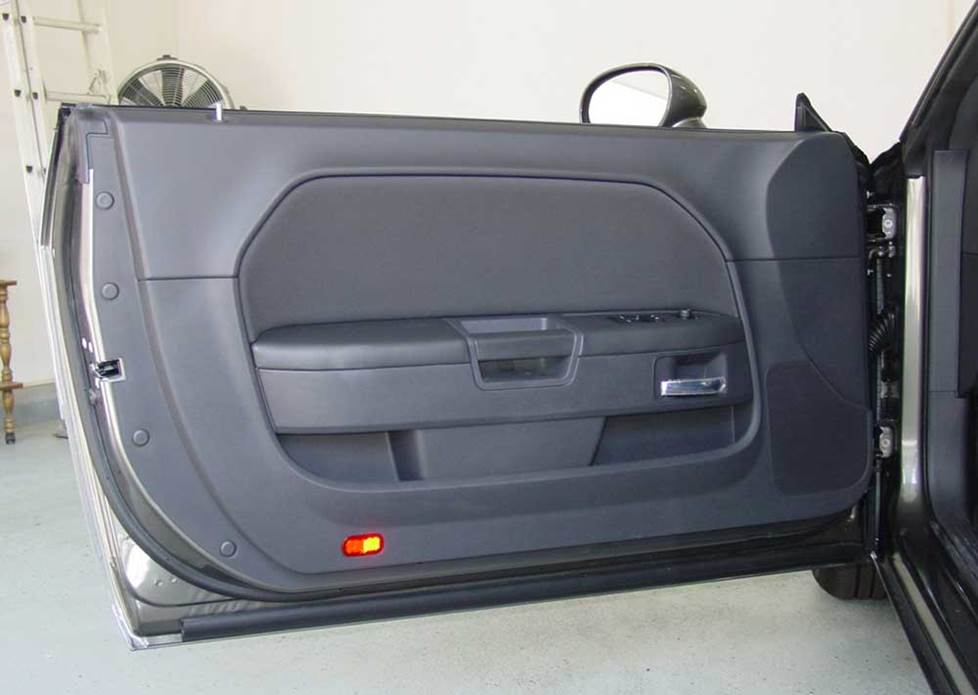
The Challenger's doors are reasonably easy to work with (Crutchfield Research Photo)
Removing the door speakers
Both the base and Boston Acoustics systems have 6"x9" speakers in the doors. The difference is in impedance, with the base models at 4 ohms and the Bostons at 2 ohms. The removal and replacement process is the same, however.
Step-by-step removal instructions can be found in the Crutchfield MasterSheet™ that's included free with your speaker purchase. This is not a fiendishly complex procedure, but it does involve multiple steps and a fair number of "fiddly bits."
Before you start, we suggest snagging a couple of small containers or sandwich bags that you'll use to store the various screws you'll be removing. A little organization now will save you some headaches later. It's also a good idea to reserve a clean, safe place to store the door panel while you're installing the speakers.
The grille sits very close to the speaker on this car, which creates some minor fit issues. You can choose from 5-1/4", 6-1/2", 6-3/4", or same-size 6"x9" speakers, but you'll find a much wider selection of 5-1/4" models. If mounting brackets are required for the installation, they're included free with your Crutchfield order.
Tools needed: Small flat blade screwdriver, Phillips screwdriver, panel tool, Torx T15 driver
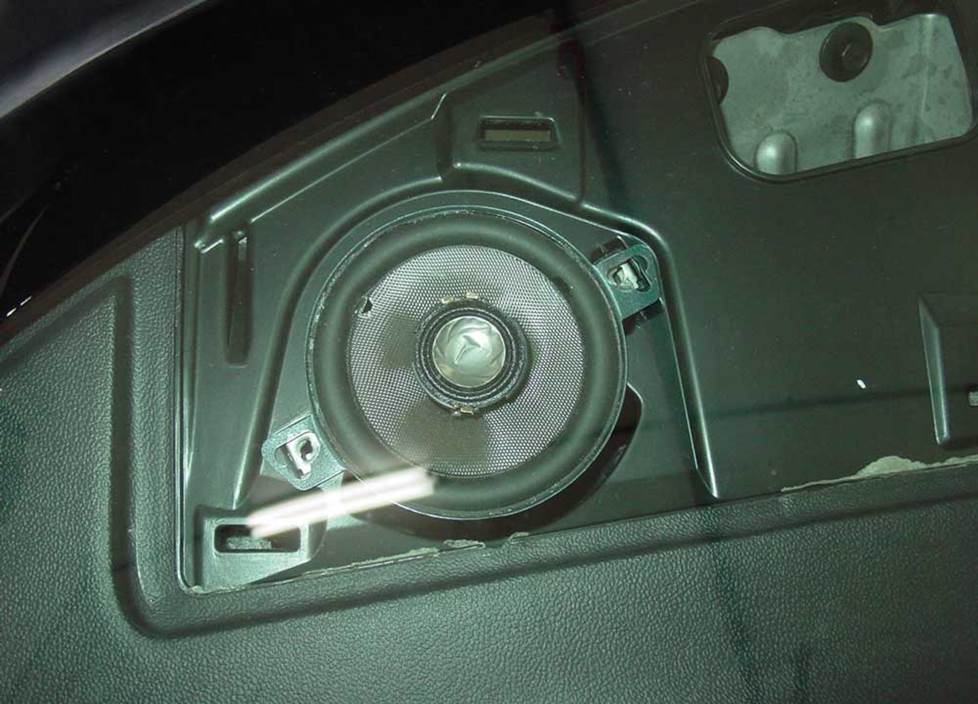
A great spot for a new tweeter (Crutchfield Research Photo)
Removing the dash speakers
Challengers equipped with premium systems feature speakers in the center and corners of the dash. Again, we haven't researched the Kicker or Harman Kardon systems, but we do have experience with the Boston Acoustics system.
To remove the 3-1/2" corner speaker start by prying up the grille panel to release the ten (!) clips that hold it in place. With the speaker exposed, you'll remove two Phillips screws that secure the speaker, then disconnect the harness and set the speaker aside. Direct replacements are not available, but if you're installing a component system, the dash corners are great spots for your tweeters.
The center dash speaker is the same size, and the removal process is exactly the same, too. If you have a base model and you're thinking about installing a speaker in this location, note that this location is not pre-wired from the factory. If you install a component system, you really won't need the center dash speaker to elevate the soundstage. If you like it, leave it. If you don't, just disconnect it.
Tools needed: Panel tool, Phillips screwdriver
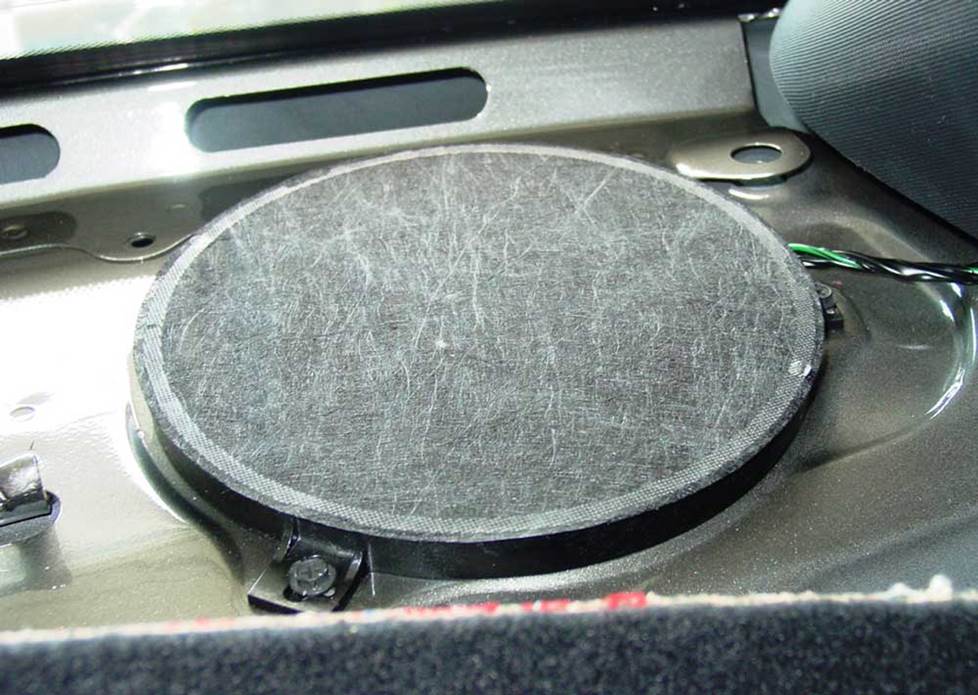
The Challenger's rear deck speakers (Crutchfield Research Photo)
Removing the rear deck speakers
In the Challenger's rear deck, you'll find a pair of 6-3/4" speakers, regardless of whether you have the base or the Boston Acoustics package. The difference, again, is the impedance, with the base models at 4 ohms and the Bostons at 2 ohms. The Boston Acoustics system also includes an 8" subwoofer back here.
Accessing rear deck speakers usually involves dealing with the rear seat in some fashion or other, and the Challenger is no exception. The good news is that, compared with some coupes we've seen, the Challenger is comparatively easy to work with.
You won't need to remove the rear seat backs, thank goodness, but you will need to lower them. You might want to grab an old (but clean) blanket to toss over them while you're working. You'll need to pry out two clips on the front edge of the rear deck panel, then pry out two clips on the lower side trim panels.
Once those side panels are loose, pull them out (gently) just enough to clear the deck trim panel, then pull the deck panel out just enough to access the speaker location. When you've gained access to the speakers, remove the screws that secure each one to the rear deck, then disconnect the harness and remove the speaker(s).
A variety of 5-1/4" speakers will fit in the deck, but you can also choose select 6-1/2"or 6-3/4" models. Mounting brackets, if needed, are included with your purchase.
If you're upgrading the factory subwoofer, you'll need to look for a shallow-mount aftermarket model. In some cases (we'll let you know before you buy), you might need to drill new mounting screw holes for your new sub. If you do this, work carefully and wear eye protection.
Tools needed: Panel tool, right-angle Phillips screwdriver, (sub only) drill and 1/8" bit
Read our Car Speakers Buying Guide for more information.
Shop for speakers that fit your Dodge Challenger
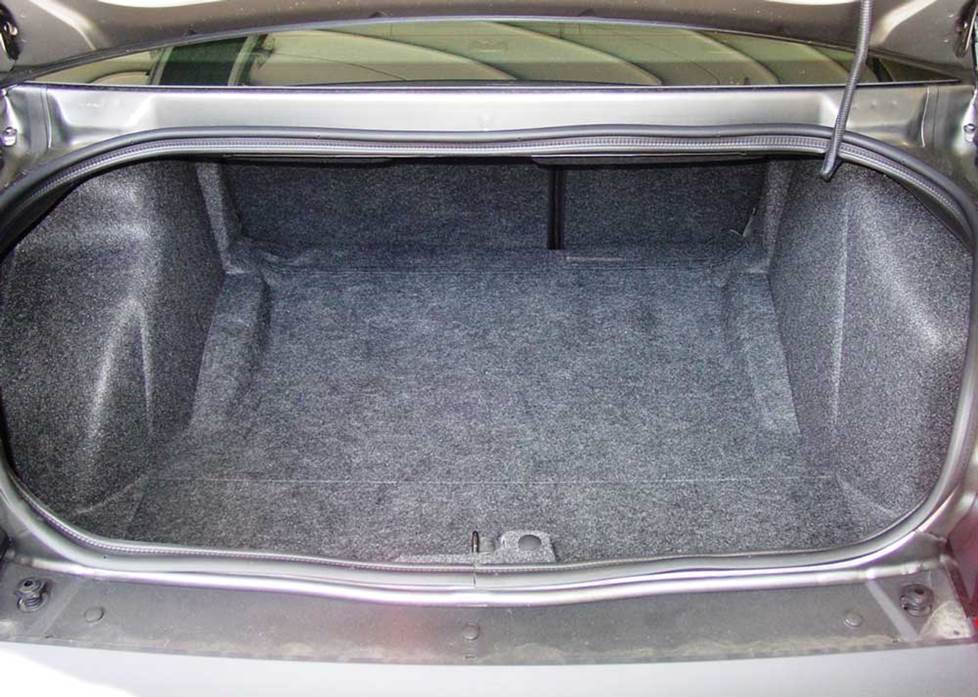
The Challenger's trunk offers a decent amount of space for a sub box (Crutchfield Research Photo)
Bass in your Challenger
Of all the modern ponycars, the Challenger offers the most spacious trunk. That's good news if you're taking a long trip and better news if you like big-time bass.
The premium Kicker and Harman Kardon systems included trunk-mounted subwoofers as part of their vast array of speakers, but, since we haven't had a chance to work with a Kicker- or HK-equipped Challenger yet, we're going to restrict our advice to the base and Boston Acoustics systems.
If you have some experience with the Kicker or Harman Kardon systems, we'd like to hear from you. To learn more ways to help, read about our "crowdsourced" vehicle research process. If that sound like something you'd want to do, contact us via the email addy in the article.
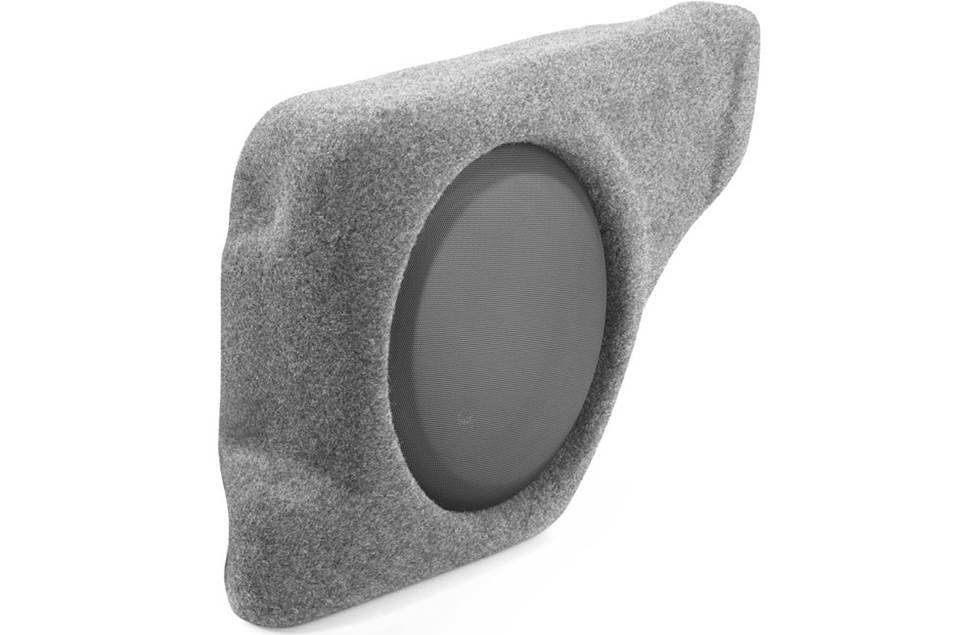
This JL Audio Stealthbox is designed to fit in your Challenger
If you're planning a sub box, you'll have a 32" W x 15" H x 35"/42" D space to work with, with plenty of room left over to mount an amp or two. The battery is located below the cargo floor, which means you won't have to go through the firewall if you need to wire amps to power some big subs.
There's also a custom-fit option. The JL Audio Stealthbox, which features a 12" sub mounted in a specially designed enclosure, fits right into the Challenger.
Learn more about building a bass system in our Car Subwoofer Buying Guide.
Shop for vehicle-specific subwoofers for your Dodge Challenger
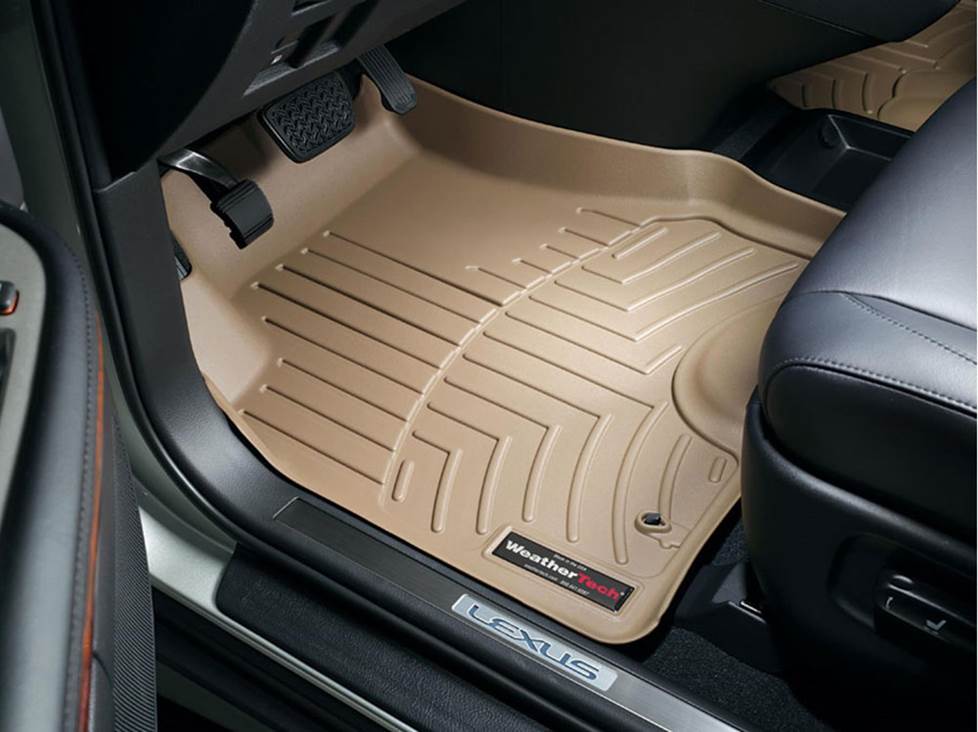
Keep your Challenger's carpeting looking sharp with a set of custom-fit WeatherTech floor liners
Other options for your Challenger
There are plenty of other ways to improve your Challenger. Here are just a few of them:
Protect the carpets with WeatherTech floor liners
It's easier than you think to mess up your Camry's interior while you're going about your daily business. Floor mats and liners from WeatherTech will help protect your car's carpeting from dirt and damage. And if they're already dirty and damaged, these mats will cover it up and make your car's interior a nicer place to be.
Add an amp (or two)
A new 4-channel amplifier will help you get the most out of your new speakers. You'll get cleaner power (and a lot more of it), which will result in much, much better sound. A mono amp can provide the juice you need for your new rear deck subwoofer, too. Learn more about adding amps to your system in our Car Amplifier Buying Guide.
Install a iPod® and satellite radio adapter
If you don't want to replace the factory receiver, you can still add musical variety to your Challenger. We offer several adapters that will allow you to use an iPod, MP3 player, or a SiriusXM satellite radio tuner with the factory system.
Use Dynamat to seal in sound
The Dynamat Xtreme Door Kit is the perfect way to seal in sound. This heavy-duty noise damping material is easy to install, and it really makes a difference. One kit will take care of the front doors. If you install a big sub, you might want to line the trunk lid as well.
Remote start and security systems
Adding remote start capability to your vehicle lets you warm it up in the winter or cool it down in the summer. The iDatastart system is incredibly convenient and makes it easier than ever to install a remote start system, so we highly recommend it. The module requires a vehicle-specific T-harness (sold separately) to connect with your vehicle's computer, security, and ignition systems, so we ask that you call to order so that we can make sure you get the right harness for your ride.
You can also talk to your Crutchfield Advisor about a security system. They’re not as easy to install (we usually suggest letting a professional do the job), but we can help you choose a system that’ll work in your vehicle.
Let's get started!
Ready to shop? Use our vehicle selector to find the gear that will fit your car or truck. If you have questions of your own, give us a shout via phone, chat, or email


Jon Paulette from Crutchfield
Posted on 1/3/2018
Jay, If you bought your gear from Crutchfield, you can call Tech Support for free help troubleshooting your system. If you purchased your equipment elsewhere, you can still get expert Crutchfield Tech Support - 90 days-worth for only $30. Check out our tech support page for details.
Jay from Imperial beach CA
Posted on 1/2/2018
Hi I have a 2009 srt8 with the 6 speaker BA that have been repacked with kickers and a mono sub with a kicker 8'' sub in the rear deck also a alpine 927hd headunit so with said the stock amp is still in the car and the door speakers only put out low no mid per the amp specs from factory... what can I do please help. Bypass the amp or install new??? Thanks
Jon Paulette from Crutchfield
Posted on 10/8/2017
Dave, Sorry to hear that. With this sort of thing, it's always better to have a conversation with one of our highly trained techs. And, since you bought your gear from Crutchfield, you can call Tech Support for free help troubleshooting your system. Give us a call, and we'll help you out.
Dave Mednick from Woodstock, GA
Posted on 10/6/2017
I've got a 2014 Challenger R/T Redline with the base "RES" / 4-speaker system. With the help of Crutchfield, I have replaced the receiver with a Pioneer AVIC8100-NEX using the Maestro RR and CH adapters to retain steering wheel control and UConnect system. Even with AndroidAuto disabled, the UConnect handsfree is inoperable. So, I disabled UConnect and use AndroidAuto only.... the steering wheel controls try to connect handsfree to UConnect anyway. I've talked to Maestro and they have nothing to offer. What, if anything, can I do to get my steering wheel controls to interact with AndroidAuto instead of UConnect?
Jon Paulette from Crutchfield
Posted on 5/31/2017
Rick, With a question like that, it's always better to have a conversation with a real live human. Give us a call and talk to one of our advisors. We can help you choose the right gear and give you the right advice on how to install it.
Rick from Covington
Posted on 5/30/2017
2016 challenger scat pack 9 speaker alpine with 8 inch sub in deck where do I tap in the line out converter to the dual voice coil sub has 2 wires to each side of sub all 4 wires are different colors so do I hook left and right side using each side off sub to tap to. Wanting to hook up my alpine mono block amp and 2 12s please best place to tap for line out
Jon Paulette from Crutchfield
Posted on 3/8/2017
Hayden, We'll be happy to help you choose the right gear. I've sent your question to our sales team, and they'll be contacting you via email soon. For immediate help, you can contact them via phone or chat.
Hayden mckenzie from Canada
Posted on 3/7/2017
2016 challenger 8.4 uconnect Harmon kardon: I want to be able to feel the subs hit in the front seat. do you recommend using a line converter lci2 and after market amp to power the stock Harmon kardon subs? if so where would be the best spot to tap into with the lci2? or would I be better off adding the jl stealth box - jl amp xd600/1 -lci2? I would like to keep factory look as much as possible Thanks for your help and great YouTube videos
Jon Paulette from Crutchfield
Posted on 11/16/2016
Jeffrey, There is an amp in there. There are a few ways you can approach upgrading the sound in this car, so I'm going to forward this to our sales team. Someone will be in touch via email soon.
Jeffrey Glaude from Simsbury
Posted on 11/15/2016
I have a 2014 Challenger RT with 7 speaker Boston Acoustics system. I want to keep my head unit. Is there an amp in the dash for this system? If there is can I upgrade the amp and then speakers?