1997-2001 Honda CR-V
How to upgrade the stereo system in your CR-V


In brief: This Crutchfield Research Garage article gives you an overview of your CR-V's stock stereo system and your aftermarket upgrade options. We'll tell you all about:
- The factory stereo system
- Removing the factory radio
- Removing the factory speakers
- Adding more bass
- Other options for your CR-V
Then, use our vehicle selector to find the gear that will fit your Honda.
Overview of the Honda CR-V
The term "cute ute" may or may not have been a thing when the Honda CR-V debuted in 1997, but it's certainly an apt description of this small SUV. This comfortable, practical little vehicle was an immediate hit and this first-gen editon still has a following today.
No wonder. The original CR-V combined the road manners of a compact car with (almost) the cargo capacity of a minivan, plus a handy amount of ground clearance, the security of all-wheel drive, and the bonus of not being a minivan. Add all that goodness to Honda's rock-solid reliability and styling that still looks good today, and you wind up with a truly nifty little truck.
If you're still enjoying your CR-V, a new stereo will be a very smart upgrade. The stock stuff wasn't that great to begin with and it's old enough to vote now, so upgrading the audio gear will make your CR-V even niftier than it already is.

The factory radios are easy to remove and replace in the CR-V (Crutchfield Research Photo)
The factory stereo system
The CR-V’s stereo system was pretty basic at the time, and that time was two decades ago. The receivers, even (especially?) the nav receiver that came along towards the end of the run, are just old at this point and not in the good way. Needless to say, an upgrade will bring better sound and vastly improved functionality to your daily drive.
The good news is that upgrading the radio and speakers in this Honda is a pretty easy job, even for the beginning car audio DIY-er. There’s not a ton to do, the work requires only basic tools, and when you buy your new gear from Crutchfield, you get free tech support for the life of your gear. If you run into a hassle during your installation, our Virginia-based tech experts are here seven days a week to answer your questions.
Read our Car Stereo Buying Guide for shopping tips and advice.

You can replace the CR-V's stock radio with a variety of single-DIN or double-DIN aftermarket models (Crutchfield Research Photo)
Removing the factory radio
Before you start your project, be sure to set the parking brake and disconnect the negative battery cable to prevent any electrical short. Once that’s done, you’ll be ready to work.
Removing the stock radio isn’t particularly difficult, but you will be removing a fair number of panels and screws, so work patiently, stay organized, and hang onto the screws you remove. You’ll need them when you’re putting the dash back together.
If your CR-V has a manual transmission, you’ll need to remove the shifter console before you proceed with the radio removal process. You’ll start by removing one retaining clip and one Phillips screw from each side of the console. Next, remove two Phillips screws from the front of the console, then pull back the shifter console to access the lower console trim panel. Finally, remove two Phillips screws from the lower console trim panel.
Detailed stereo and speaker removal instructions

If your CR-V has an automatic transmission, there’s a lot less to do. Pry out the retaining clips in the trim piece, then remove it. After that, the process is the same for both variants, and all the details can be found in your Crutchfield MasterSheet.
Instructions for connecting and installing the new radio can be found in the instructions for the dash kit and wiring harness. You’ll get a big discount on both of those items when you order your stereo from Crutchfield.
The CR-V’s dash cavity can comfortably hold a single-DIN (2" tall) or double-DIN (4" tall) aftermarket radio. If you want to go old-school, a shaft-style receiver can work, too.
Tools needed: panel tool, Phillips screwdriver, 8mm socket and ratchet (optional)
Shop for car stereos that fit your Honda CRV

The stock front and rear speakers are all 6-1/2" models (Crutchfield Research Photo)
Removing the factory speakers
The CR-V's speakers are easy to get to, easy to remove, and easy to replace. If you're new to car audio DIY, this is a great project.

Removing the front speakers starts with removing the grilles. It doesn't get much harder from there. (Crutchfield Research Photo)
Removing the front door speakers
Replacing the CR-V’s front door speakers is pretty easy. You won’t even have to remove the door panels.
Start at the bottom and use a panel tool to pry off the speaker grille. Remove the three Phillips screws securing the speaker, then pull it out, disconnect it, and set it aside. Connect the new 6-1/2" speaker’s wiring adapter (included with your Crutchfield speaker purchase) to the vehicle’s wiring, then secure it with the screws you just removed. And that’s it, basically. Test the new speakers to make sure they’re working. If they are, put the grilles back on and enjoy!
Most speakers will fit right into the cavity, but in some cases, you’ll need to cut out the back of the plastic cup or mounting bracket to accommodate your new speakers. Once you've entered your vehicle info, we'll be able to warn you about this while you're shopping for those new speakers.
Tools needed: Phillips screwdriver, small flat blade screwdriver

The rear cargo area speakers are also very easy to reach and replace (Crutchfield Research Photo)
Removing the rear side panel speakers
The CR-V’s 6-1/2" rear cargo area side panel speakers are also quite easy to deal with. Pry off the grille, remove the three Phillips screws securing the speaker, pull it out, disconnect it, and get it out of there. From there, just connect the harness to the vehicle’s wiring, then secure it with the old screws and test it out. If it works, you’re ready to reattach the grilles.
There’s a pretty vast selection of speakers that will fit here and in the front doors, so you can sound-match your way to a pretty nifty system. There’s also plenty of nooks and crannies for an amplifier. We’ll take a look at the subwoofer situation below.
Tools needed: Phillips screwdriver, small flat blade screwdriver
Read our Car Speakers Buying Guide for more information.
Shop for speakers that fit your Honda CRV
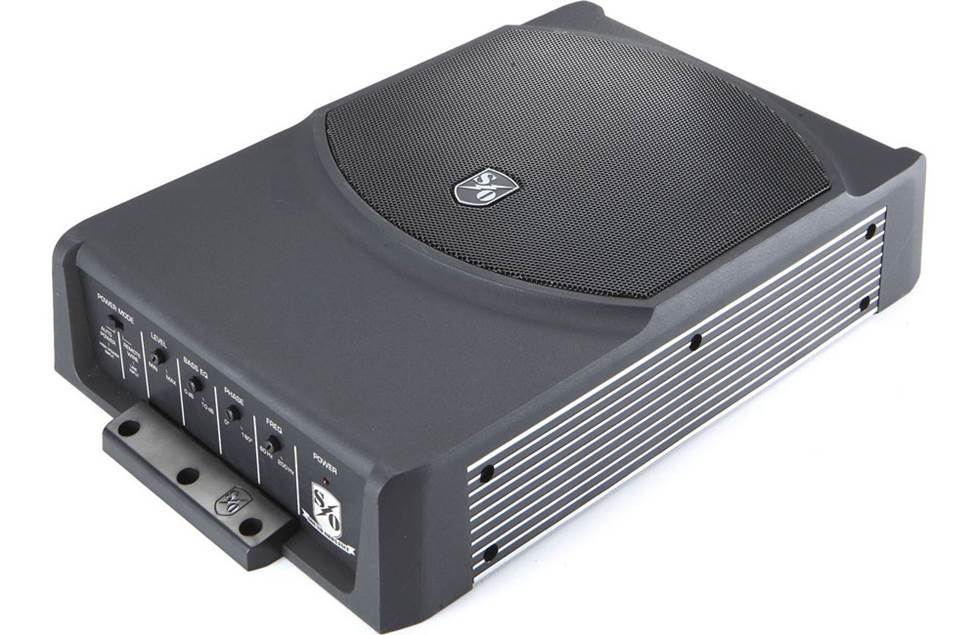
The Sound Ordnance B-8PTD powered subwoofer can enhance the bass in your CR-V
Bass in your CR-V
Just because the CR-V is a small SUV doesn’t mean there isn’t a healthy amount of space for a subwoofer box. Measured between the wheelwells, you’ll have a 33" W x 18" H x 23"/28" D space to work with, which ain’t bad, really.
Of course, not everyone wants or needs a big sub enclosure eating up the majority of the usable cargo space. If that sounds like you, we’d suggest a powered subwoofer for your CR-V. You’ll get plenty of bass without losing your everyday utility.
You can learn more about building a bass system in our Car Subwoofer Buying Guide.
Any vehicle that’s been around as long as the first-gen CR-V has plenty of history, and that includes aftermarket stereo upgrades. We’ve seen a few very impressive builds, and you have, too. If you’re planning something interesting, we can definitely help with that. And when the project’s done, send some pics and info to our Custom Car Showroom. We’d love to see your work.

A custom-fit WeatherTech cargo liner will look great in your CR-V
Other options for your CR-V
Here are some other cool upgrade ideas for your CR-V.
Protect your interior with custom-fit floor liners
No matter how gently your CR-V has been treated over the years, the factory mats and carpeting are probably showing some age. At this point, it’s probably a good idea to add set of custom-fit WeatherTech Floor Liners to your interior. These incredibly durable mats trap moisture, contain dirt, and keep the interior looking nice. You can also add a cargo liner (see above). Enter your vehicle information to see what fits your CR-V.
Keep your CR-V secure with a security system
Installing a security system in your CR-V isn't easy (security systems rarely are), but it's definitely a good idea. Our Crutchfield Advisors can help figure out what you need to get the job done, but we usually recommend taking your car and new gear to a professional installer.
Let's get started!
Ready to shop? Use our vehicle selector to find the gear that will fit your car or truck. If you have questions, give us a shout via phone or chat.

We considered using this shot for the lead photo. Not for long, though.... (Crutchfield Research Photo)


Comments (0)