Drew Bullis's '93 Mercury Villager
A stealth XM installation!

As a Crutchfield Sales Team Leader, Drew Bullis talks to a lot of Crutchfield customers about satellite radio. And these days, it seems like just about everybody wants the convenience of a portable "plug and play" system. The advantage of a plug and play system is clear — you can listen at home, in the car, or on the go, all with one satellite radio subscription. But there's often one little hitch: where to mount the tuner in the car?
In many vehicles, an empty console or storage compartment can be the perfect solution. We've showcased several stealth satellite radio installation in the past few months, but Drew's solution may be the slickest we've seen yet!
The Mercury Villager came stock with a cassette player in the dash. (Hey, it was 1993.) In its place, Drew has installed the very classy JVC KDLH-3150 receiver. He tells us that he likes the receiver so much, he installed an identical one in his wife's car! (But you might not realize at first glance that they're the same model — JVC lets you tweak the display color to match your car's interior. In the Villager, Drew has the display locked on a cool green-blue shade.) Another nice feature: the JVC receiver has a nameable auxiliary input. Drew plugged in his XM tuner and titled the input "XM."
Just below the radio, there's a storage compartment designed to hold — what else — cassettes. Since the cassette player is long gone, it's the perfect place to stash something just a little more high tech — a Delphi Roady™ XM Satellite Radio receiver! To hold the Roady in place, Drew cut a square of ABS dash plastic (available from Crutchfield) down to size, and screwed it to the sides of the compartment using plastic L-brackets. Then, he drilled a hole for the Roady's antenna, power, and signal wires, and attached the Roady's mounting bracket to the ABS plastic using more screws. He routed the wires from the Roady through the hole he drilled, through the console, and to the antenna and in-dash receiver.
With the storage compartment closed, there's no hint of satellite radio system. With the compartment open, Drew has easy access to the Roady's controls and a great view of its bright LCD display.
To listen in the house, Drew has a kit that provides power for the Roady, and allows for connection to his home stereo system. Listening at home is as simple as sliding the Roady out of its cradle, taking it inside, and connecting a couple of wires!
What about the antenna?
You may not have noticed the XM antenna in the picture of the Villager above. That's because the antenna isn't on the exterior of the van at all! Drew knew that in some cases, you can get good XM reception if you mount the antenna at the very front of the vehicle's dashboard, up against the windshield. He cautions that it doesn't work in all cases, and that the manufacturer recommends exterior mounting for the very best results. However, he tried it out in this vehicle and ended up with excellent results. He reports a minimum of dropouts, and he appreciates not having an extra antenna on the outside of the van. Drew cut a square of sticky-back Velcro to attach the antenna to the dashboard, and routed the wire along the bottom of the windshield, behind the dash, and to the Roady tuner.
Drew, thanks for the inside look at your stellar XM Satellite Radio installation. And everyone else: We want to hear about your installations, too! Whether it's just satellite radio or a whole new aftermarket system, drop us a line using the guidelines below. Your car could be the next one featured on the CrutchfieldAdvisor web site!
In many vehicles, an empty console or storage compartment can be the perfect solution. We've showcased several stealth satellite radio installation in the past few months, but Drew's solution may be the slickest we've seen yet!
 Drew Bullis and his 1993 Mercury Villager van |
The Mercury Villager came stock with a cassette player in the dash. (Hey, it was 1993.) In its place, Drew has installed the very classy JVC KDLH-3150 receiver. He tells us that he likes the receiver so much, he installed an identical one in his wife's car! (But you might not realize at first glance that they're the same model — JVC lets you tweak the display color to match your car's interior. In the Villager, Drew has the display locked on a cool green-blue shade.) Another nice feature: the JVC receiver has a nameable auxiliary input. Drew plugged in his XM tuner and titled the input "XM."
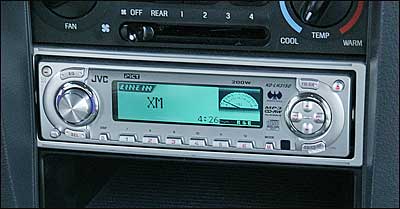 JVC's KDLH-3150 nestles in the dash. |
Just below the radio, there's a storage compartment designed to hold — what else — cassettes. Since the cassette player is long gone, it's the perfect place to stash something just a little more high tech — a Delphi Roady™ XM Satellite Radio receiver! To hold the Roady in place, Drew cut a square of ABS dash plastic (available from Crutchfield) down to size, and screwed it to the sides of the compartment using plastic L-brackets. Then, he drilled a hole for the Roady's antenna, power, and signal wires, and attached the Roady's mounting bracket to the ABS plastic using more screws. He routed the wires from the Roady through the hole he drilled, through the console, and to the antenna and in-dash receiver.
With the storage compartment closed, there's no hint of satellite radio system. With the compartment open, Drew has easy access to the Roady's controls and a great view of its bright LCD display.
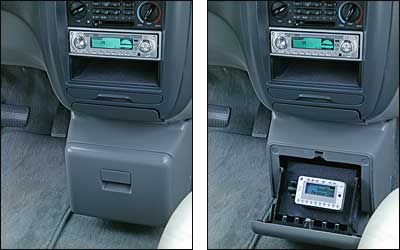 With the storage compartment closed (left), the Delphi Roady is safely out of sight. Open the door (right), and it springs into view! |
To listen in the house, Drew has a kit that provides power for the Roady, and allows for connection to his home stereo system. Listening at home is as simple as sliding the Roady out of its cradle, taking it inside, and connecting a couple of wires!
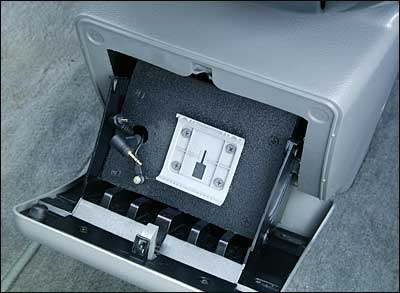 With the Roady removed, Drew's handiwork with ABS plastic and a power drill are clearly visible. |
What about the antenna?
You may not have noticed the XM antenna in the picture of the Villager above. That's because the antenna isn't on the exterior of the van at all! Drew knew that in some cases, you can get good XM reception if you mount the antenna at the very front of the vehicle's dashboard, up against the windshield. He cautions that it doesn't work in all cases, and that the manufacturer recommends exterior mounting for the very best results. However, he tried it out in this vehicle and ended up with excellent results. He reports a minimum of dropouts, and he appreciates not having an extra antenna on the outside of the van. Drew cut a square of sticky-back Velcro to attach the antenna to the dashboard, and routed the wire along the bottom of the windshield, behind the dash, and to the Roady tuner.
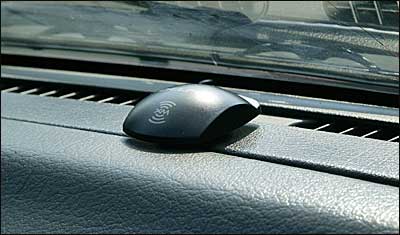 The XM antenna is mounted to the dashboard with a square of sticky-back Velcro. |
Drew, thanks for the inside look at your stellar XM Satellite Radio installation. And everyone else: We want to hear about your installations, too! Whether it's just satellite radio or a whole new aftermarket system, drop us a line using the guidelines below. Your car could be the next one featured on the CrutchfieldAdvisor web site!


Comments (0)