How to use a multimeter
Exploring the ins and outs of multimeters

The ever-useful multimeter is a crucial part of any electronics enthusiast's toolbox. In this article, we’ll touch on the parts of a multimeter, then we'll go into common car and home audio issues and how to troubleshoot them, as well as a few common mistakes you should avoid when testing.
Multimeters are hand-held devices used for measuring voltage, current, and resistance in electrical circuits. You can use one to figure out which lead on your car stereo or amplifier isn't powering one of your speakers. Or you can use it to check the final load of your subwoofers before connecting them to an amplifier. A multimeter's utility cannot be understated.

Parts of a multimeter
I believe anyone into car or home electronics should own a multimeter and know how to use it. Whether you’re a novice or you have experience with one, a little refresher never hurts. Here’s a quick breakdown of the parts of a multimeter:
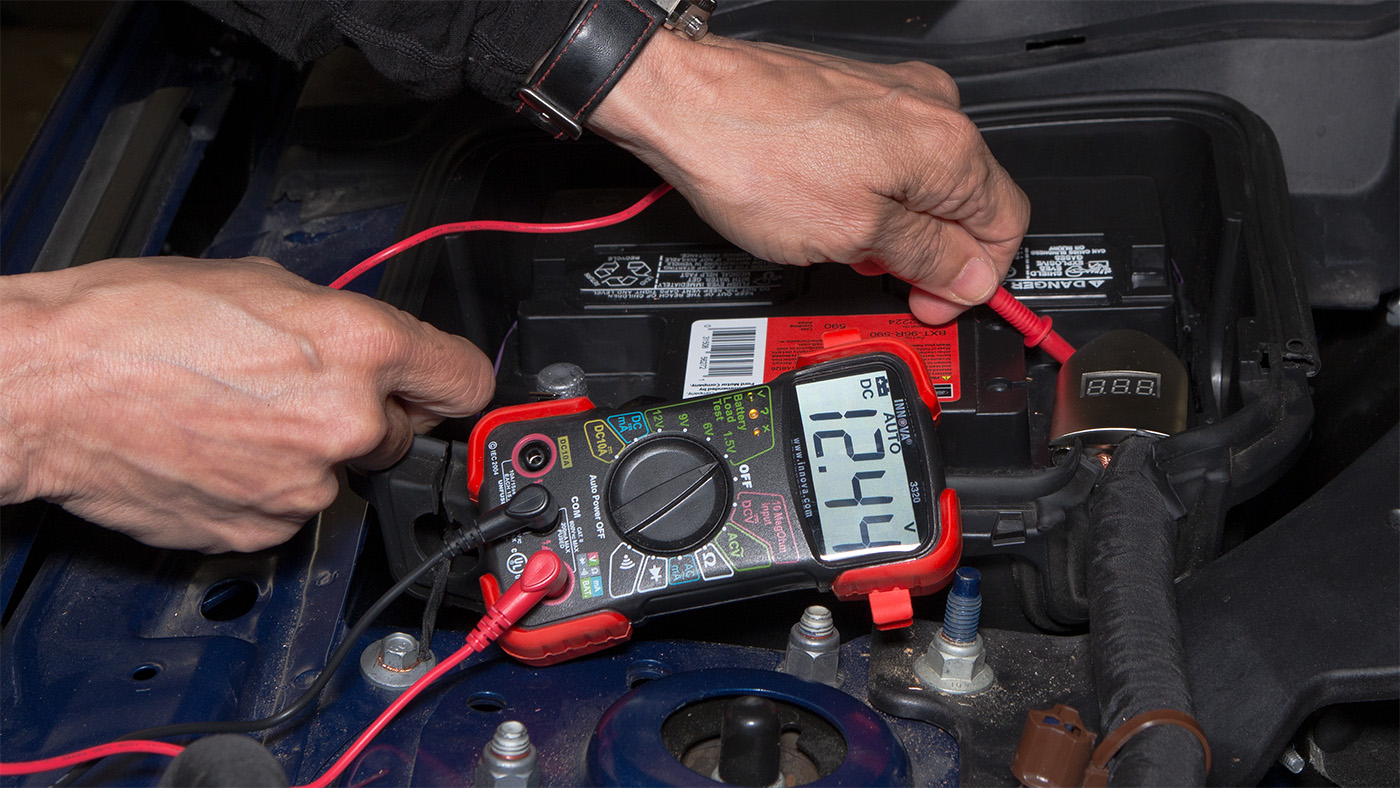
- The display on a multimeter is either a digital readout or an analog panel with a needle. This part tells you what you're measuring and the value of the measurement.
- Next up are your insulated leads, also called probes. These are used for making a connection between the thing you're testing and the multimeter. The red lead is positive and the black one is negative.
- Multimeters often come with multiple ports on their front panel. There's always a black grounding port, labeled "COM" or "Common", for the black probe. Your red lead will often be connected to a port labeled "VΩmA", or "Volts, Ohms, milliamps". If you need to measure larger currents, there are usually ports for 300mA and 10A.
- The selector knob found in the middle of a multimeter lets you select the unit of measurement. This is what you'll use to switch between measuring voltage, current, and resistance.
- Some multimeters, like this one from Install Bay, also let you test the DC voltage of household batteries and even traditional car batteries. Just select the appropriate Battery Load Test setting.
Common car audio uses for a multimeter
Car audio requires a multimeter more than you’d think, especially if something isn’t working. For example:
- Wondering what sort of final load your speakers or subs are going to present to your amp?
- What if that amp isn’t powering your speakers, or its signal is too weak?
- Is your amp not kicking on when you turn your car on?
Those are some of the most common problems that rear their heads during an installation. Let’s discuss how to troubleshoot those issues with a multimeter and explore them step-by-step.

How to check speaker resistance
To see what kind of load your speakers are presenting to your amplifier, you’ll want to:
- Set your multimeter to measure resistance — denoted in Ohms (Ω) — using the selector knob.
- Attach the positive red probe to the positive terminal on the speaker.
- Attach the negative black probe to the speaker’s negative terminal.
- Check multimeter’s display to see the resistance of the speaker or subwoofer and make sure it reads the desired impedance.
Pretty easy, right? This is helpful if you’re checking to see if a speaker still works. If it doesn’t, the multimeter will either show very low resistance or very high resistance. Low resistance means there’s a short somewhere, while high resistance means some connection somewhere in the speaker has been broken.
It’s crucial to note here that the multimeter is measuring resistance rather than impedance. Without getting too much into the weeds, just know that the measured resistance will be a little lower than the speaker’s rated impedance.
This is also handy for checking subs wired in either series or parallel to an amp. Doing so will let you know if the load they’re presenting to the amp is correct and keeps your amplifier from overheating or shutting off if a sub isn’t wired up correctly and its impedance is too low.
If you suspect there’s an issue with your sub, like its voice coil being burnt out or the motor structure otherwise being blown, a multimeter is your friend. If something is awry, your multimeter will read “OL” (short for “Open Lead”), meaning your multimeter isn’t able to complete a connection between its two probes.

Checking RCA preamp output voltage on a car stereo
Getting a weak signal from your amplifier? It’s always a good idea to check the preamp outputs on your radio first to see if that’s where the problem is. Here’s how:
- Disconnect your RCA cables from your amplifier but leave them connected to your stereo
- Use the selector knob to set your multimeter to measure AC voltage
- Attach the positive red probe to the center pin of the RCA cable
- Attach the negative black probe to the outer ring/ground of the RCA cable
- Read the multimeter’s display to see how much voltage is coming through, making sure it matches the preamp output voltage your stereo is capable of
It’s important to note that you’ll need to do steps 3-5 on a per-channel basis. For example, if you have a radio with two pairs of RCA outputs, you’ll need to check the left RCA and the right RCA connection for each pair. In total, you’ll be checking the voltage of four RCAs.
You’ll need to play a constant, steady test tone while checking the voltage. For most applications, a test tone of 1kHz is recommended. If you’re testing subwoofer pre-outs you’ll want to play a lower test tone or you can remove the low-pass filter on your stereo for the test.

Testing the speaker-level outputs on an amplifier
When speakers connected to an amplifier don’t produce any sound, it can be tricky to narrow down what the underlying issue is. I recommend checking the amplifier, since it’s the start of the signal path to your speaker or speakers. Here’s how:
- Use the selector knob to set your multimeter to measure AC voltage
- Attach the positive red probe to the positive terminal on one channel of your amp
- Attach the negative black probe to the negative terminal on the same amplifier channel
- Read the multimeter’s display to see the voltage of your amp’s output terminal. It should read anywhere from below 12-volts to, in exceptional cases, almost 30-volts depending on the output power of your amp. A very low or zero reading indicates the channel has gone bad.
Much like testing RCA pre-out voltage on a stereo, you’ll want to play a test tone while checking speaker-level output voltage on an amplifier. 1kHz is recommended here for regular speakers, or lower if you’re testing a subwoofer amplifier.
Grounding issues?
Grounding problems are some of the most common in car audio. Got a pesky hiss or buzz in your signal? Hearing static or crackling, or even distortion? A bad ground is always a good thing to check for. To do so:
- Set your multimeter to measure resistance using the selector knob
- Attach the positive red probe to the ground wire connected to your radio or amplifier
- Attach the negative black probe to a grounding point in your vehicle, like the chassis
- Read the multimeter’s display. A reading close to or at zero ohms means the ground is good to go. Any deviation from that and the ground is bad.
If you wind up having a bad ground, there are a few things you can do. You can make sure the grounding point is free of paint or rust. If that doesn’t do the trick, then you can try replacing the ground wire with a new one.
Remote turn-on wire troubles
There’s nothing worse than installing a shiny new system — radio, amplifier, and all — turning it on for the first time only for your amp to not kick on. Womp womp. That usually indicates an issue with a remote turn-on wire and is a surprisingly common thing to troubleshoot. Here’s how to do it:
- Set your multimeter to measure DC voltage using the selector knob
- With your vehicle’s ignition off, connect the positive red probe to the remote turn-on lead on your stereo
- Connect the black negative probe to a grounding point in your vehicle
- Turn the vehicle on
- Read the multimeter’s display. You should have a reading of 12 volts. Anything less than that indicates a problem with the remote turn-on lead.
Testing accessory power lead on a car stereo
If you’ve installed your car radio and it won’t stay on without the engine running, there could be an issue with the accessory power connection. To test this:
- Set your multimeter to measure DC voltage using the selector knob
- With your vehicle’s ignition off, connect the positive red probe to the accessory power lead
- Connect the black negative probe to a grounding point in your vehicle
- Turn the vehicle on without turning the engine over
- Read the multimeter’s display. You should have a reading of 12 volts. Anything less than that indicates an issue with the accessory power lead.
Testing constant power lead on a car stereo
Much in the same vein as accessory power lead issues, constant power lead problems can be frustrating. The constant power wire on your stereo ensures the radio always receives power even when the vehicle is turned off, which keeps the radio’s memory working. If there’s an issue, you may constantly have to reset your radio’s settings or clock. To troubleshoot this:
- Set your multimeter to measure DC voltage using the selector knob
- With your vehicle’s ignition off, connect the positive red probe to the constant power lead
- Connect the black negative probe to a grounding point in your vehicle
- Read the multimeter’s display. You should have a reading of 12 volts with the vehicle off. If your multimeter shows a zero, there’s a problem somewhere in the constant power lead’s path.
Common home audio uses for a multimeter
Multimeters can be used for more than car audio or 12-volt projects. You can use them to troubleshoot your home audio system as well. Think your receiver’s speaker channels are bad? Multimeter. Wondering why a component isn’t getting power from a wall outlet? You guessed it: multimeter. Here are some of the most common issues and how to troubleshoot them.

Testing voltage at a wall outlet
Wall outlets are an often-overlooked part of troubleshooting home audio issues. I’ve been the victim of outlet-related issues myself, scratching my head and trying to fix everything but the root cause. If you’re in a similar situation, here’s how to make sure the outlet isn’t the issue.
- Set your multimeter to measure AC voltage using the selector knob
- Connect the red positive probe to the smaller “hot” vertical slot in the outlet
- Connect the black negative probe to the larger “neutral” vertical slot in the outlet
- Read the multimeter’s display. You should get a reading of 110 to 120-volts. If you get a drastically lower number, there’s a fault at the outlet.
If you have an outlet with three holes, you can check the third one by connecting the red probe to the “hot” slot and the black probe to the round safety ground hole.

Checking the outputs on a receiver or amplifier
Troubleshooting the channels on your receiver is similar to how you’d check the channels on a car amplifier. This is useful for rooting out the cause of a speaker not working.
- Set your multimeter to measure AC voltage using the selector knob
- Connect the red positive probe to the positive terminal of the channel to be tested
- Connect the black negative probe to the negative terminal of the channel to be tested
- Play a test tone (around 1kHz) at a moderate volume
- Read the multimeter’s display. Voltage will fluctuate, and that’s okay. A zero reading indicates the channel is bad.

Testing your receiver’s 12-volt trigger output
When you turn your receiver on, it’s nice to have your other components turn on as well. This is done by connecting your receiver’s 12-volt trigger output to the 12-volt trigger input of another piece of gear. If that other piece of gear doesn't turn on, there could be an issue with your receiver. Curious as to if that’s causing the issue? This is how to check it:
- Set your multimeter to measure DC voltage
- Plug a male-to-male mono minijack cable into your receiver's12-volt trigger output
- Connect the red positive probe to the front portion of the minijack plug (the positive segment)
- Connect the black negative probe to back portion of the minijack plug (the grounding segment)
- Read the multimeter’s display. The voltage should be at or around 12 volts if the trigger output is working properly.
- If your multimeter shows zero, then there’s an issue. The next step is to try a different cable. Cheap cables are more likely to fail than the stereo's connection.
Common multimeter mistakes
To keep from having hiccups with your multimeter, always be aware of what you're doing and what settings you're using. It can be easy to make a mistake when you're in the thick of a project. Just keep these tips on your mind while you're testing equipment:
- Make sure the leads are plugged into the correct terminals
- Select the right measurement and range using the selection knob
- Don't measure AC voltage as DC voltage (or vice versa)
- Disconnect any power cables or sources before testing
- Don't touch the probes with your fingers while the multimeter is on
- Give your multimeter time to give you an accurate reading
Need assistance?
If you don’t have a multimeter but are looking to get one, feel free to reach out to one of our Advisors for personalized, one-on-one advice. In addition to mulitimeters, we carry a lot of fun and handy tools for the DIY-er's toolbox. Also, all Crutchfield purchases come with a generous 60-day return period and free lifetime technical support. Our techs are more than happy to help you use your multimeter to test common electronics issues with products purchased from us.


Merle from Toledo
Posted on 8/24/2025
Vary usefull
Ed. from Van Nuys
Posted on 8/17/2025
Great!