Video: Anthem ARC Genesis step-by-step guide
How to use Anthem Room Correction to get the best sound in your space

How to set up ARC Genesis
In this video, we'll take you step by step through a typical Anthem Room Correction measurement, and show you how to save speaker configurations to your Anthem receiver, integrated amplifier, or preamp.
You'll need a computer for this, because your included mic plugs in using USB. You'll interact with the software using your browser.
ARC Genesis steps
0:00 Intro
0:17 Hook up your receiver
0:33 Use an ethernet cable or Wi-Fi
0:54 How to find the IP address
1:10 Enter IP address into browser
1:26 Update firmware
1:42 Setting "No Signal Power Off"
1:52 Turn on CEC control
2:04 Make sure your room is quiet before calibrating
2:18 Plug in the included microphone into your computer
2:34 Download & install ARC Genesis
2:54 Set your subwoofer level
3:41 Set up your speakers
4:14 Set up additional configurations
4:41 Taking multiple measurements
4:55 Set up the microphone
5:27 Place microphone in the prime listening position
5:38 Follow prompts for additional placements
5:56 Upload calibration results to your amp or receiver
6:38 Recap and contact info
Remember, since you bought your Anthem product from us, you are entitled to free tech support, 7 days a week, for as long as you own it.
Good luck, and thanks for choosing Crutchfield. We hope you love how your system sounds after calibration.
Read video transcript
Hey, I'm JR, Training Manager here at Crutchfield, and today we're going to go through the setup process of an Anthem home theater receiver. We'll be focusing on Anthem Room Correction. Anthem's room correction software is so powerful that it requires the use of a PC or a Mac for setup.
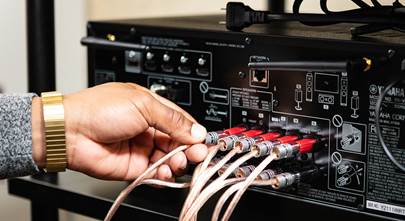
The first thing we'll want to do is to hook up an HDMI cable to the eARC port on our TV, and we'll need to hook up a subwoofer as well as run speaker wires to all of our speakers.
For the strongest internet connection, you'll want to run an ethernet cord from your Anthem receiver directly to your router for the setup process. You can do it over Wi-Fi; you'll go to the Wi-Fi settings menu to find your network for the receiver, or you can go and do a new AirPlay device if you're using Apple, or go to Google Home to do a new Android device.
With everything connected, we'll need to find our Anthem receiver's IP address on our network. The easiest way to do that is actually from the display on the front panel. Navigate to Network Control, Network Status, and your IP address will be displayed. Now that we have the IP address, we'll need to enter that into the navigation bar of our browser. You can do this on a computer, on a tablet, or on a smartphone. We think that the larger screen of a tablet or a computer makes for a much easier experience than that of a smartphone.
Now that we've got our Anthem receiver in the web interface, the first thing we'll do is go to the "Save/Load update" tab. Here you will want to turn automatic updates on, and beta firmware off, and then click "Update Firmware." With our firmware up-to-date, we are going to go to the "General" tab and set "no signal power off" to "never."
If you're going to use apps on your smart TV, we're going to want to turn HDMI CEC on. This will allow your Anthem receiver to turn on and off when you turn your TV on and off. It is important to make sure your room is super quiet while doing the room calibration. HVAC systems, refrigerators, and other appliances can create noises like a low hum that will definitely throw off the calibration.
Included with the Anthem receiver is a USB microphone. We're going to plug this into our computer and set it up on the included tripod. This is a little different than most other home theater receivers where you plug the mic directly into the receiver; this one plugs into your computer. On our computer we are going to download and install ARC Genesis. This is Anthem's software for room calibration.
Once installed, go to the preferences menu and turn ARC mode to "professional" mode. In the ARC menu under other tools, select "launch quick measure." This will allow us to set the proper level for our subwoofer selected at the bottom of the screen.
Now that your room is quiet, go ahead and hit start. You will hear a rumble from your subwoofer and a level reading will appear on the screen next to "Stop." You will then go to the back of your sub and adjust its volume or level or gain until your level shows between 75 and 80 dB, or decibels. That is the sweet spot. Now that the subwoofer level is set, you can press stop. We will then go back to the home menu by pressing "ARC Home" at the top of the page.
Next we will configure our speakers. We can find this in the device specific settings portion of the ARC Genesis screen. The height speakers are critical if you are using Dolby Atmos speakers, and it's important to tell the software where your height speakers are. Are they in the ceiling or in the wall? Are they in the front, the middle, or the rear part of your room? You can do this in the software.
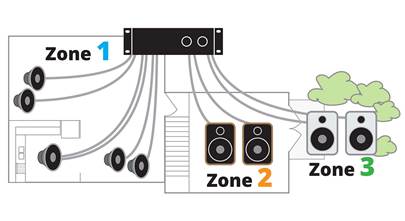
You can set up room calibration for multiple configurations of the same speaker system. For when you want to watch movies, you'll want all of your surround sound speakers. When you're just listening to music, you might just want your front left and right speakers and your sub. You can set these configurations up and then have the receiver calibrate your room for each configuration. Every speaker configuration will need at least the front left and right speakers.
We can take 5 to 10 measurements per speaker configuration: home theater, 2-channel...the number of measurements is sort of based on how big your room is and how much seating you have. The more couches and chairs you have, the more positions you'll want to measure.
We are almost ready to take the measurements of our room. First we need to make sure our microphone is set up properly. Back in our browser, we will need to set the input source for the Anthem receiver to "Analog One."
Back in ARC Genesis, we will need to make sure that the microphone that is selected is the one that came with our Anthem receiver, and not any other internal or external microphone our computer may have. We will start by placing the microphone in our prime listening position; it is important to make sure that the microphone is at least 18 inches away from any wall or boundary, and that the microphone is facing up.
Next, we will hit the button to start calibration. When it finishes measuring our prime listening position, we will move it to our next listening position based on the prompts on your screen, and hit "resume." When placing the microphone, every position after the initial position should be no further than 36 inches from that.
Once you have measured your last microphone position, you will see a popup come up with three buttons. You should hit "upload now" to upload the calibration results into your Anthem receiver. You should then watch some movies and listen to some music, and experience the perfect calibration that Anthem has done with Anthem Room Correction. If you ever want to go back and tweak it or change it, you can do that, because the software allows you to save it on your computer.
So we've got our Anthem home theater receiver set up, and I hope you found this helpful in setting up yours with Anthem Room Correction. If you need any assistance with your home theater, please get in touch with us here at Crutchfield. Thanks for watching.


Comments (0)